Slack integration
Slack is an instant messaging and collaboration platform.
There are two ways to build interactions between Slack and Windmill: run code on Windmill by a Slack command or use the Slack API directly from Windmill. In this guide, we'll cover both approaches.
Action on Windmill from Slack
The goal here is to be able to invoke a Windmill Script from Slack, by using
/windmill command.
First, you need to be a workspace admin. Then connect either through the UI or the CLI:
- UI
- CLI (non-interactive)
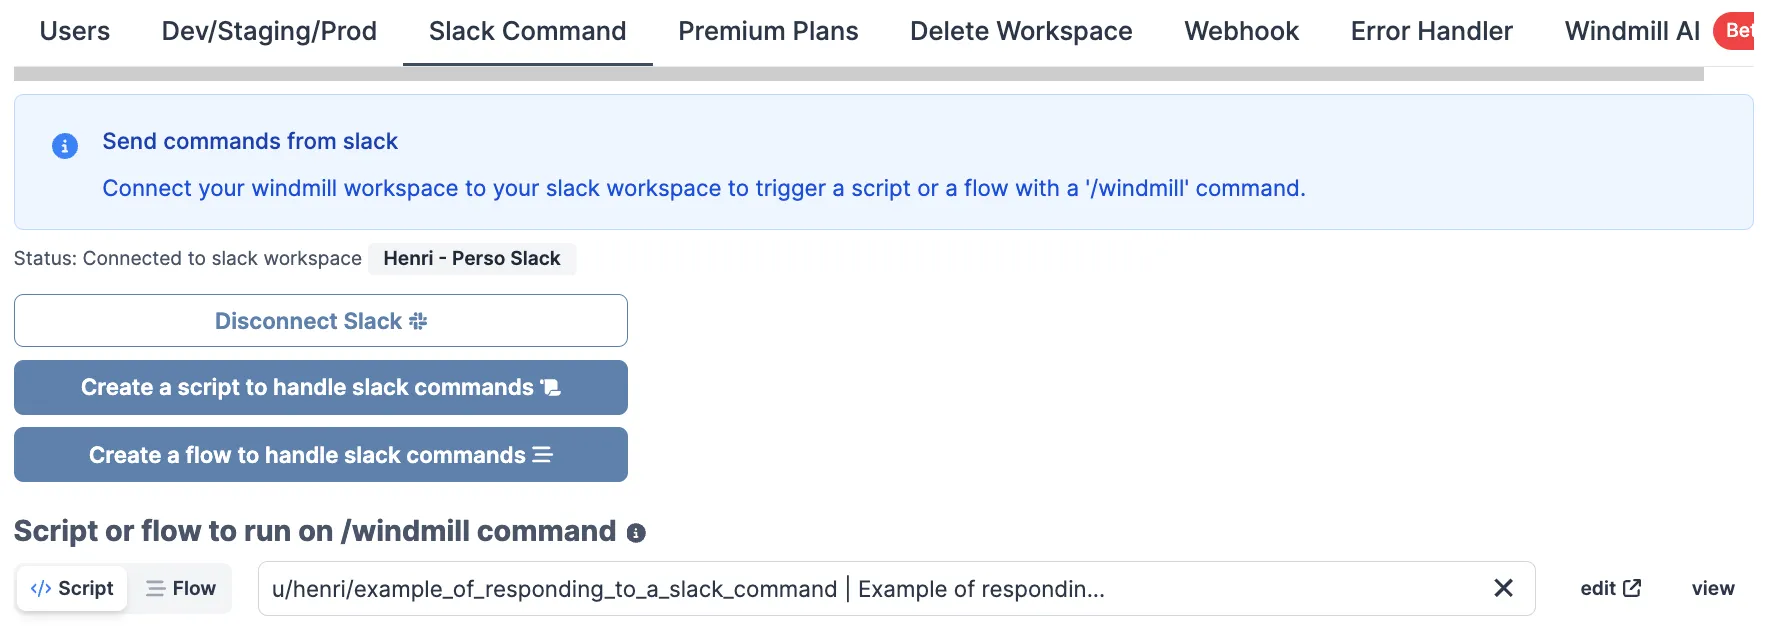
Go to
Workspace Settings Page
and select the "Slack Command" tab. On there, click "Connect to Slack".
The Slack integration is done through OAuth. On self-hosted instances, integrating an OAuth API will require Setup OAuth and SSO.
By default, the OAuth flow uses instance-level Slack app credentials configured by your administrator. Workspace admins can also configure their own Slack app with workspace-specific credentials for better isolation and independent management.
Slack will ask you to allow Windmill to access your workspace. Click "Allow".
At the time of writing, Slack cautions that Windmill is not an approved app. We are working on getting the app approved but you can safely ignore it for now.
You can connect multiple Windmill workspaces to the same Slack workspace. Only one Windmill workspace can accept the /windmill commands from a given Slack workspace. This feature is mostly useful for the error handler.
The CLI lets you connect Slack without going through the browser OAuth flow — useful for configure-as-code setups, CI provisioning, and scripted onboarding. It produces the same DB state as the UI flow (workspace_settings fields, g/slack group, slack_bot folder, encrypted f/slack_bot/bot_token variable and resource).
First, create a Slack app at api.slack.com/apps (or use your existing one). In OAuth & Permissions, add the bot scopes Windmill expects (commands, chat:write, chat:write.public, channels:join, files:write, app_mentions:read, im:history, im:read), then click Install to Workspace to get the Bot User OAuth Token (xoxb-…).
Fetch the team_id and team_name by calling auth.test:
curl -s -X POST https://slack.com/api/auth.test \
  -H "Authorization: Bearer xoxb-YOUR-TOKEN"
Then connect the workspace:
wmill workspace connect-slack \
  --bot-token xoxb-... \
  --team-id T01234ABC \
  --team-name "Your Team Name"
The command is admin-only and idempotent — re-running with the same arguments is a no-op, and running with a different team rewrites the binding in place. To disconnect later:
wmill workspace disconnect-slack
This clears slack_team_id and slack_name. To also remove the bot token variable/resource/folder/group, delete the corresponding files from your local sync folder and run wmill sync push.
At the instance level, a super-admin can mint the global bot token (used for critical alerts) similarly:
wmill instance connect-slack \
  --bot-token xoxb-... \
  --team-id T01234ABC \
  --team-name "Your Team Name"
wmill {workspace,instance} connect-slackThe OAuth client (client_id / client_secret) still needs to exist in instance settings so fallback paths and the UI "Connect" button keep working. Configure it via the instance settings UI or by editing instance_settings.yaml's oauths entry and running wmill instance push.
Using commands on Slack
Once you allow access, you will be redirected to the Slack settings in Windmill. We'll create a command handler Script first, so let's click "Create a script to handle Slack command".
You will be navigated to the Script editor. Give your script a name
(e.g. slack_command_handler), a short summary (e.g. "Slack command handler"). You'll get to this template:
export async function main(response_url: string, text: string) {
	const x = await fetch(response_url, {
		method: 'POST',
		body: JSON.stringify({ text: `ROGER ${text}` })
	});
	const username = process.env['WM_USERNAME'];
	console.log(`user = ${username}`);
}
After the Script is deployed, navigate back to the
Slack settings
Choose the "Script" option for adding a command handler and select your newly created Script.
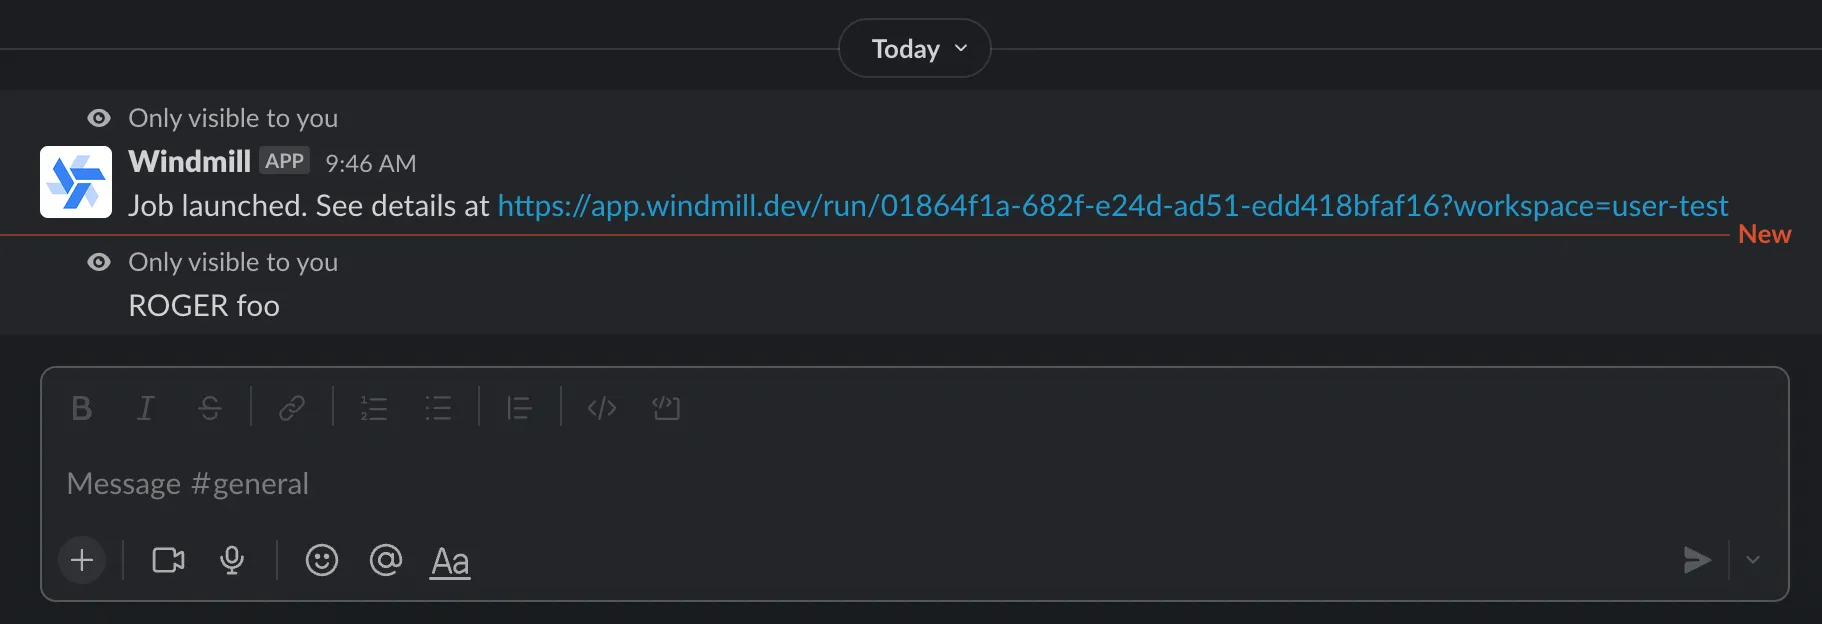
Congratulations! You've just created a Slack command handler. Now you can use
the /windmill command in your Slack workspace to trigger the Script. Try it
out with /windmill foo and you should get back ROGER foo. Go ahead and
customize the Script to your needs.
In addition to response_url, the script/flow can use the following parameters, simply by having them as inputs with the proper name:
channel_id
user_name
user_id
command
trigger_id
api_app_id
Using @mentions
In addition to slash commands, you can trigger your Windmill scripts by @mentioning the Windmill bot in any channel, thread, or direct message. @mentions work identically to /windmill commands - they use the same handler script configured in your workspace settings and pass the same parameters.
When you @mention the bot (e.g., @Windmill hello world), the bot mention is automatically stripped from the text before being passed to your handler script, so it receives just hello world - identical to how /windmill hello world would work.
@mentions work in:
- Public channels (when the bot is invited to the channel)
- Private channels (when the bot is invited)
- Direct messages with the bot
- Message threads (reply to any message and @mention the bot)
The command parameter will be set to @mention for @mention triggers (vs /windmill for slash commands), allowing your handler to distinguish between the two if needed.
Available parameters for @mention triggers:
text           // Message text with bot mention stripped
channel_id     // Channel where message was sent
user_id        // Slack user ID who sent the message
command        // Set to "@mention" for @mentions
event_id       // Unique event identifier
ts             // Message timestamp
thread_ts      // Thread timestamp (if in a thread)
@mentions are delivered via Slack's Events API, which means your handler must respond within 3 seconds. For longer-running operations, launch a job and send updates to Slack asynchronously using the Slack API.
Responding to / commands vs @ mentions
When handling Slack triggers, the response method differs depending on the trigger type:
For /windmill slash commands: Use the response_url parameter (a webhook URL) to send your response back to Slack.
For @mention triggers: Use the Slack Web API with the bot token to post messages to the channel.
- Bun
- Deno
- Python
import { WebClient } from '@slack/web-api';
import * as wmill from 'windmill-client';

type Slack = {
  token: string;
};

export async function main(
  text: string,
  response_url: string,
  channel_id: string,
  command: string
) {
  const responseText = `You said: ${text}`;

  if (command === '@mention') {
    // For @mentions: use Slack Web API
    const slack = await wmill.getResource<Slack>('f/slack_bot/bot_token');
    const web = new WebClient(slack.token);
    await web.chat.postMessage({
      channel: channel_id,
      text: responseText
    });
  } else {
    // For /windmill commands: use response_url
    await fetch(response_url, {
      method: 'POST',
      body: JSON.stringify({ text: responseText })
    });
  }
}
import { WebClient } from 'npm:@slack/web-api';
import * as wmill from 'npm:windmill-client';

type Slack = {
  token: string;
};

export async function main(
  text: string,
  response_url: string,
  channel_id: string,
  command: string
) {
  const responseText = `You said: ${text}`;

  if (command === '@mention') {
    // For @mentions: use Slack Web API
    const slack = await wmill.getResource<Slack>('f/slack_bot/bot_token');
    const web = new WebClient(slack.token);
    await web.chat.postMessage({
      channel: channel_id,
      text: responseText
    });
  } else {
    // For /windmill commands: use response_url
    await fetch(response_url, {
      method: 'POST',
      body: JSON.stringify({ text: responseText })
    });
  }
}
from slack_sdk import WebClient
import wmill
import requests
import json

def main(text: str, response_url: str, channel_id: str, command: str):
    response_text = f"You said: {text}"

    if command == "@mention":
        # For @mentions: use Slack Web API
        slack = wmill.get_resource("f/slack_bot/bot_token")
        client = WebClient(token=slack["token"])
        client.chat_postMessage(
            channel=channel_id,
            text=response_text
        )
    else:
        # For /windmill commands: use response_url
        requests.post(
            response_url,
            data=json.dumps({"text": response_text}),
            headers={"Content-Type": "application/json"}
        )
Workspace-level Slack app configuration
By default, workspaces use the instance-level Slack app configured by your Windmill administrator. However, workspace admins can optionally configure their own Slack app for their workspace. This provides:
- Workspace isolation: Each workspace uses its own Slack app and credentials
- Separate rate limits: Avoid sharing rate limits across workspaces
- Independent management: Workspace admins can manage their own Slack integration
To configure a workspace-specific Slack app:
- UI
- CLI (settings.yaml)
- Navigate to workspace settings → Slack app section
- Enter your Slack app's Client ID and Client Secret
- Save the configuration
The workspace-level OAuth override lives in settings.yaml as two fields that round-trip via wmill sync pull / wmill sync push:
slack_oauth_client_id: "1234567890.1234567890"
slack_oauth_client_secret: "abcdef0123456789"
Set both to values and push to upsert; clear them (delete the lines or set both to "") and push to remove the workspace-level override and fall back to the instance-level Slack app. wmill sync pull always emits the two fields (null when unset), so round-trip is bijective — the committed YAML is a complete snapshot.
After the override is in place, use the CLI's non-interactive connect command described above, or the UI's workspace-specific "Save and Connect" button (which authorizes using the workspace-level client).
The workspace-level Slack app will only apply to the auomatically managed f/slack_bot/bot_token resource used for workspace handlers and slack approvals. For general user specific slack oauth tokens, the instance level OAuth connection will be used.
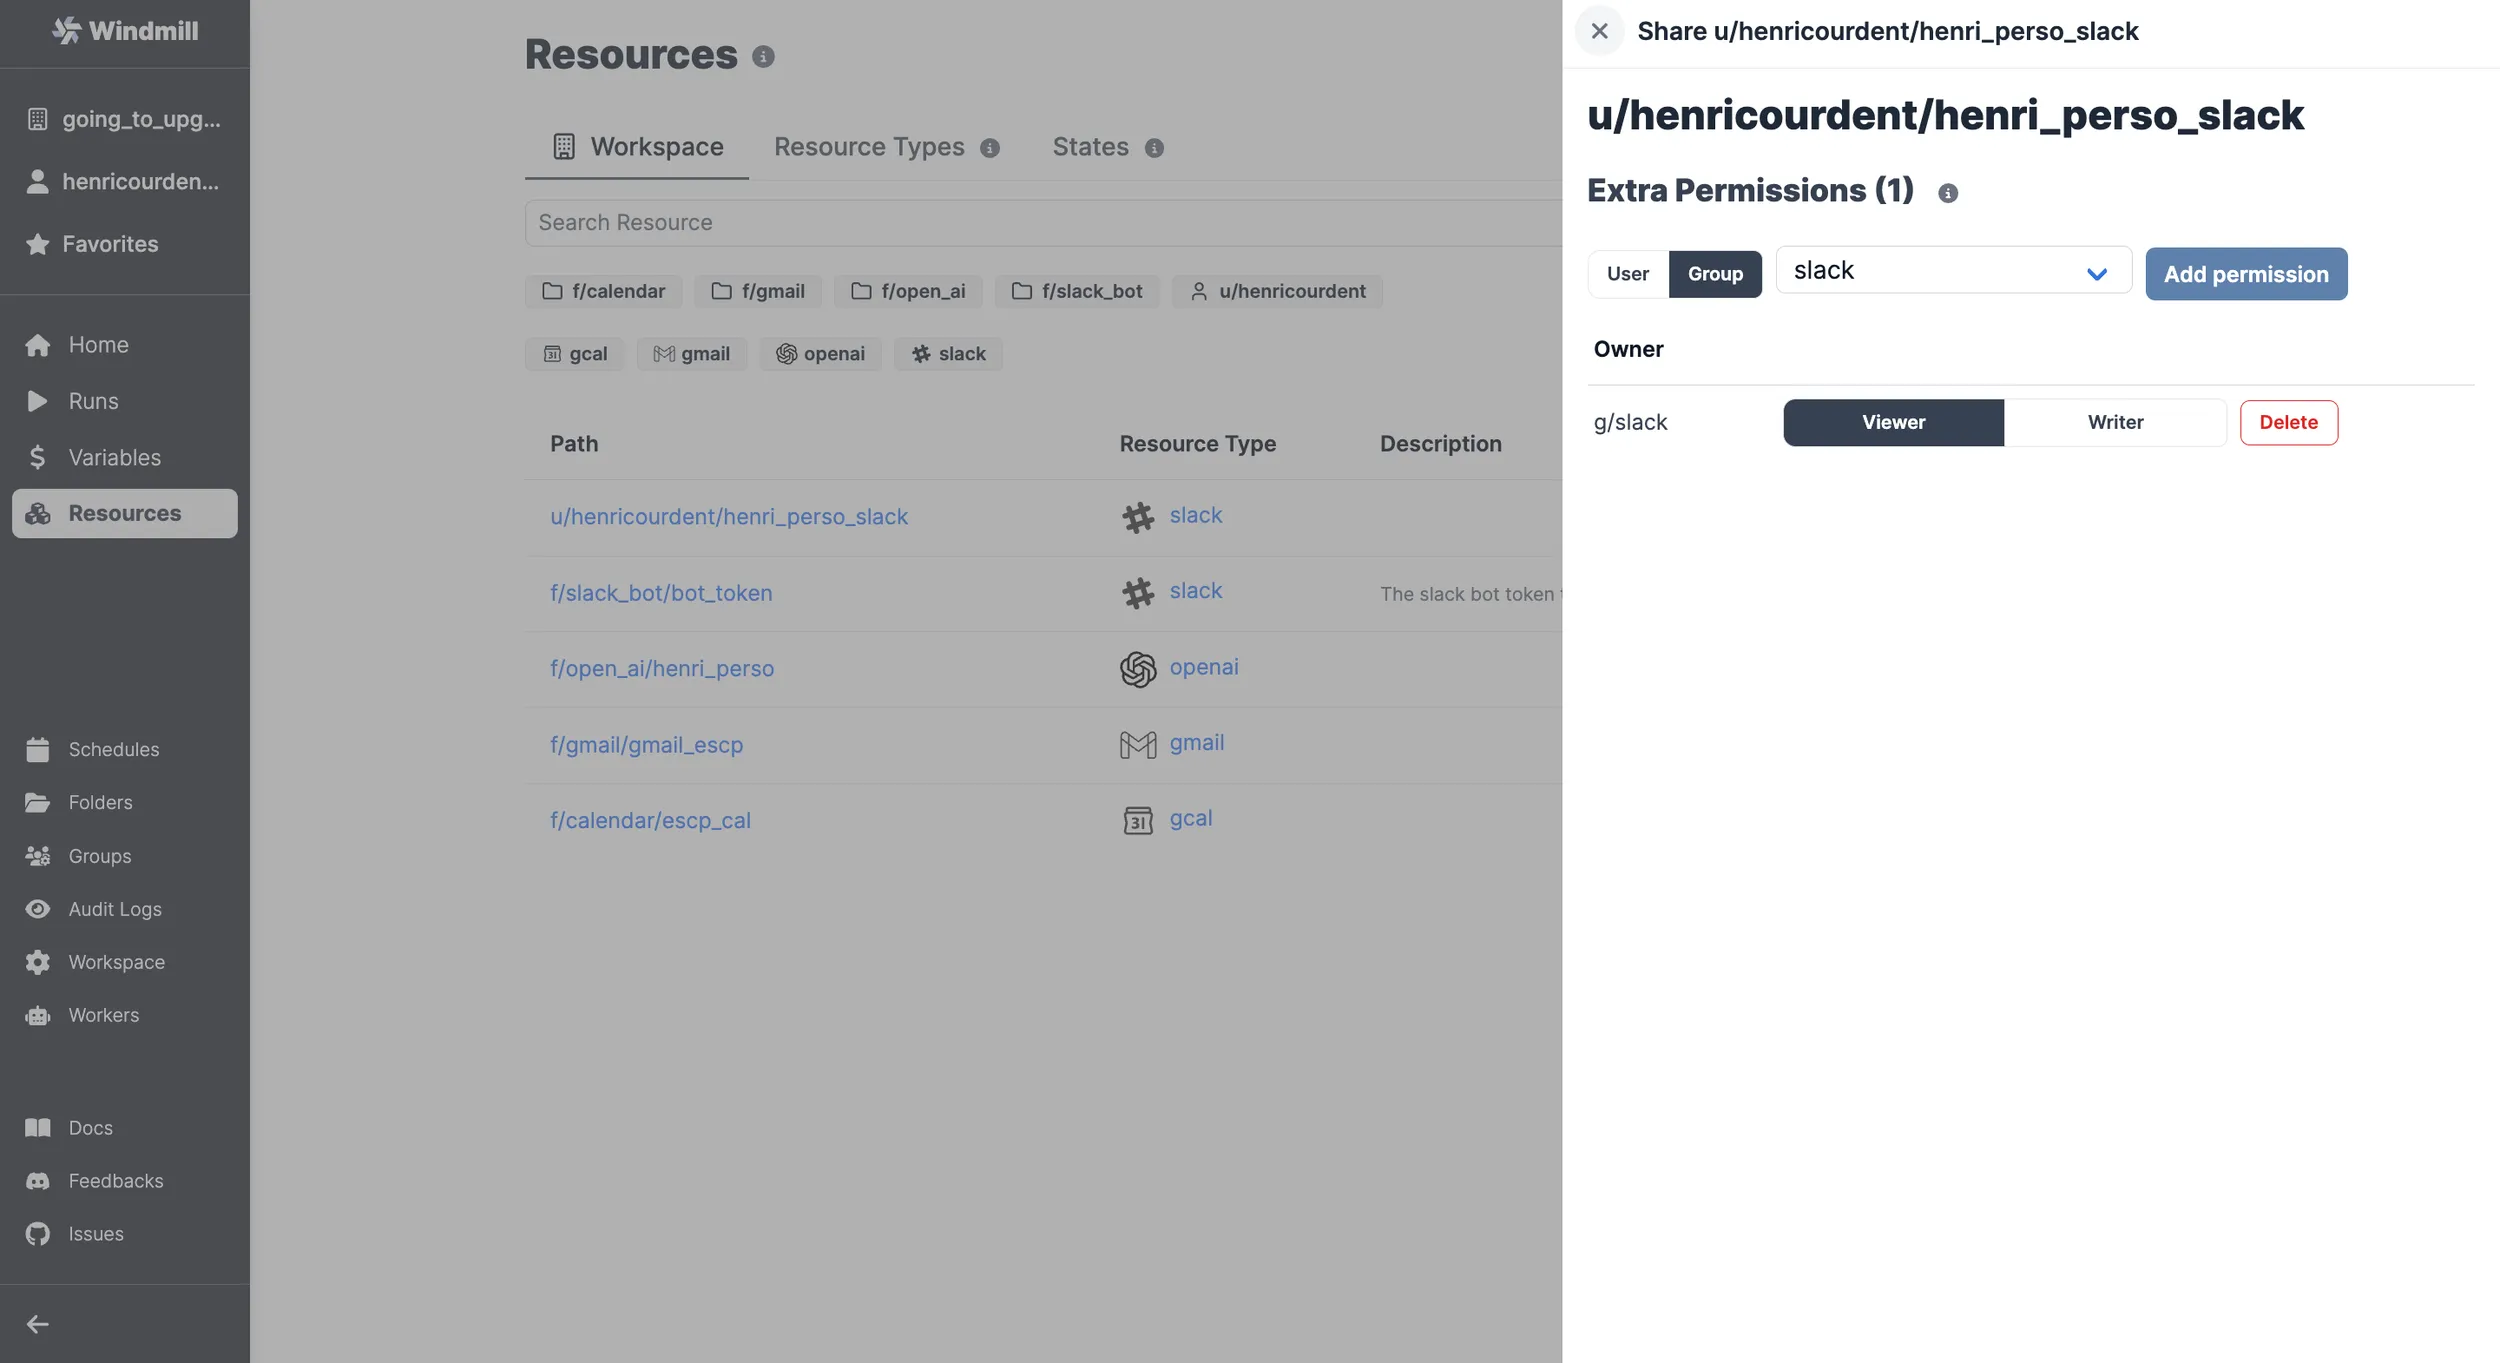
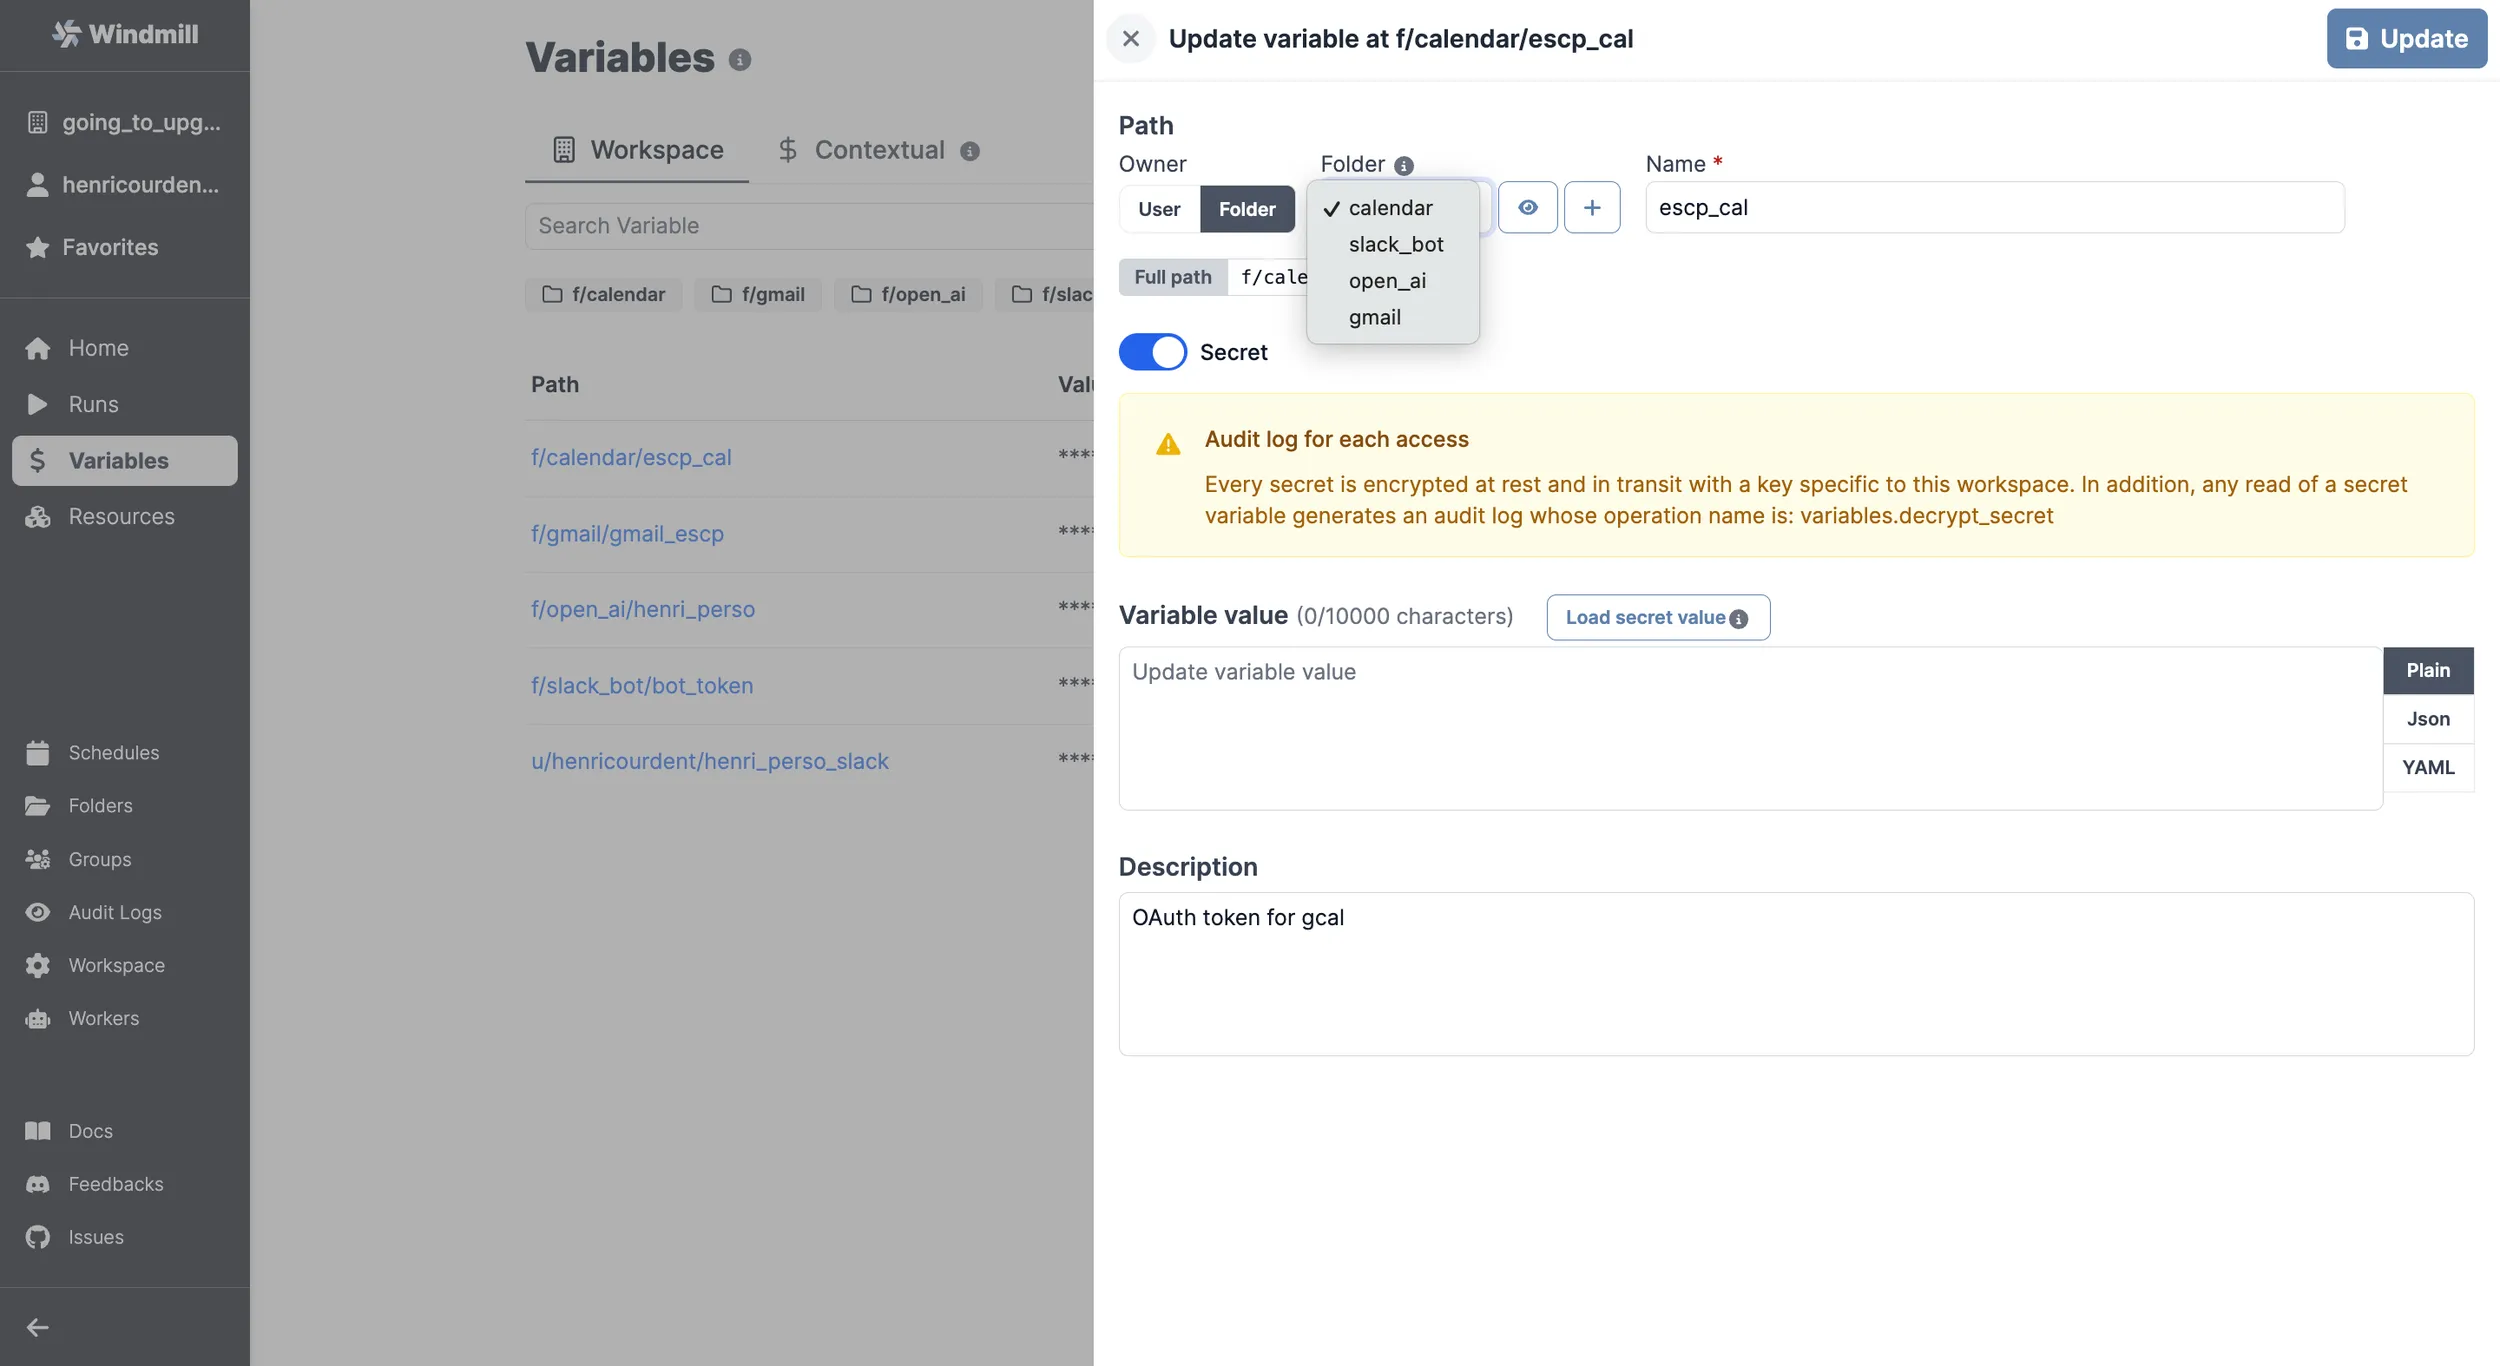
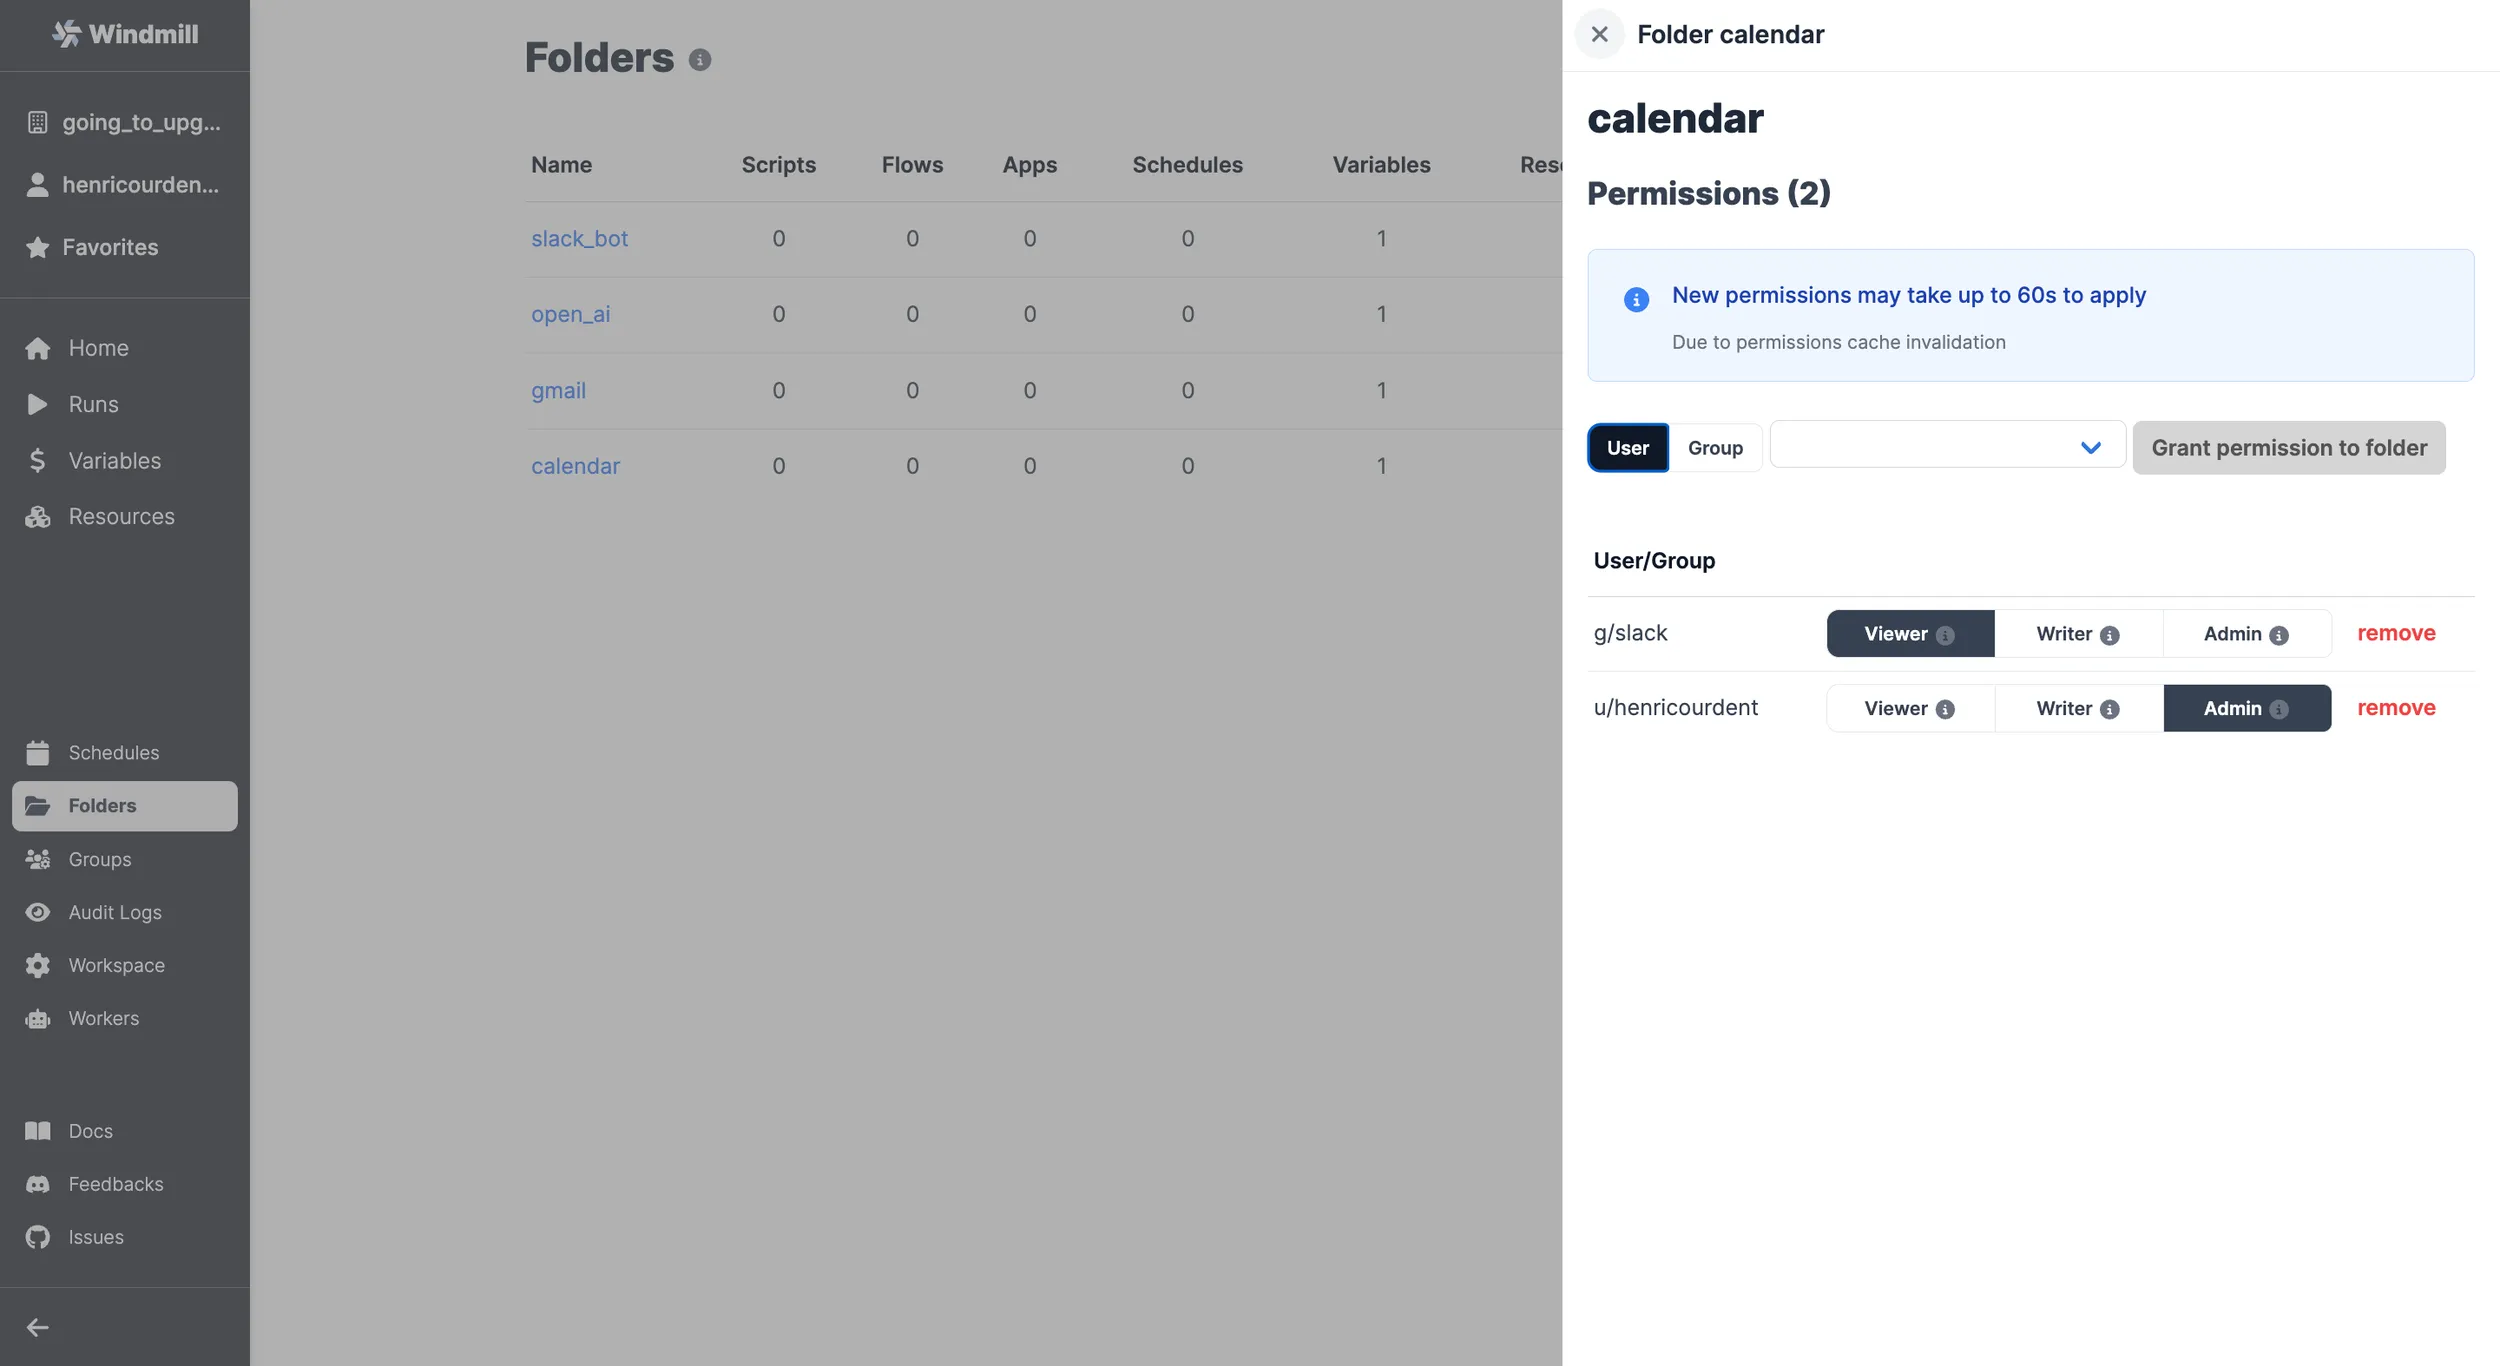
You won't be able to have Slack interact with your resources and variables before adding them to the slack group that was automatically created by Windmill after you set up your Slack workspace on Windmill. Tutorial below.
How to let Slack use your resources and variables:
Handle multiple commands
We cover in a subsequent article how to manage multiple commands & human-in-the-loop steps from your slackbot using branches, a text parser and approval steps.
Monitor who ran the command
You can see who ran the /windmill command by going to the
Runs page
on Windmill. The runs will be permissioned through the g/slack global group.
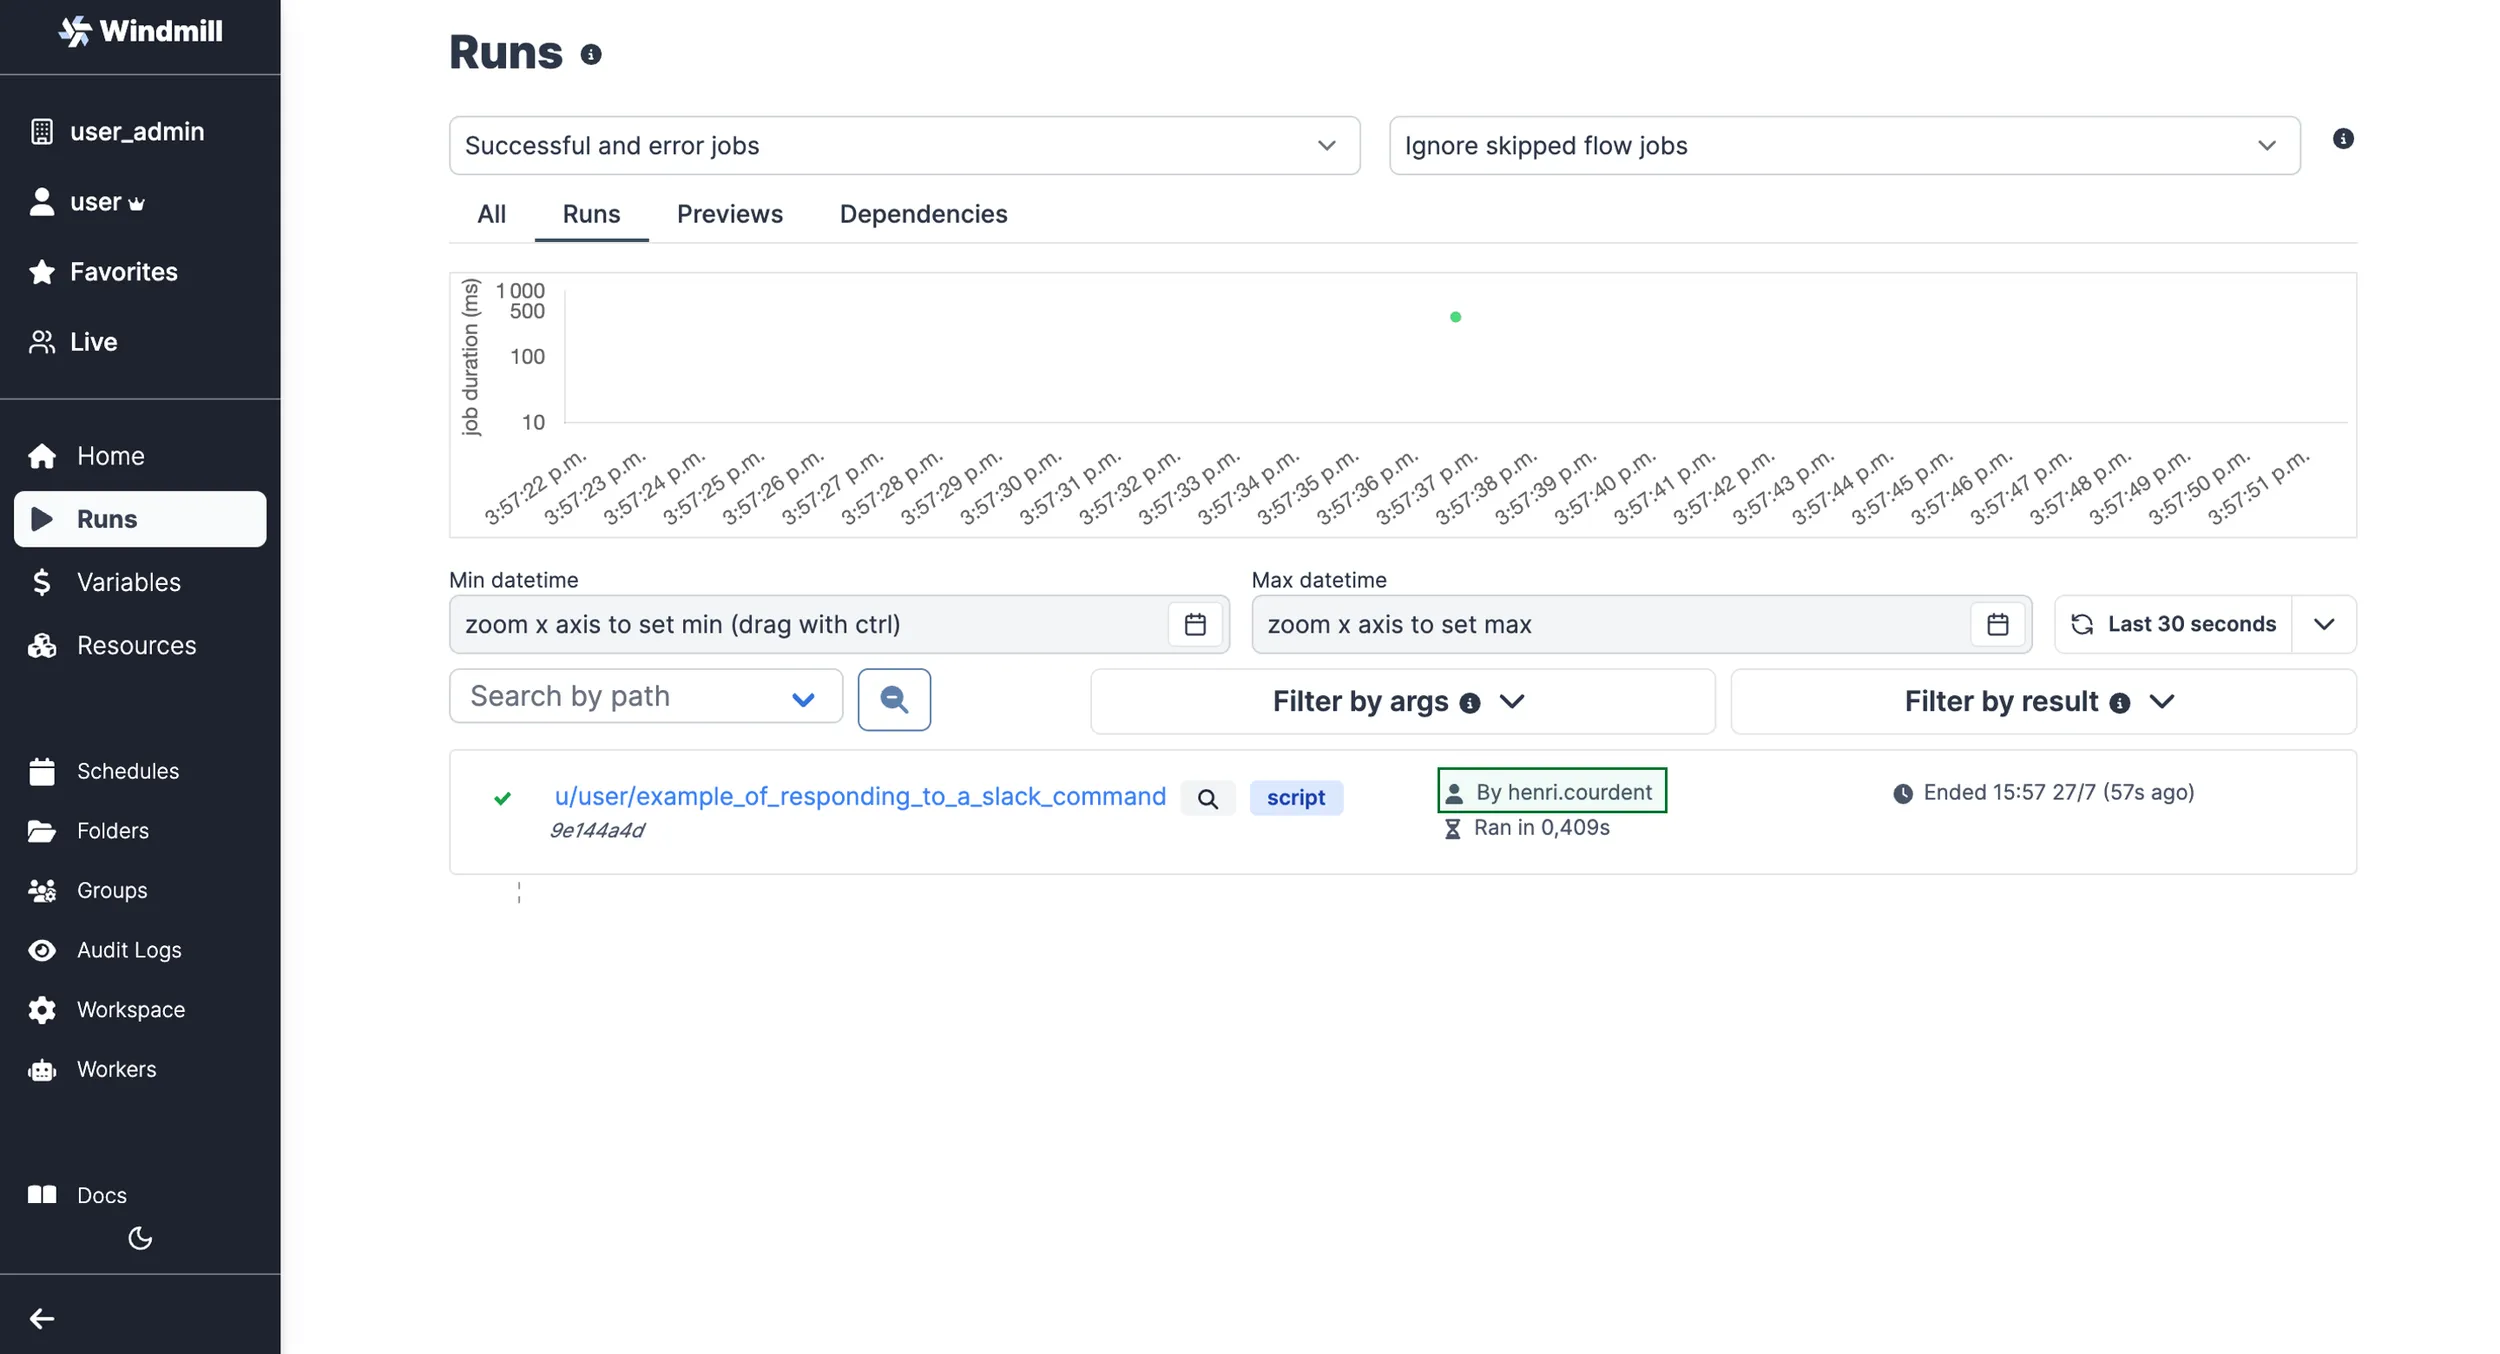
You can also monitor and permission it from within the script leveraging the contextual variable WM_USERNAME that will get the value of the Slack user.
For example our script:
export async function main(response_url: string, text: string) {
	const x = await fetch(response_url, {
		method: 'POST',
		body: JSON.stringify({ text: `ROGER ${text}` })
	});
	// This part:
	const username = process.env['WM_USERNAME'];
	console.log(`user = ${username}`);
}
will console.log user = username, username being the Slack username.
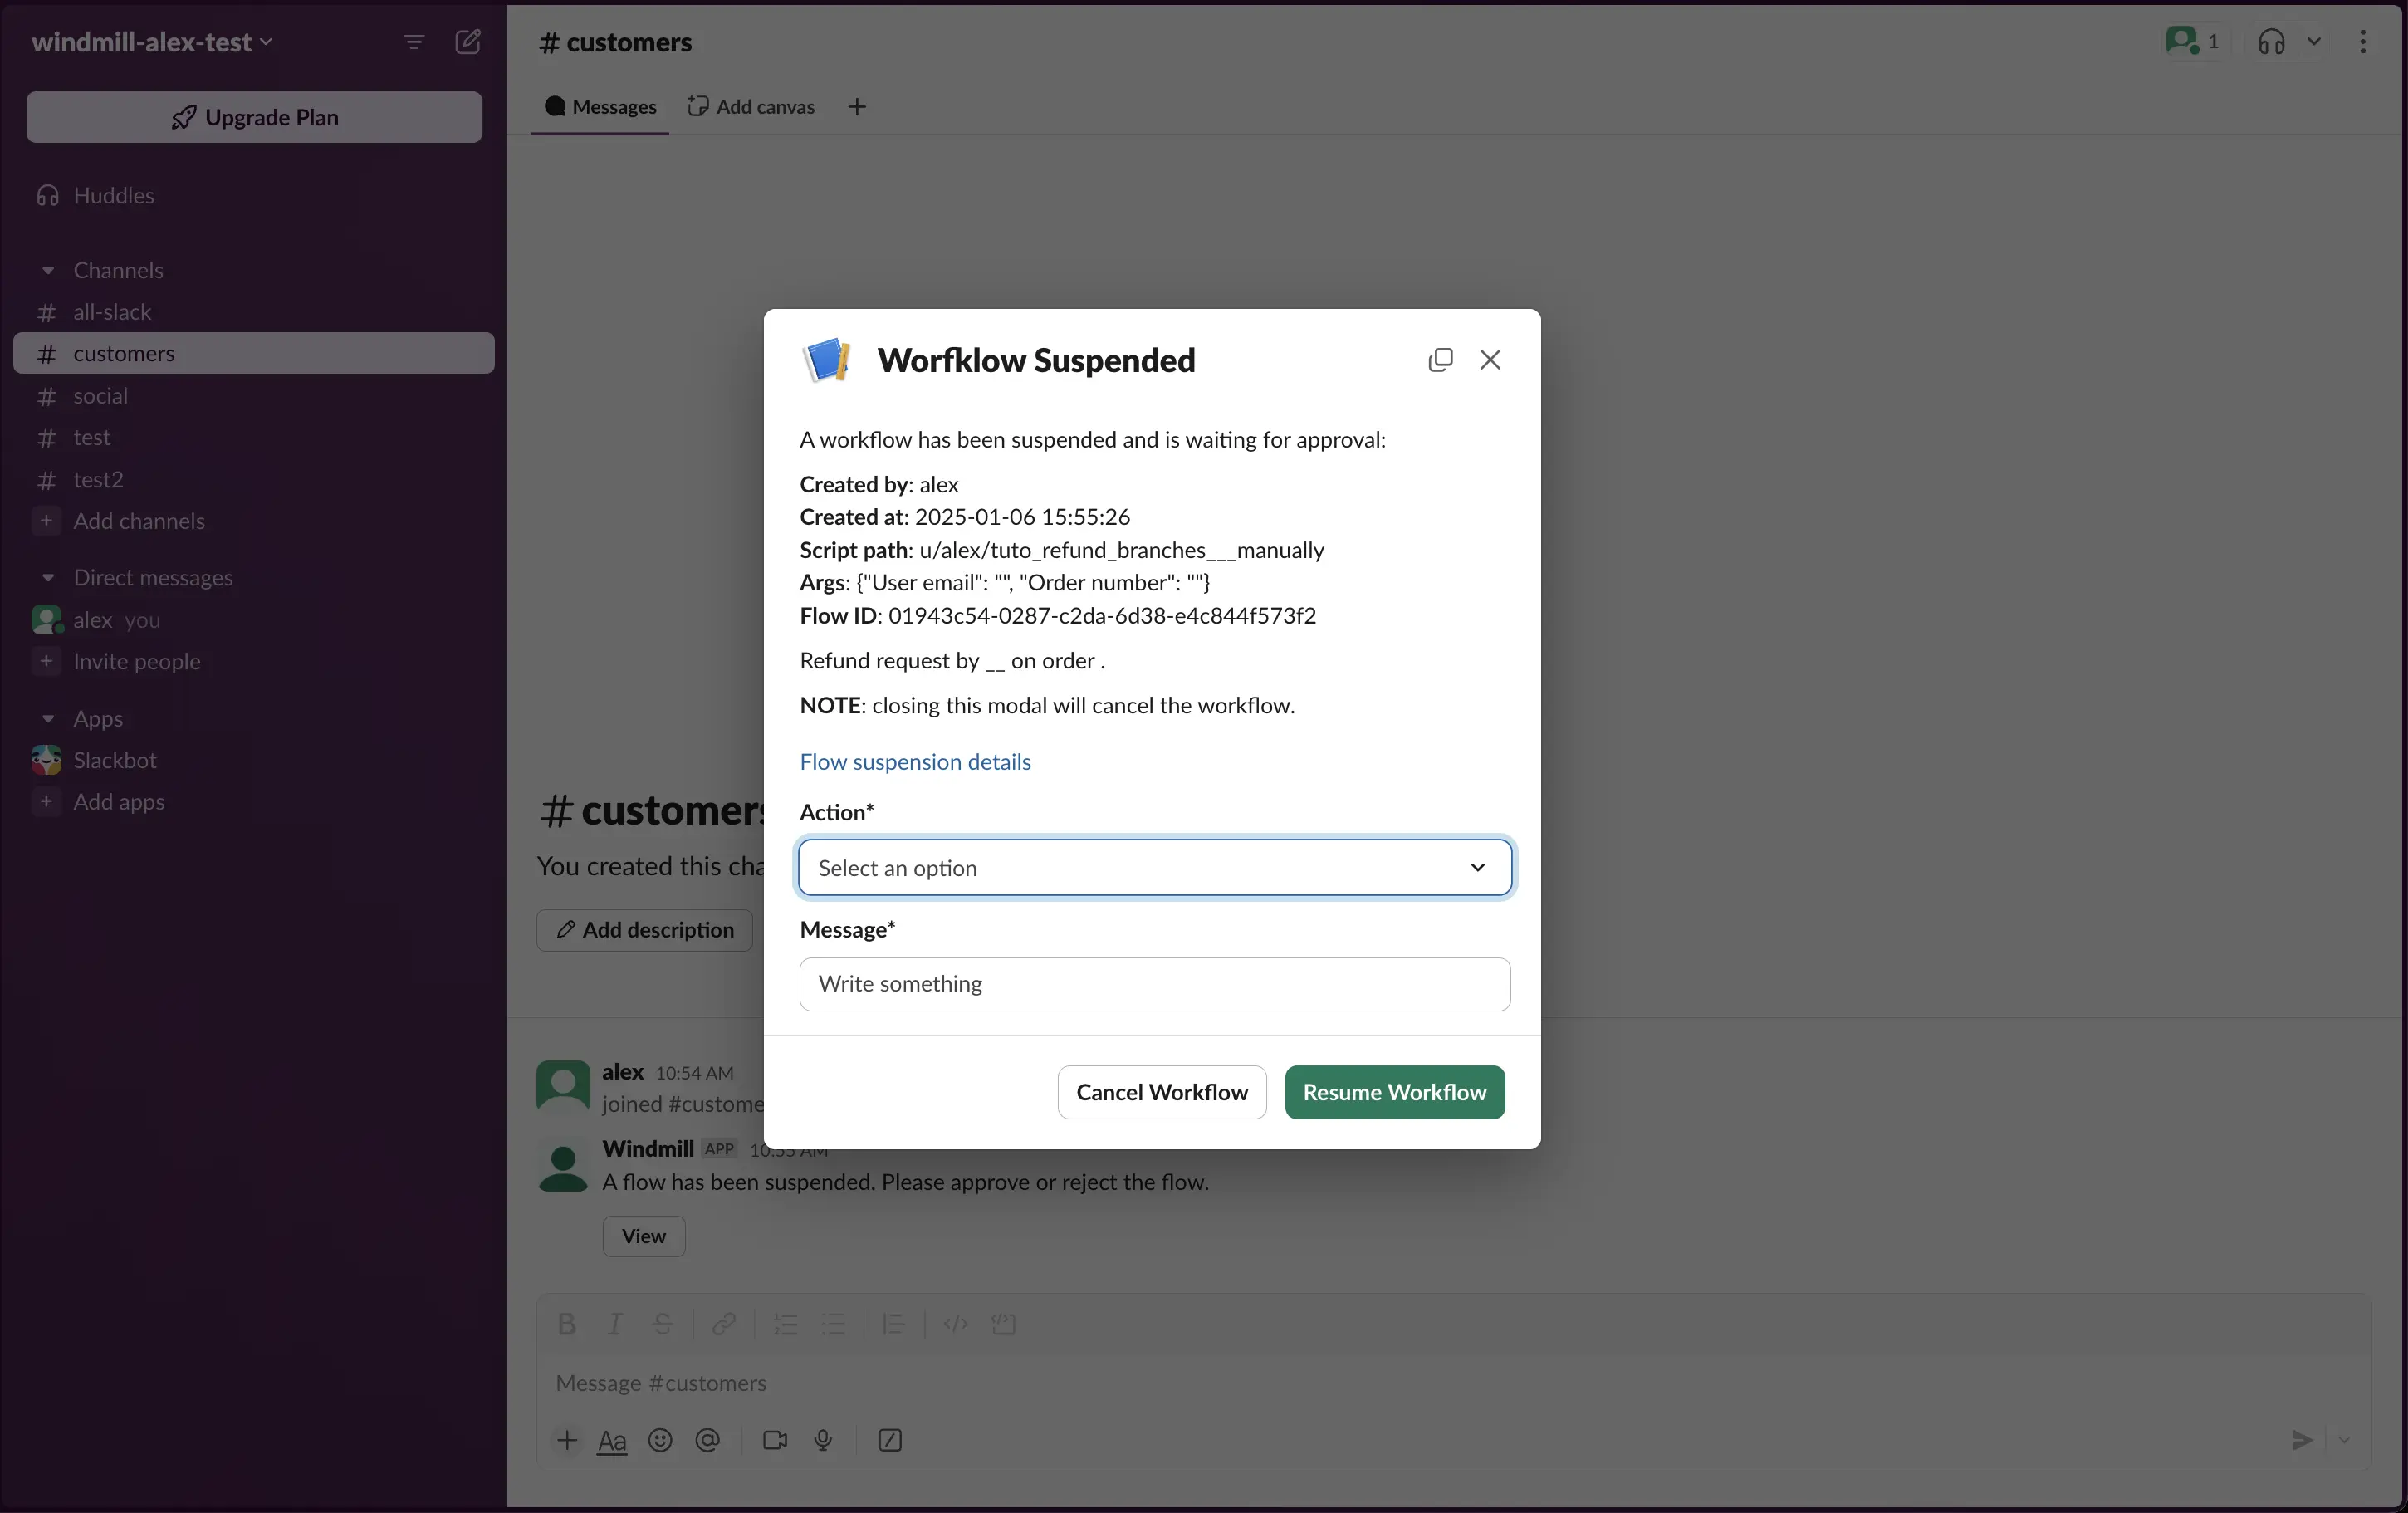
Slack approval steps
Approval steps are a way to suspend a flow until specific event(s) are received, such as approvals or cancellations. You can use them to handle approvals from Slack.
The Windmill Python and TypeScript clients both have a helper function to request an interactive approval on Slack. An interactive approval is a Slack message that can be approved or rejected directly from Slack without having to go back to the Windmill UI.
The following hub scripts can be used:
- Python: Request Interactive Slack Approval
- TypeScript: Request Interactive Slack Approval
If you define a form on the approval step, the form will be displayed in the Slack message as a modal.
Both of these scripts are using the Windmill client helper function:
- Python
- Bun
wmill.request_interactive_slack_approval(
    slack_resource_path="/u/username/my_slack_resource",
    channel_id="admins-slack-channel",
    message="Please approve this request",
    approver="approver123",
    default_args_json={"key1": "value1", "key2": 42},
    dynamic_enums_json={"foo": ["choice1", "choice2"], "bar": ["optionA", "optionB"]},
)
await wmill.requestInteractiveSlackApproval({
    slackResourcePath: "/u/username/my_slack_resource",
    channelId: "admins-slack-channel",
    message: "Please approve this request",
    approver: "approver123",
    defaultArgsJson: { key1: "value1", key2: 42 },
    dynamicEnumsJson: { foo: ["choice1", "choice2"], bar: ["optionA", "optionB"] },
});
Where dynamic_enums can be used to dynamically set the options of enum form arguments and default_args can be used to dynamically set the default values of form arguments.
If multiple approvals are required, you can use the client helper directly and send approval requests to different channels:
- Python
- Bun
import wmill

def main():
    # Send approval request to customers
    wmill.request_interactive_slack_approval(
        'u/username/slack_resource',
        'customers',
    )

    # Send approval request to admins
    wmill.request_interactive_slack_approval(
        'u/username/slack_resource',
        'admins',
    )
import * as wmill from "windmill-client"

export async function main() {
  await wmill.requestInteractiveSlackApproval({
    slackResourcePath: "/u/username/slack_resource",
    channelId: "customers"
  })
  await wmill.requestInteractiveSlackApproval({
    slackResourcePath: "/u/username/slack_resource",
    channelId: "admins"
  })
}
For more details on approval steps and their features, check out the Approval steps documentation.
Action on Slack from Windmill
The second way to make Slack and Windmill interact is through scripts triggered from Windmill to the Slack API. In other words, our goal here is to allow Windmill Scripts acting on Slack on your behalf.
Lets navigate to the Resources page page and click "Add a resource/API".
You can read more about Resources in the documentation here.
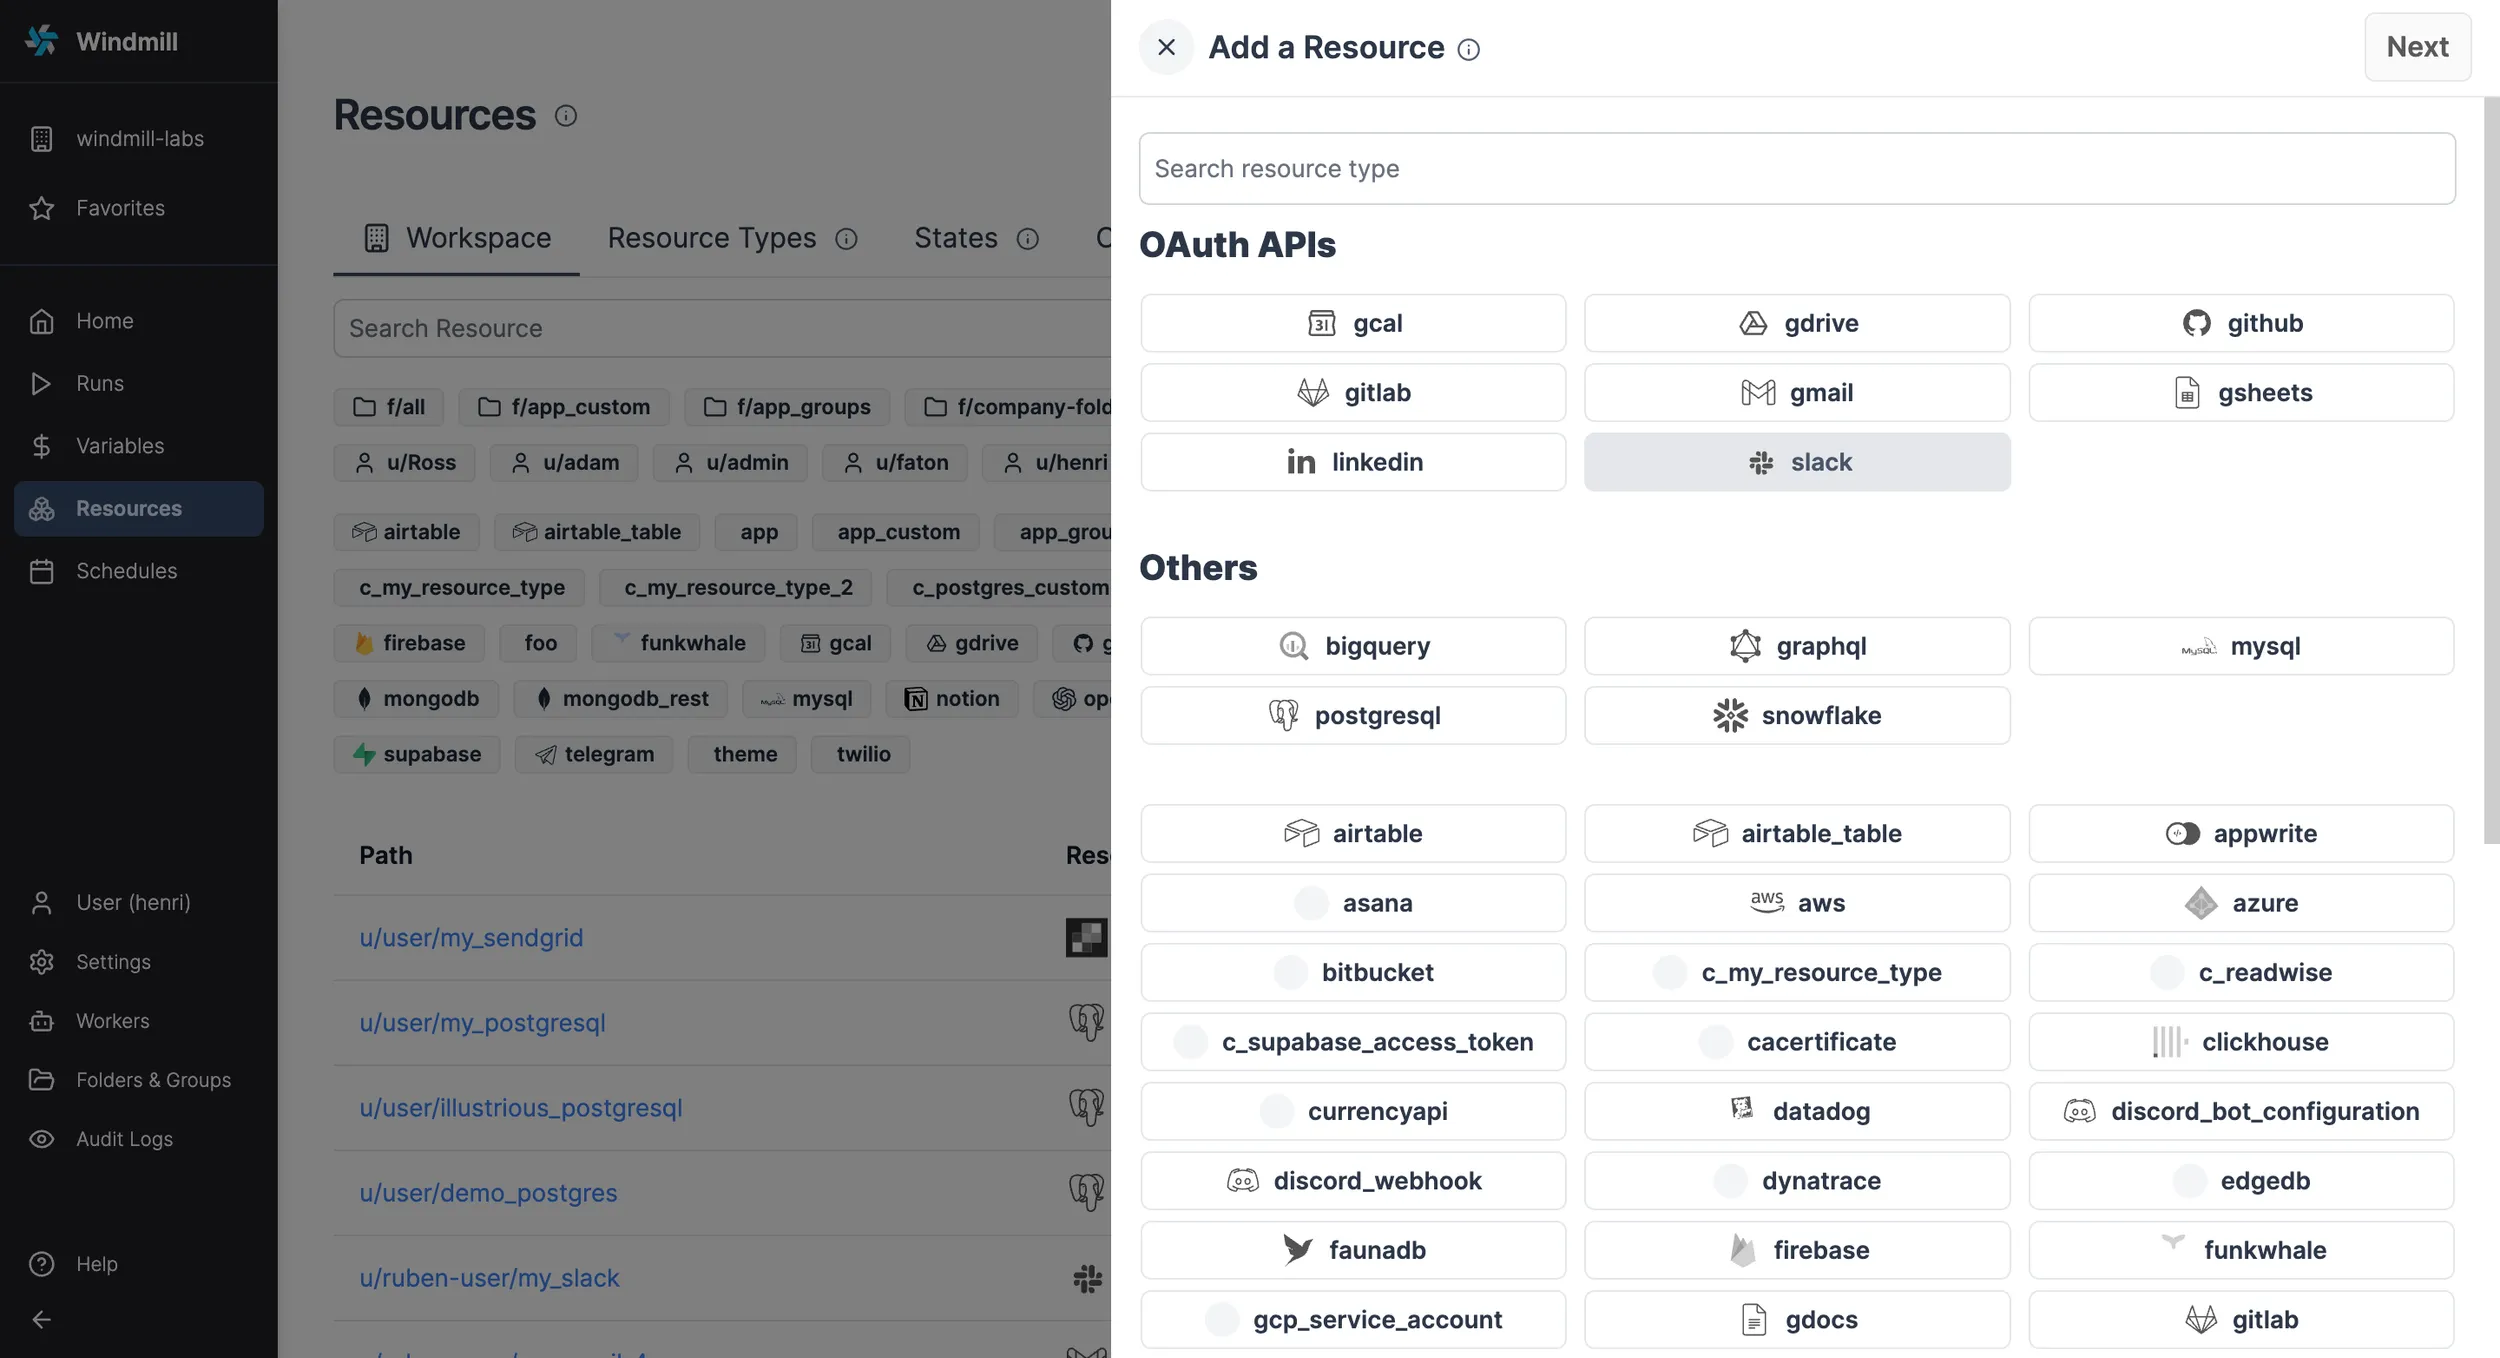
Select the slack Resource Type from the "OAuth APIs" list and by clicking
"Connect", you will be redirected to the Slack account associated with your browser. Click "Allow" to let
Windmill access your Slack workspace. Once that's done, you will be redirected
back to Windmill, where you can name your Slack Resource and Save it.
On self-hosted instances, integrating an OAuth API will require Setup OAuth and SSO.
Your connection is made! Now you can trigger the Slack API from Windmill.
For example, try this script to send a message to a channel.
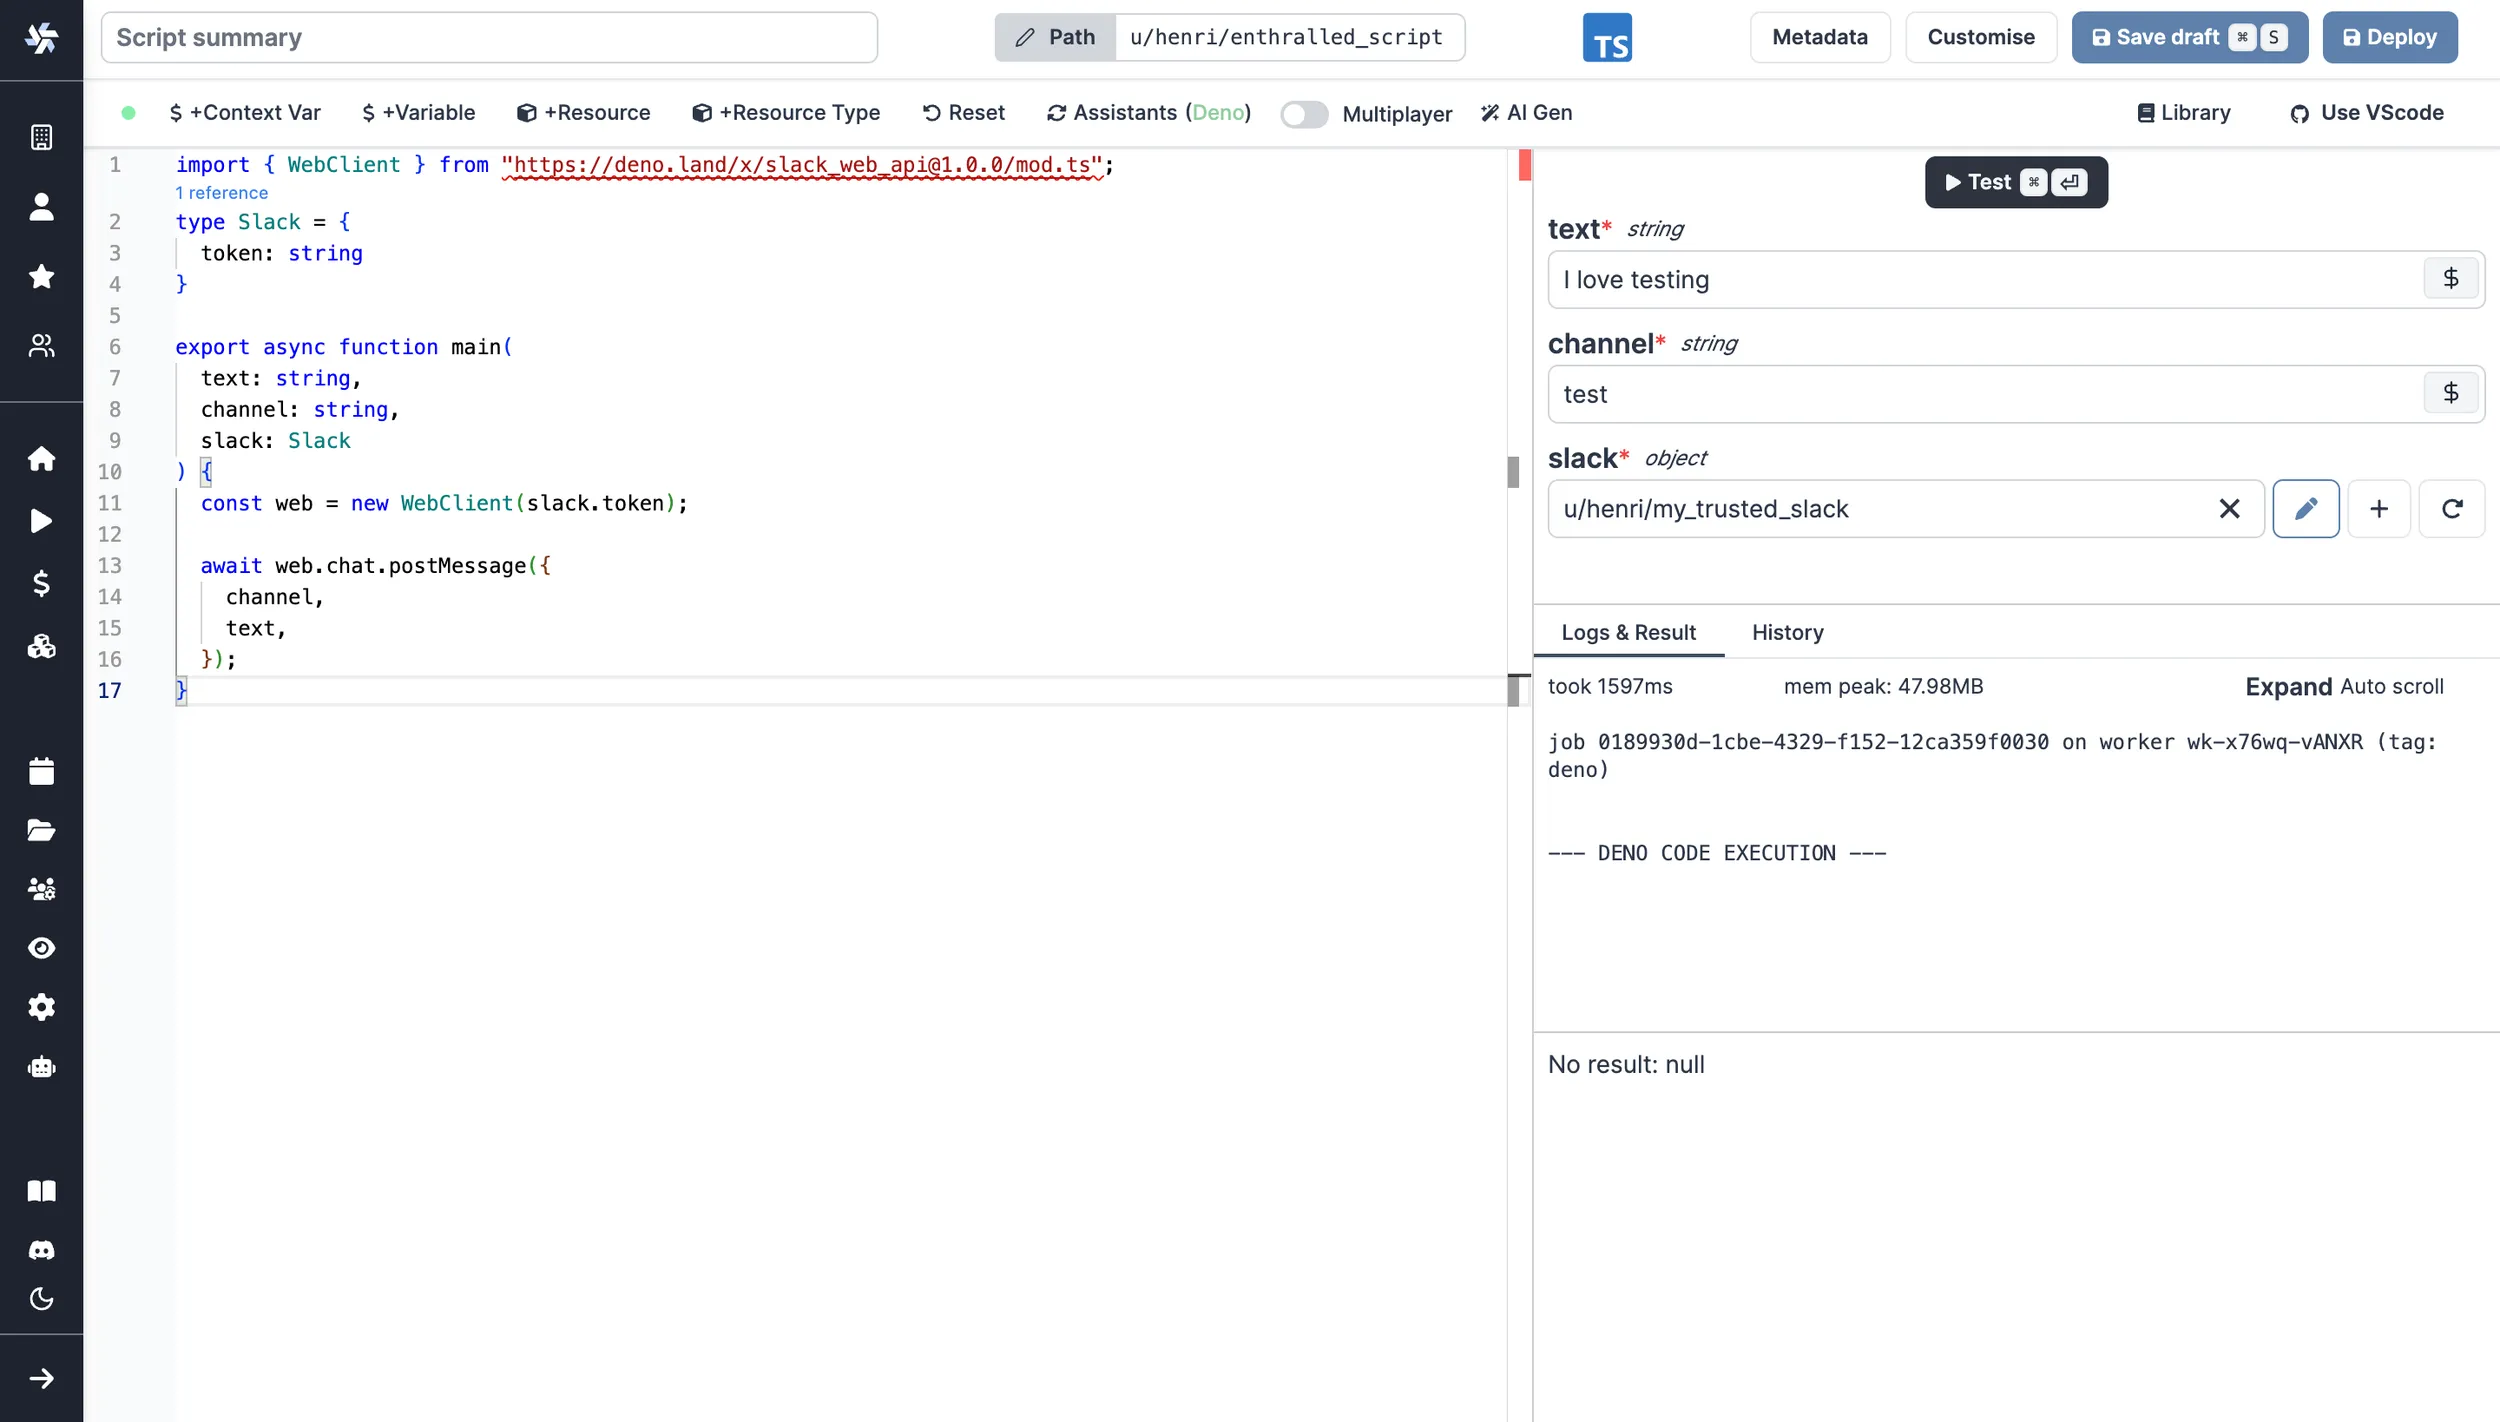
import { WebClient } from '@slack/web-api';
type Slack = {
	token: string;
};

export async function main(text: string, channel: string, slack: Slack) {
	const web = new WebClient(slack.token);

	await web.chat.postMessage({
		channel,
		text
	});
}
Have messages published on Windmill's behalf
Using the resource created above, Slack will behave on your behalf (under your name).
To have messages published on Windmill's behalf, use the Slack resource created in the Action on Windmill from Slack section.
Also, explore more Slack scripts, flows and apps on Windmill Hub.
Error handlers
Slack is an efficient way to be notified of errors on a Windmill run, whole workspace or instance. Windmill provides an integration for error handling on Slack.
More details on Error handling page.
Critical alerts
Slack can be used to receive critical alerts from Windmill. This feature is available in the Enterprise Edition.
Critical alerts are generated under the following conditions:
- Job is re-run after a crash
- License key does not renew
- Workspace error handler fails
- Number of running workers in a group falls below a specified threshold
- Number of jobs waiting in queue is above a threshold for more than a specified amount of time
To set up critical alerts to Slack:
- Configure SMTP in the instance settings
- Connect your instance to Slack in the instance settings
- Specify the Slack channel where alerts should be sent
You can also set up worker group-specific alerts to receive notifications when the number of running workers in a group falls below a specified threshold. This can be configured in the worker group config.
Instance-wide critical alerts are only visible to users with the superadmin or devops roles. For workspace-specific alerts, users need to have admin privilege over that workspace.