Setup OAuth and SSO
Windmill supports Single Sign-On for Google, Microsoft, Okta, GitHub, GitLab, Jumpcloud, Keycloak, Authentik, Authelia, Kanidm, Zitadel, Nextcloud, PocketID and domain restriction.
Windmill supports Slack, GitHub, GitLab, Bitbucket, Google Sheets, Google Drive, Gmail, Google Calendar, Google Forms, Google Cloud, Google Workspace, Basecamp, LinkedIn, QuickBooks, Visma, Snowflake, and Custom OAuth.
On self-hosted instances, OAuth configuration are set in the instance settings.
SSO
We recommend using a private navigation tab to test the new settings as soon as they are saved by refreshing the login page as a non authed user.
Google login
Create Google OAuth keys
First, you need to create a Google OAuth Client:
- Go to https://console.developers.google.com/apis/credentials and create a project if you did not have one.
- Click "Create Credentials", then click "OAuth Client ID" in the drop-down menu.
- Enter the following:
- Application Type: Web Application
- Name: Windmill
- Authorized Redirect URLs:
https://<YOUR_INSTANCE>/user/login_callback/google
- Click Create.
- Copy the Client ID and Client Secret from the "OAuth Client" modal.
Instance settings 'SSO OAuth' - 'SSO' - Toggle "Google" and set client id, org and client secret.
Microsoft
Redirect URI: https://<YOUR_INSTANCE>/user/login_callback/microsoft
Login: https://<YOUR_INSTANCE>/user/login
Create a new OAuth 2.0 Client in Microsoft portal.
In the "Authentication" tab, set the redirect URI to BASE_URL/user/login_callback/microsoft, the logout channel to
BASE_URL/auth/logout where BASE_URL is what you configured as core BASE_URL.
Also set "Accounts in any organizational directory (Any Microsoft Entra ID tenant -
Multitenant) and personal Microsoft accounts (e.g. Skype, Xbox)", you can restrict the
emails directly in Windmill using the "allowed_domains" setting.
Instance settings 'SSO OAuth' - - 'SSO' - Toggle "microsoft" and set client id, org and client secret.
Okta
From your Admin page, setup Windmill using the service flow:
-
Create a new app integration:a. For "sign-in method" select "OIDC - Open ID Connect".
b. For "application type" select "Web Application".
-
Select all of the following options for Grant type of "Client acting on behalf of a user":
- Authorization Code
- Refresh Token
- Implicit (hybrid)
- Allow ID Token with implicit grant type
- Allow Access Token with implicit grant type
-
For Refresh Token, select "Rotate token after every use".
-
Under "LOGIN", set the following:
- "Sign-in redirect URIs"
https://<your windmill's public hostname as configured in values.yaml>/user/login_callback/okta/ - "Sign-out redirect URIs"
https://<your windmill's public hostname as configured in values.yaml> - "Login initiated by"
App Only - "Initiate login URI"
https://<your windmill's public hostname as configured in values.yaml>/user/login
- "Sign-in redirect URIs"
Instance settings 'SSO OAuth' - - 'SSO' - Toggle "okta" and set client id, org and client secret.
GitHub
Redirect URI: https://<YOUR_INSTANCE>/user/login_callback/github
Login: https://<YOUR_INSTANCE>/user/login
Instance settings 'SSO OAuth' - - 'SSO' - Toggle "github" and set client id, org and client secret.
GitLab
Redirect URI: https://<YOUR_INSTANCE>/user/login_callback/gitlab
Login: https://<YOUR_INSTANCE>/user/login
GitLab's Single Sign-On integration is supported by Windmill. Detailed steps for setting up GitLab as an OAuth SSO provider will be provided in the upcoming documentation but the entry for the oauth.json is as following:
Instance settings 'SSO OAuth' - - 'SSO' - Toggle "gitlab" and set client id, org and client secret.
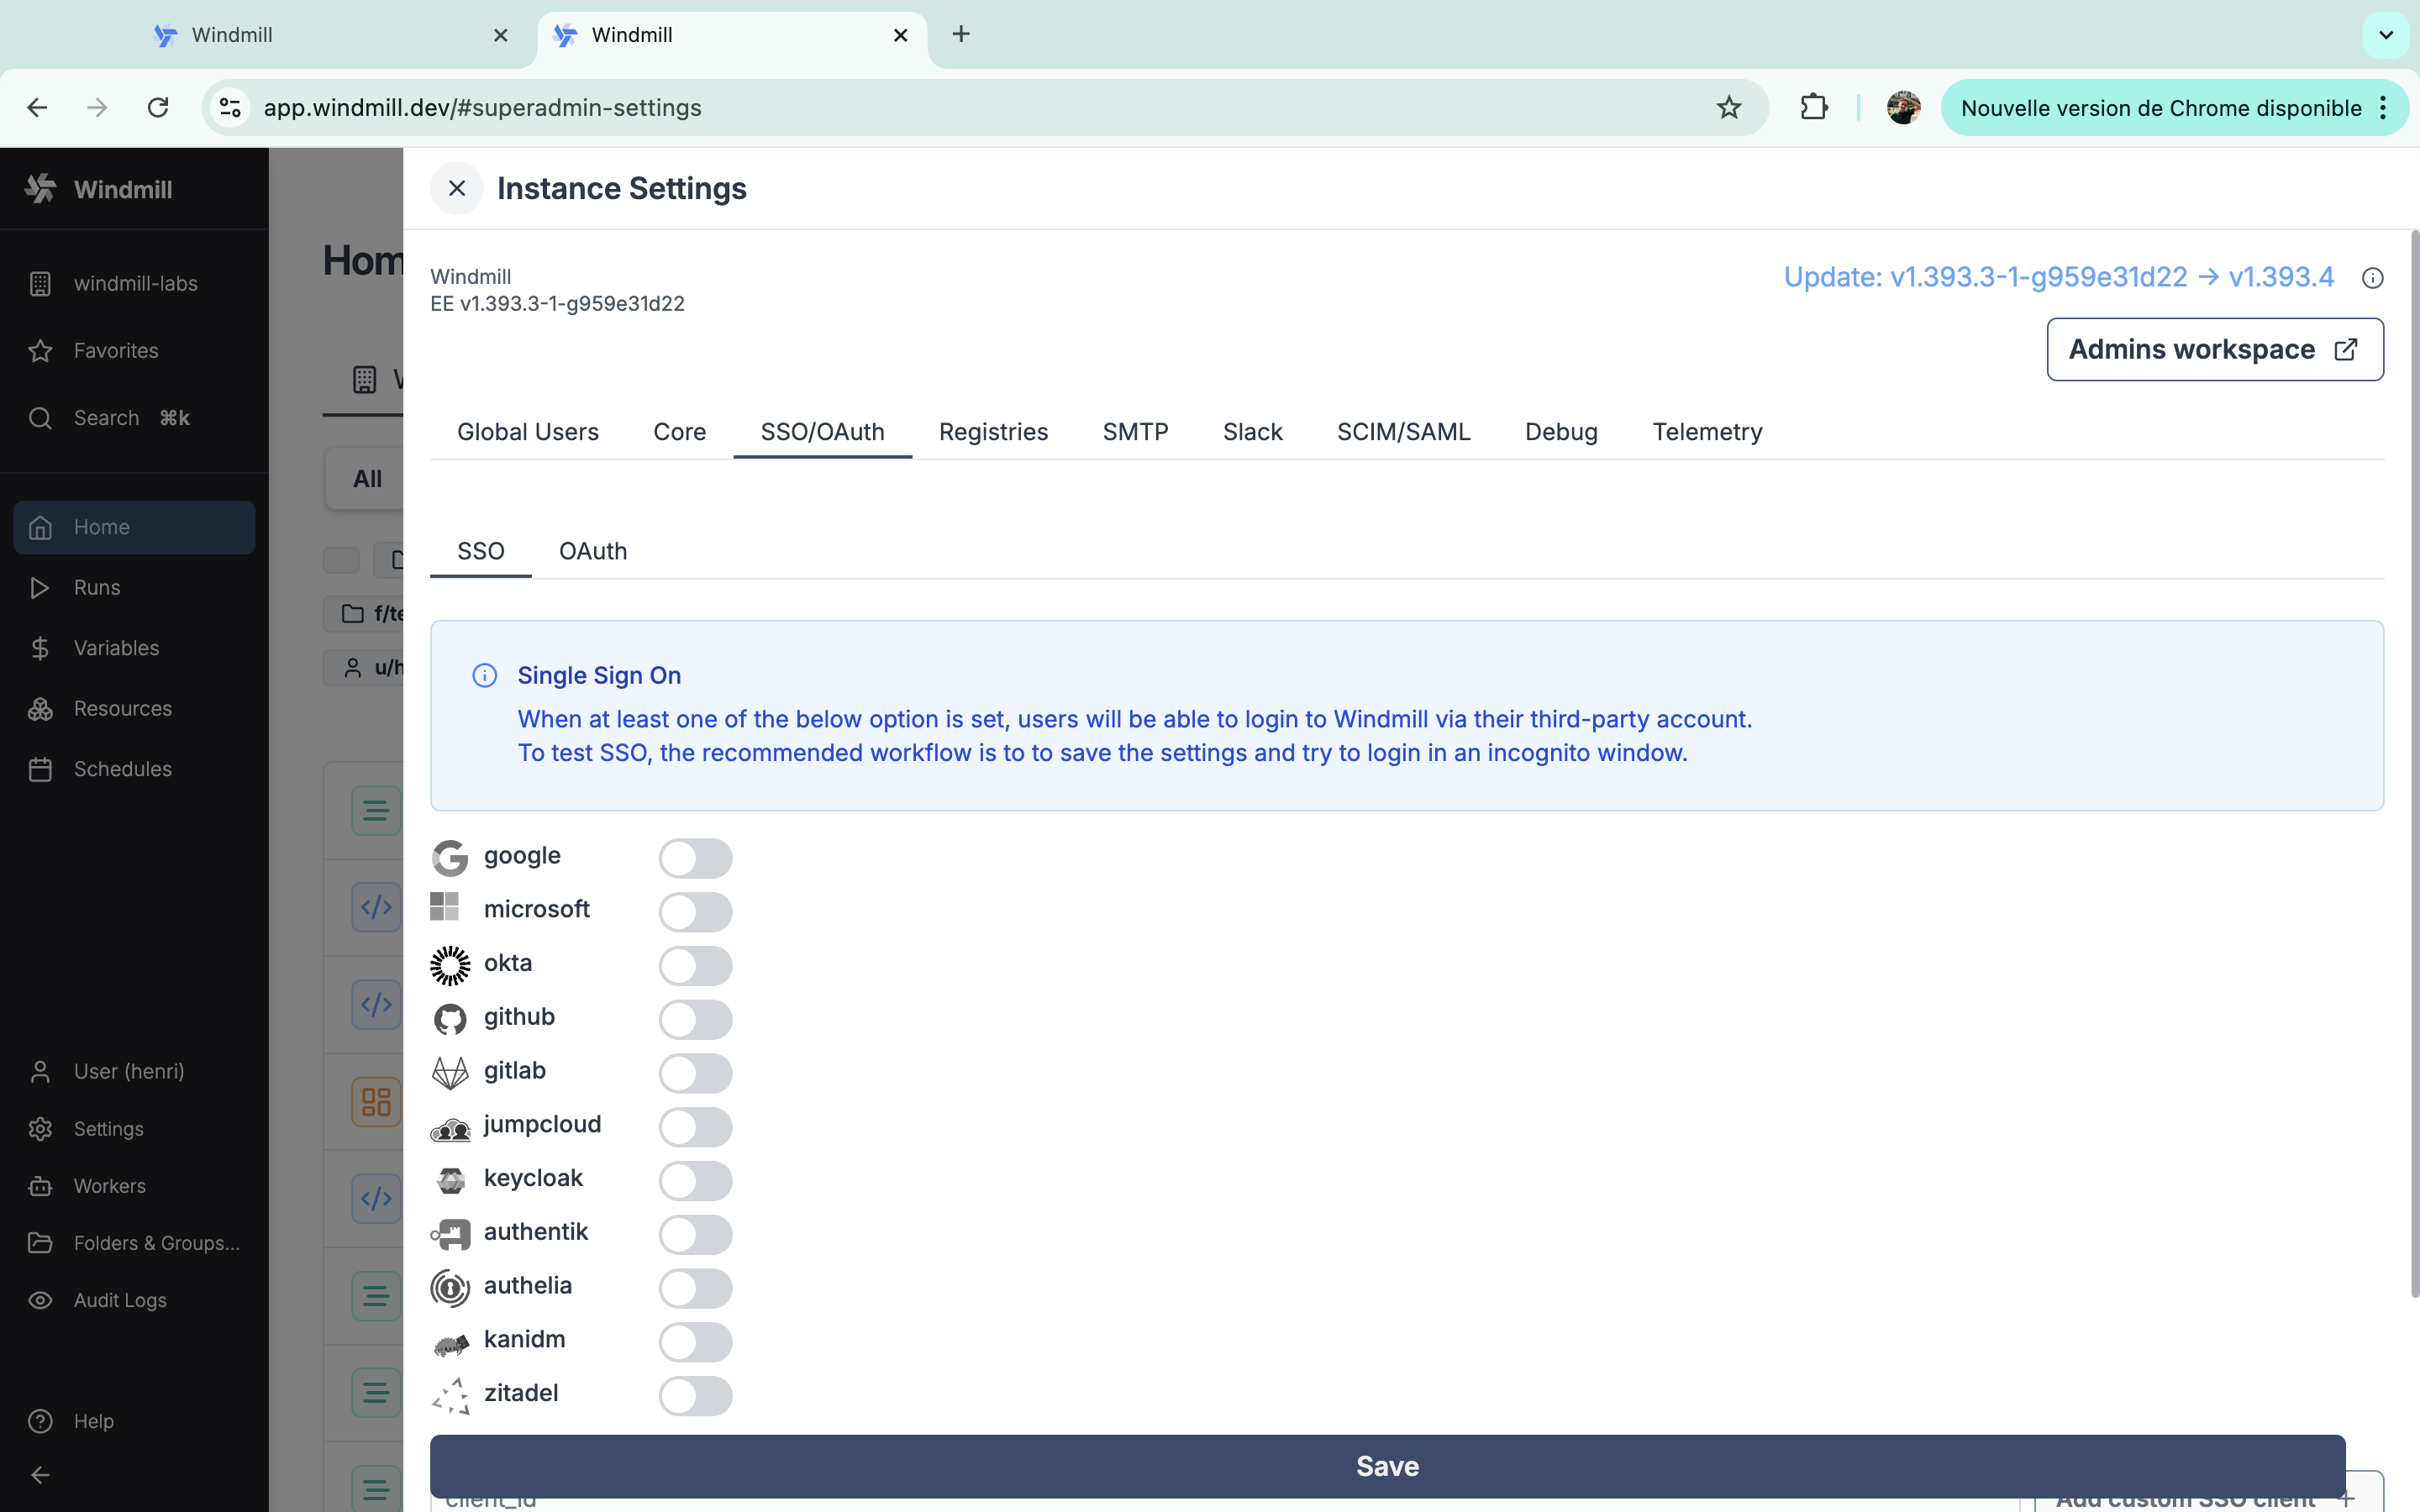
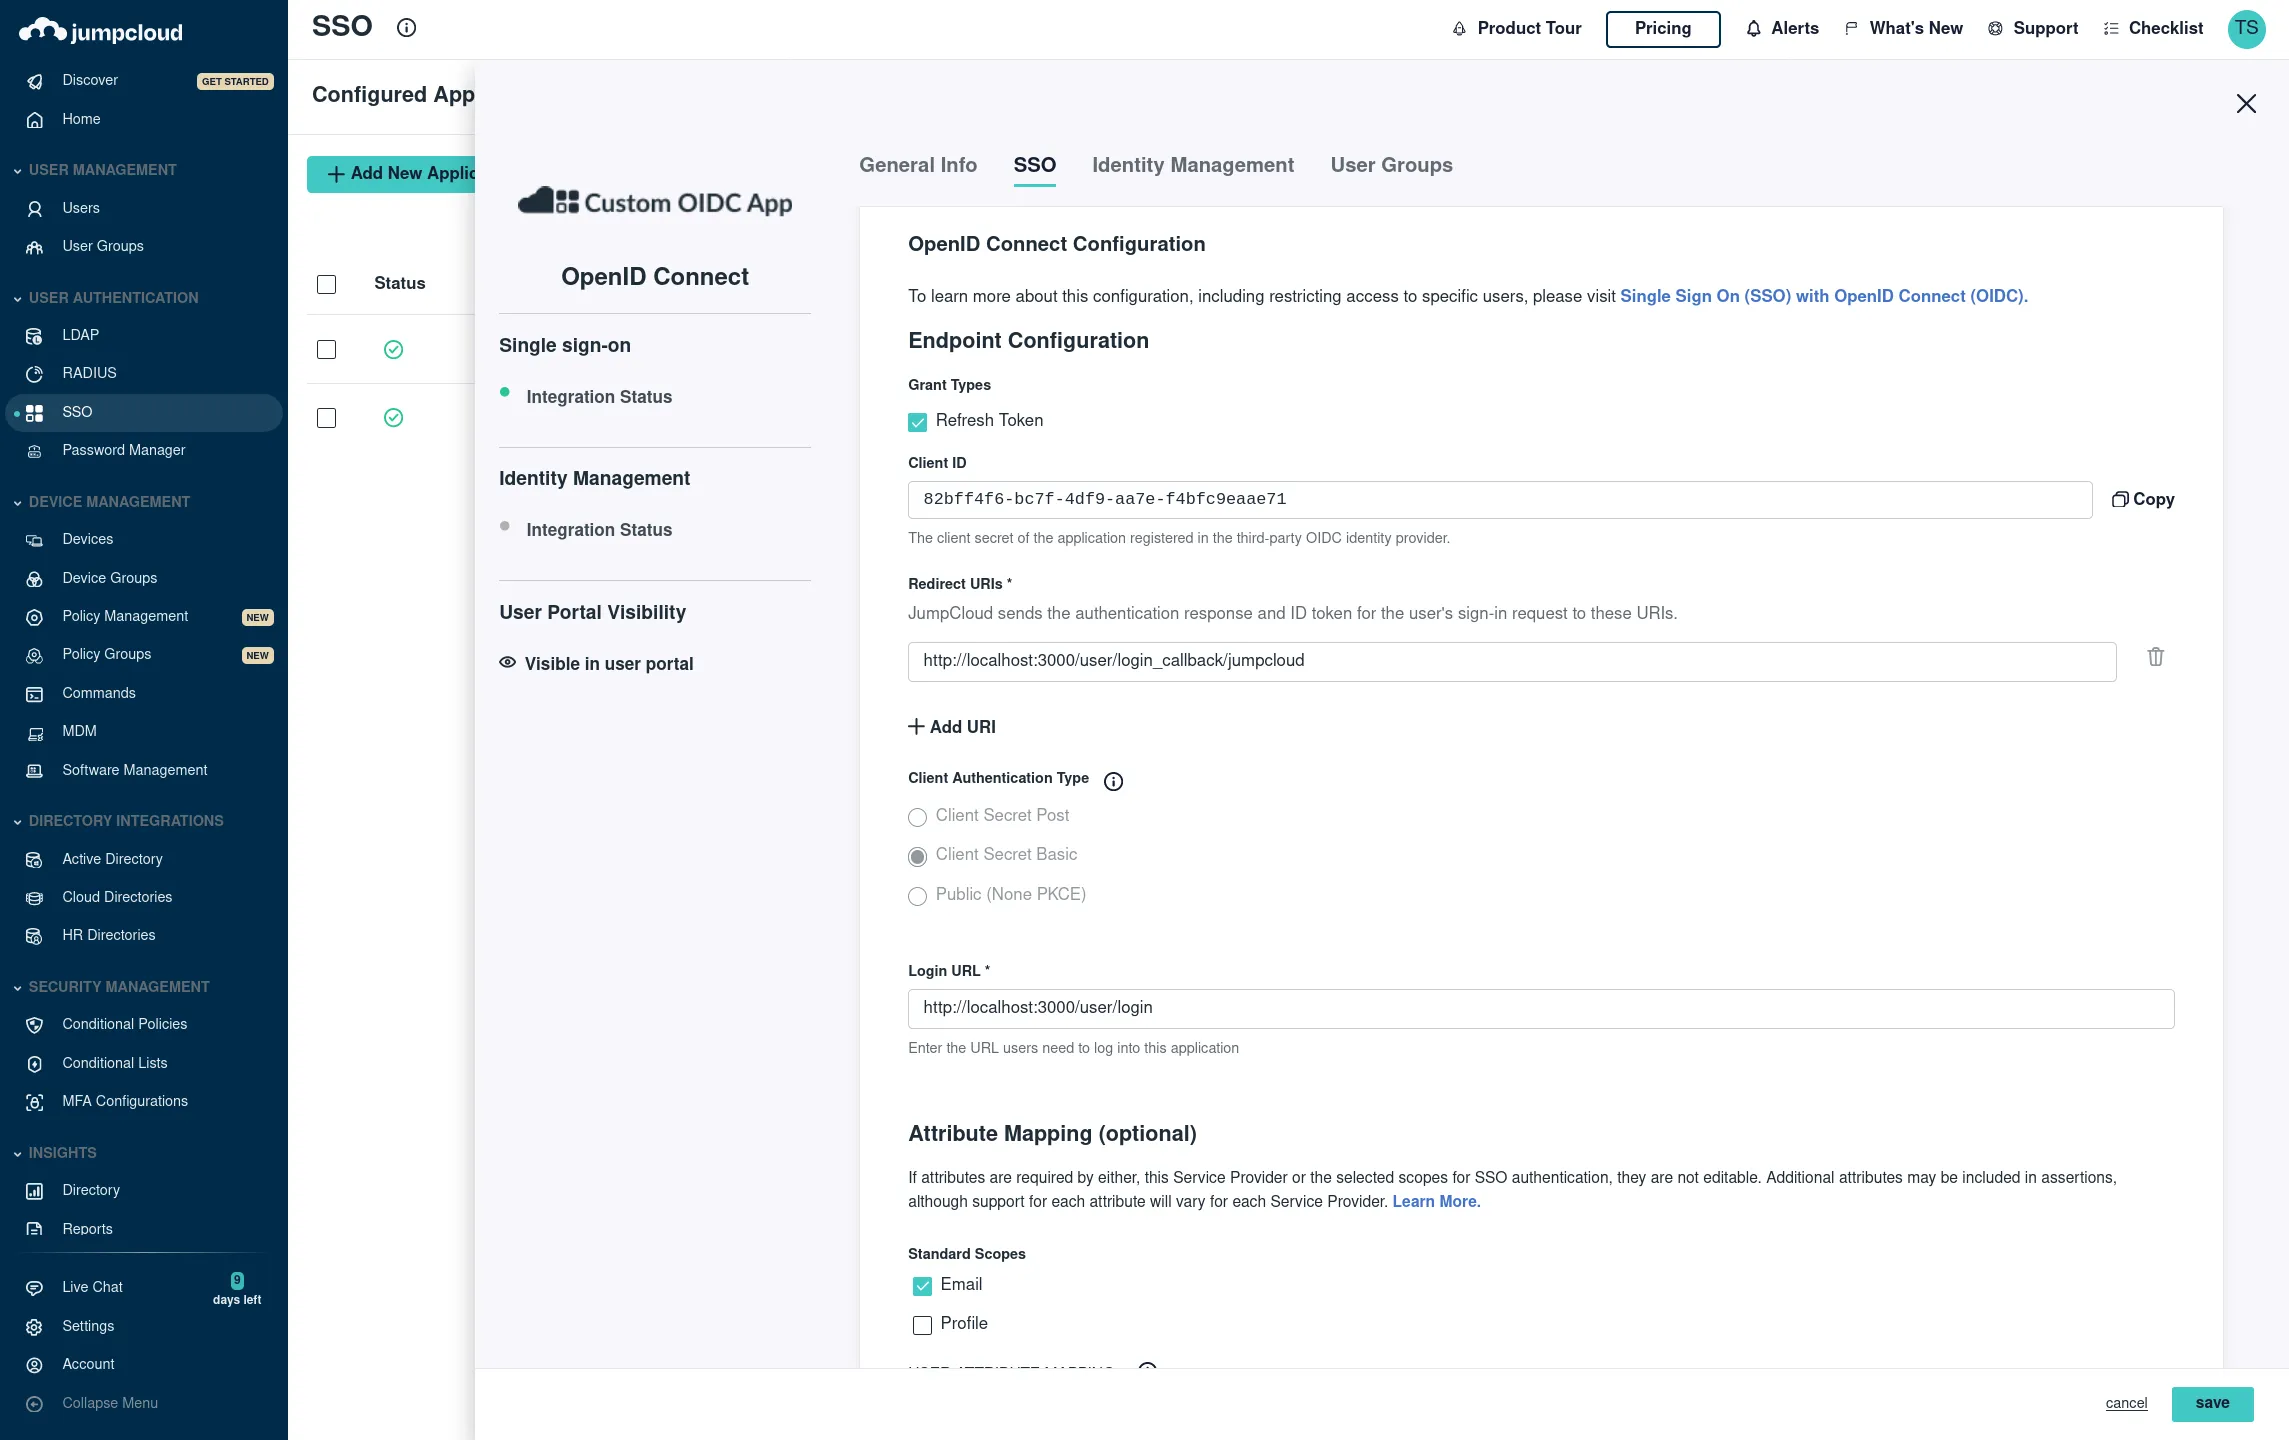
Jumpcloud
SSO -> Custom OIDC
Name: Windmill
Go to SSO tab:
Redirect URI: https://<YOUR_INSTANCE>/user/login_callback/jumpcloud
Login: https://<YOUR_INSTANCE>/user/login
Client Authentication Type: Client Secret Basic Attribute Mapping, Standard Scopes: Check Email
Add the proper groups then click save. You should see your Client ID and Client Secret on the next screen then add the following entry "jumpcloud":
Instance settings 'SSO OAuth' - - 'SSO' - Toggle "jumpcloud" and set client id and client secret, and "Client Authentication Type" to "Client Secret Basic"
Keycloak
Setup your realm in Keycloak and set Keycloak in Instance settings 'SSO OAuth' - - 'SSO' and Keycloak
You need to add the following client scope to keycloak client: offline_access
Authentik
To integrate Windmill with Authentik as an OAuth provider, follow these steps:
-
Create OAuth Client in Authentik:
- Go to your Authentik instance dashboard.
- Navigate to Applications and click Create New Application.
- In the application settings, set the following:
- Redirect URI:
https://<YOUR_INSTANCE>/user/login_callback/authentik - Post-Logout Redirect URI:
https://<YOUR_INSTANCE>/user/login - Grant Types: Authorization Code, Refresh Token
- Redirect URI:
- After saving the application, you will be provided with a Client ID and Client Secret.
-
Instance settings in Windmill:
- Go to Windmill's admin settings under 'SSO OAuth' - 'SSO'.
- Toggle "authentik" and enter:
- Authentik URL:
https://<AUTHENTIK_HOST>/application/o/authorize/ - Client ID: [from Authentik]
- Client Secret: [from Authentik]
- Authentik URL:
- Save your settings.
Authelia
To integrate Windmill with Authelia as an OAuth provider, follow these steps:
-
Create OAuth Client in Authelia:
- Go to your Authelia instance dashboard.
- Navigate to OIDC Clients and create a new client.
- Set the following values:
- Redirect URI:
https://<YOUR_INSTANCE>/user/login_callback/authelia - Post-Logout Redirect URI:
https://<YOUR_INSTANCE>/user/login - Scopes: OpenID, Email
- Redirect URI:
- After saving, you will be given a Client ID and Client Secret.
-
Instance settings in Windmill:
- Go to Windmill's admin settings under 'SSO OAuth' - 'SSO'.
- Toggle "authelia" and enter:
- Authelia URL:
https://<AUTHELIA_URL>/api/oidc/authorization - Client ID: [from Authelia]
- Client Secret: [from Authelia]
- Authelia URL:
- Save your settings.
Kanidm
To integrate Windmill with Kanidm as an OAuth provider, follow these steps:
-
Create OAuth Client in Kanidm:
- In your Kanidm instance, create a new OAuth 2.0 client in the dashboard.
- Set the following values:
- Redirect URI:
https://<YOUR_INSTANCE>/user/login_callback/kanidm - Post-Logout Redirect URI:
https://<YOUR_INSTANCE>/user/login
- Redirect URI:
- After saving the client, you will receive a Client ID and Client Secret.
-
Instance settings in Windmill:
- Go to Windmill's admin settings under 'SSO OAuth' - 'SSO'.
- Toggle "kanidm" and enter:
- Kanidm URL:
https://<KANIDM_URL>/ui/oauth2 - Client ID: [from Kanidm]
- Client Secret: [from Kanidm]
- Kanidm URL:
- Save your settings.
Zitadel
To integrate Windmill with Zitadel as an OAuth provider, follow these steps:
-
Create OAuth Client in Zitadel:
- Log in to your Zitadel instance.
- Navigate to the Applications section and create a new OAuth client.
- Set the following values:
- Redirect URI:
https://<YOUR_INSTANCE>/user/login_callback/zitadel - Post-Logout Redirect URI:
https://<YOUR_INSTANCE>/user/login
- Redirect URI:
- Once created, Zitadel will provide a Client ID and Client Secret.
-
Instance settings in Windmill:
- Go to Windmill's admin settings under 'SSO OAuth' - 'SSO'.
- Toggle "zitadel" and enter:
- Zitadel URL:
https://<ZITADEL_URL>/oauth/v2/authorize - Client ID: [from Zitadel]
- Client Secret: [from Zitadel]
- Zitadel URL:
- Save your settings.
Nextcloud
To integrate Windmill with Nextcloud as an OAuth provider, follow these steps:
-
Create OAuth Client in Nextcloud:
- Go to your Nextcloud instance as an administrator.
- Navigate to Administration settings → Security → OAuth 2.0 clients.
- Click Add client to create a new OAuth2 application.
- Set the following values:
- Redirect URI:
https://<YOUR_INSTANCE>/user/login_callback/nextcloud - Name:
Windmill(or any name you prefer)
- Redirect URI:
- After saving the client, you will receive a Client ID and Client Secret.
- For more details, see the Nextcloud OAuth2 documentation.
-
Instance settings in Windmill:
- Go to Windmill's admin settings under 'SSO OAuth' - 'SSO'.
- Toggle "nextcloud" and enter:
- Nextcloud Instance Domain:
your.nextcloud.domain(without https://) - Client ID: [from Nextcloud]
- Client Secret: [from Nextcloud]
- Nextcloud Instance Domain:
- Save your settings.
PocketID
PocketID is a simple, self-hosted OIDC provider. To integrate it with Windmill:
-
Create OAuth client in PocketID:
- Go to your PocketID instance admin panel.
- Create a new OAuth client with the following settings:
- Redirect URI:
https://<YOUR_INSTANCE>/user/login_callback/pocketid
- Redirect URI:
- After saving, you will receive a Client ID and Client Secret.
-
Instance settings in Windmill:
- Go to Windmill's admin settings under 'SSO OAuth' - 'SSO'.
- Toggle "pocketid" and enter:
- PocketID URL: The base URL of your PocketID instance (e.g.
https://pocket-id.example.com). The OIDC endpoints (/authorize,/api/oidc/token,/api/oidc/userinfo) are derived automatically. - Custom Name (optional): A display name for the login button.
- Client ID: [from PocketID]
- Client Secret: [from PocketID]
- PocketID URL: The base URL of your PocketID instance (e.g.
- Save your settings.
Custom OAuth
You can use other custom SSO clients from the Instance settings 'SSO OAuth' - - 'SSO' and provide a client id to 'Add custom SSO client'.
OAuth
When one of the OAuth options is set, you will be able to create a specific resource containing a 'token' automatically generated by the third-party provider. To test it after setting an oauth client, go to the Resources menu and create a new one of the type of your oauth client (i.e. a 'github' resource if you set GitHub OAuth).
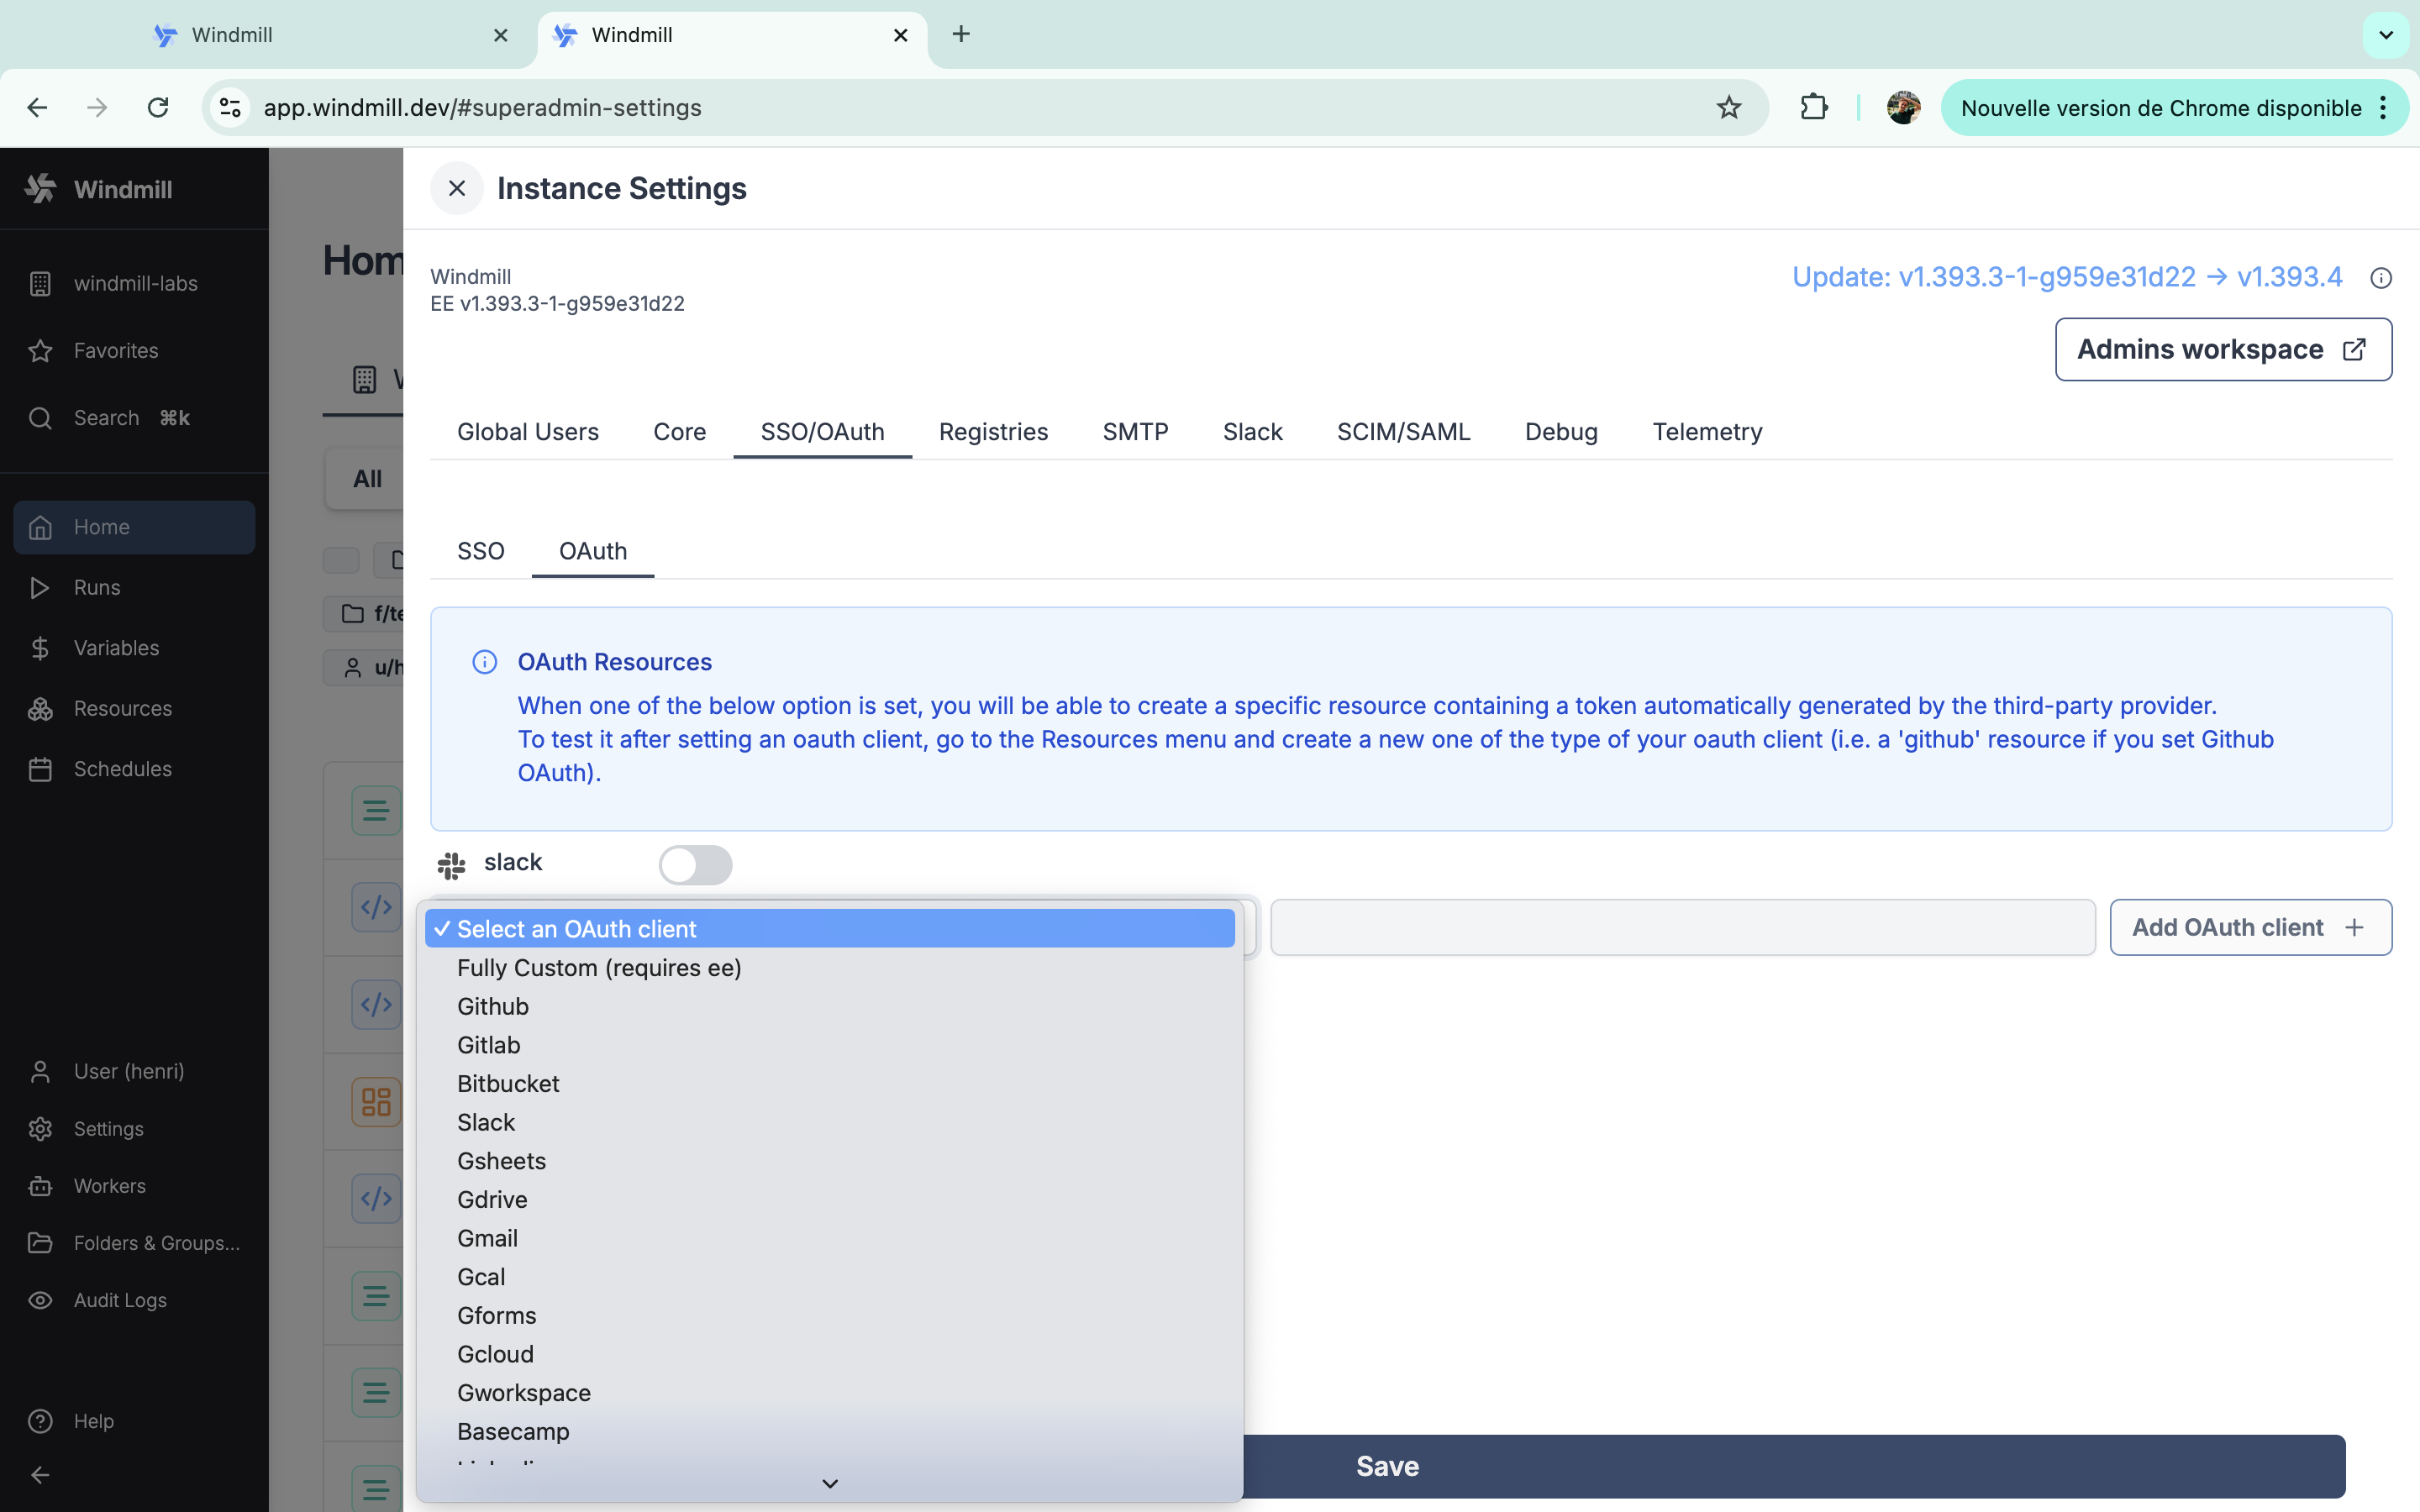
Slack
Create a new Slack app at https://api.slack.com/apps?new_app=1
Pick "From an app manifest", then YAML.

Your app manifest should look like this, replacing <YOUR INSTANCE URL> in 4 places:
These URLs must be publicly accessible:
<YOUR INSTANCE URL>/api/oauth/slack_command- for slash commands<YOUR INSTANCE URL>/api/oauth/slack_events- for @mention triggers<YOUR INSTANCE URL>/api/slack- for interactive approvals
display_information:
  name: Windmill
  description: windmill.dev slackbot and oauth integration
  background_color: '#3b82f6'
  long_description: The Windmill app allows to use command to run jobs inside Windmill as well as receiving message as the Windmill app. The Windmill app pairs a Slack workspace with a Windmill workspace. It must be installed from within the settings of a Windmill workspace.
features:
  app_home:
    home_tab_enabled: true
    messages_tab_enabled: true
    messages_tab_read_only_enabled: true
  bot_user:
    display_name: Windmill
    always_online: true
  slash_commands:
    - command: /windmill
      url: <YOUR INSTANCE URL>/api/oauth/slack_command
      description: Trigger the script set in your workspace settings for Slack
      usage_hint: the text that will be passed to the script
      should_escape: false
oauth_config:
  redirect_urls:
    - <YOUR INSTANCE URL>
  scopes:
    user:
      - chat:write
      - admin
      - channels:write
    bot:
      - chat:write
      - chat:write.public
      - channels:join
      - files:write
      - commands
      - app_mentions:read
      - im:history
      - im:read
settings:
  event_subscriptions:
    request_url: <YOUR INSTANCE URL>/api/oauth/slack_events
    bot_events:
      - app_mention
      - message.im
  interactivity:
    is_enabled: true
    request_url: <YOUR INSTANCE URL>/api/slack
  org_deploy_enabled: false
  socket_mode_enabled: false
  token_rotation_enabled: false

Then from your Instance settings, fill with Client ID and Client Secret.

As for any OAuth Settings, make sure that there is a corresponding resource type with the same name with a "token" field in the superadmin workspace. That should be the case by default with Slack.

Now users should be able to connect to Slack through OAuth:

The Slack bot install at the instance level (that normally happens when the first super-admin clicks "Connect to Slack") can also be done non-interactively via the CLI with a pre-minted xoxb-… bot token: wmill instance connect-slack --bot-token ... --team-id ... --team-name .... Same for workspace-level: wmill workspace connect-slack .... See the Slack integration doc for the full flow. Useful for configure-as-code setups and scripted provisioning.
Workspace-level Slack app
In addition to instance-level configuration, workspace admins can configure their own Slack app with workspace-specific credentials. This provides workspace isolation, separate rate limits, and independent management.
To enable workspace-level Slack apps:
- Follow the same app manifest setup above to create a Slack app
- In workspace settings, navigate to the Slack app section
- Enter the workspace-specific Client ID and Client Secret
Alternatively, via the CLI, commit slack_oauth_client_id and slack_oauth_client_secret to your workspace's settings.yaml and run wmill sync push. Both fields round-trip through sync pull (emitted as null when unset), so the committed YAML is the complete source of truth.
When configured, the workspace will use its own Slack app instead of the instance-level app. See the Slack integration documentation for more details on workspace-level configuration and when to use it.
Microsoft Teams
- Go to the Azure Portal and create a new "Bot Service" of type "Azure Bot".

- Give your bot a unique "handle".
- Select the bot to be "Single tenant" rather than "Multi-tenant".
- You can leave the rest of the settings as default.
- Once created, go to Microsoft Entra App Registration and select the bot you just created.
- On the left menu, click "Manage" -> "API permissions" -> "+ Add a permission" -> "Microsoft Graph" -> "Application permissions" -> "Channel.ReadBasic.All" and "Team.ReadBasic.All".

- On the left menu, click "Manage" -> "Certificates & secrets" -> "+ New client secret" -> "Add".
- Copy the Client Secret as you'll need it to set up the OAuth resource in Windmill.
- Also, copy the Application (client) ID and Directory (tenant) ID as you'll need them to set up the OAuth resource in Windmill.

- Sign in to the Teams Bot Framework Portal and create a new App.
- Fill in the "Basic Information" section and use the "Application ID" from the previous step.
- In the "Branding" section, upload the icons and accent colors.
- In "App Features", select "Bot" and under "Bot ID", use the "Application ID" from the previous step.

- Leave the rest of the settings as default, then go to "Domains" and add the domain of your Windmill instance.
- Finally, either "Preview" or "Publish" the app to your organization. Note that a preview is only possible if your organization allows custom app installations. If you publish, your Microsoft Teams admin will have to approve the app before it can be used in the "Manage apps" section of your organization.
Deploying and approving an app to your organization can take a while. In the worst case, it can take up to 24 hours.
- Instance settings -> Resources -> Add OAuth "teams" and set the client id (Application ID / Bot ID from the previous steps), client secret, and tenant id (Directory ID).

GitHub
- Go to GitHub Developer Settings.
- Click "New OAuth App".
- Enter the following:
- Application Name: Windmill
- Homepage URL:
https://<YOUR_INSTANCE> - Authorization Callback URL:
https://<YOUR_INSTANCE>/oauth/callback/github
- Click "Register Application".
- Copy the Client ID and Client Secret from the application details.
- Instance settings -> Resources -> Add OAuth "github" and set the client id and client secret.
GitLab
- Go to your GitLab profile settings.
- Click "New Application".
- Enter the following:
- Name: Windmill
- Redirect URI:
https://<YOUR_INSTANCE>/oauth/callback/gitlab - Scopes: Choose appropriate scopes like
api,read_user, etc.
- Click "Save Application".
- Copy the Application ID and Secret from the application details.
- Instance settings -> Resources -> Add OAuth "gitlab" and set the client id and client secret.
Bitbucket
- Go to Bitbucket's App Creation page.
- Click "Create App Password".
- Enter the following:
- Label: Windmill
- Redirect URI:
https://<YOUR_INSTANCE>/oauth/callback/bitbucket - Select appropriate scopes.
- Copy the Client ID and Client Secret from the application details.
- Instance settings -> Resources -> Add OAuth "bitbucket" and set the client id and client secret.
Google Sheets
- Create a Google OAuth account by going to https://console.developers.google.com/apis/credentials and create a project if you did not have one.
- Click "Enable APIs and Services"
- Search "Google Sheets API"
- Enable this API
- Click "Create Credentials", then click "OAuth 2.0 Client IDs" in the drop-down menu.
- Enter the following:
- Application Type: Web Application
- Name: Windmill
- Authorized Redirect URLs:
https://<YOUR_INSTANCE>/oauth/callback/gsheets
- Click Create.
- Copy the Client ID and Client Secret from the "OAuth Client" modal.
- Instance settings -> Resources -> Add OAuth "gsheet" and set client id and client secret
The same steps apply to enable more APIs (Gmail, Gdrive, etc.) on your Google Account to set up the resources in Windmill.
Google Drive (GDrive)
- Follow the instructions for Google Sheets OAuth, but search for and enable Google Drive API in the API services.
- Add the same Authorized Redirect URLs:
https://<YOUR_INSTANCE>/oauth/callback/gdrive. - Use the created credentials in Windmill.
- Instance settings -> Resources -> Add OAuth "gdrive" and set the client id and client secret.
Gmail
- Follow the instructions for Google Sheets OAuth, but search for and enable Gmail API in the API services.
- Add the same Authorized Redirect URLs:
https://<YOUR_INSTANCE>/oauth/callback/gmail. - Use the created credentials in Windmill.
- Instance settings -> Resources -> Add OAuth "gmail" and set the client id and client secret.
Google Calendar (GCal)
- Follow the instructions for Google Sheets OAuth, but search for and enable Google Calendar API in the API services.
- Add the same Authorized Redirect URLs:
https://<YOUR_INSTANCE>/oauth/callback/gcal. - Use the created credentials in Windmill.
- Instance settings -> Resources -> Add OAuth "gcal" and set the client id and client secret.
Google Forms (GForms)
- Google Forms API may use Google Drive, so follow the Google Drive API OAuth instructions.
- Add the same Authorized Redirect URLs:
https://<YOUR_INSTANCE>/oauth/callback/gforms. - Use the created credentials in Windmill.
- Instance settings -> Resources -> Add OAuth "gforms" and set the client id and client secret.
Google Cloud (GCloud)
- Follow the instructions for Google Sheets OAuth, but search for and enable Google Cloud APIs in the API services.
- Add the same Authorized Redirect URLs:
https://<YOUR_INSTANCE>/oauth/callback/gcloud. - Use the created credentials in Windmill.
- Instance settings -> Resources -> Add OAuth "gcloud" and set the client id and client secret.
Google Workspace (GWorkspace)
- Follow the instructions for Google Sheets OAuth, but ensure you enable Admin SDK API in the API services.
- Add the same Authorized Redirect URLs:
https://<YOUR_INSTANCE>/oauth/callback/gworkspace. - Use the created credentials in Windmill.
- Instance settings -> Resources -> Add OAuth "gworkspace" and set the client id and client secret.
Basecamp
- Go to Basecamp's Developer Portal.
- Click "Register Your Application".
- Enter the following:
- Name: Windmill
- Redirect URI:
https://<YOUR_INSTANCE>/oauth/callback/basecamp
- Copy the Client ID and Client Secret from the application details.
- Instance settings -> Resources -> Add OAuth "basecamp" and set the client id and client secret.
LinkedIn
- Go to LinkedIn Developers.
- Click "Create App".
- Enter the following:
- App Name: Windmill
- Authorized Redirect URLs:
https://<YOUR_INSTANCE>/oauth/callback/linkedin
- Copy the Client ID and Client Secret.
- Instance settings -> Resources -> Add OAuth "linkedin" and set the client id and client secret.
QuickBooks
- Go to QuickBooks Developer.
- Click "Create an App".
- Enter the following:
- App Name: Windmill
- Redirect URL:
https://<YOUR_INSTANCE>/oauth/callback/quickbooks
- Copy the Client ID and Client Secret.
- Instance settings -> Resources -> Add OAuth "quickbooks" and set the client id and client secret.
Visma
- Go to Visma Developer Portal.
- Click "Create New Application".
- Enter the following:
- Name: Windmill
- Redirect URI:
https://<YOUR_INSTANCE>/oauth/callback/visma
- Copy the Client ID and Client Secret.
- Instance settings -> Resources -> Add OAuth "visma" and set the client id and client secret.
Snowflake
Go to Snowflake and open a new worksheet.
Edit and run the following query to create an OAuth integration:
CREATE OR REPLACE SECURITY INTEGRATION <enter a name for the OAuth integration>
TYPE = OAUTH
OAUTH_CLIENT = CUSTOM
OAUTH_CLIENT_TYPE = 'CONFIDENTIAL'
OAUTH_REDIRECT_URI = 'https://<public url of your Windmill instance>/oauth/callback/snowflake_oauth'
OAUTH_USE_SECONDARY_ROLES = IMPLICIT
ENABLED = TRUE
COMMENT = '<enter a description of your security integration>'
Retrieve the client_id and client_secret from the following query:
-- NOTE: replace <OAuth integration name> with the name of the OAuth integration you created above.
WITH oauth_data AS (
  SELECT PARSE_JSON(SYSTEM$SHOW_OAUTH_CLIENT_SECRETS('<OAuth integration name>')) AS oauth_json
)
SELECT
    oauth_json:OAUTH_CLIENT_ID::string AS client_id,
    oauth_json:OAUTH_CLIENT_SECRET::string AS client_secret
FROM
    oauth_data;
Retrieve your snowflake account identifier from the URL of your snowflake account or from your account settings. You can also retrieve the account identifier by running this query:
SELECT CURRENT_ORGANIZATION_NAME() || '-' || CURRENT_ACCOUNT_NAME() AS org_account_formatted;
Instance settings -> Resources -> Add OAuth "snowflake_oauth" and set the client id, client secret and account identifier.
Take a look at this guide to learn more about how to build an App with the Snowflake OAuth integration.
Azure OAuth
Go to your Azure AAD App registrations and create a new registration.
Select a name set the rediredct url to: https://<YOUR WINDMILL BASE URL>/oauth/callback/azure_oauth and application type to "Web".
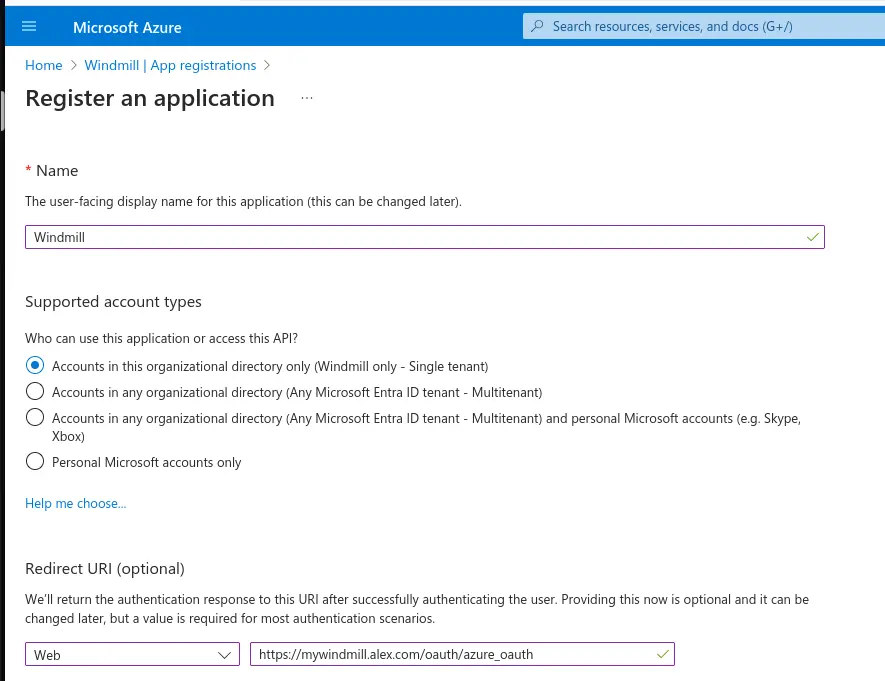
Next in "Certificates and secrets" create a new client secret and copy the Secret Value as this is the client secret you'll set later in the Windmill OAuth settings (the Secret ID is not required).
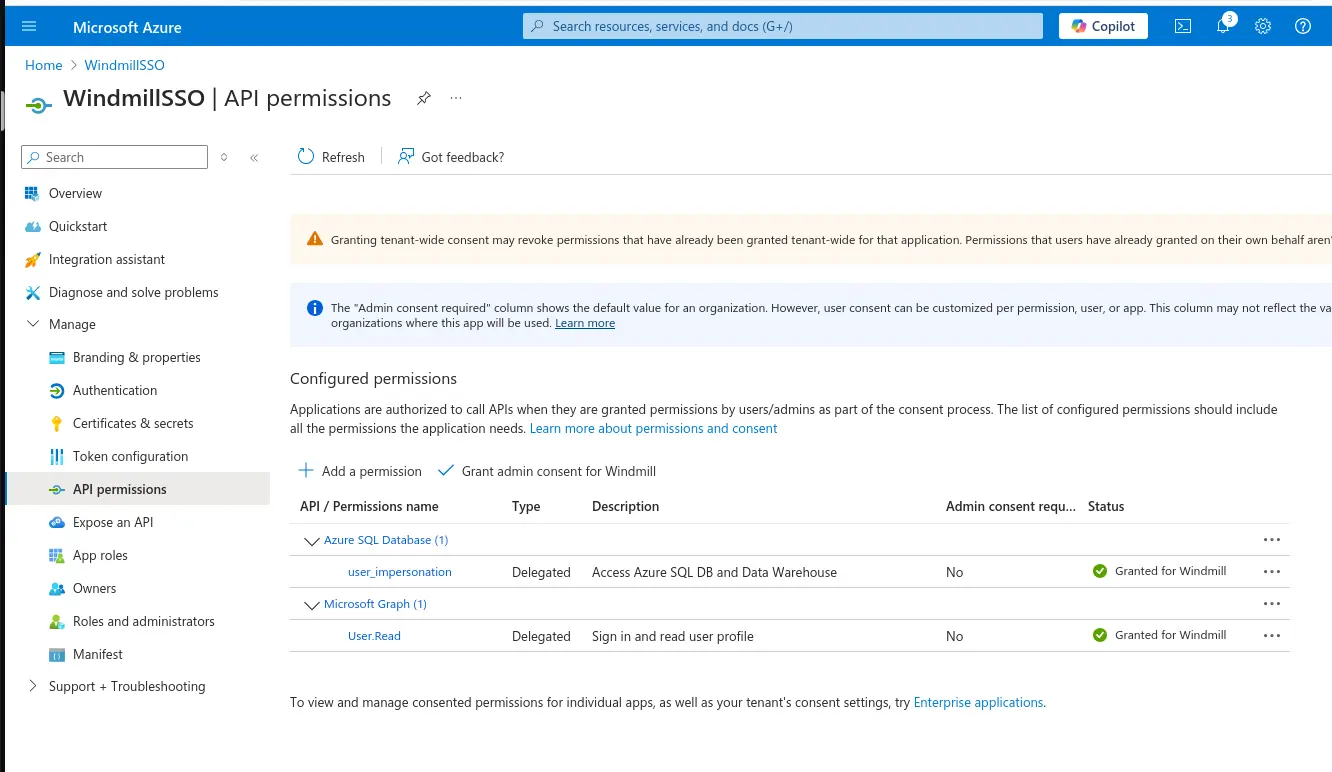
Then under "API permissions" you have to select the appropriate permissions that the OAuth application shall be able to access:
Example MSSQL:
- select "Add a permission"
- Type "Delegated"
- select "Azure SQL Database" -> "user_impersonation"
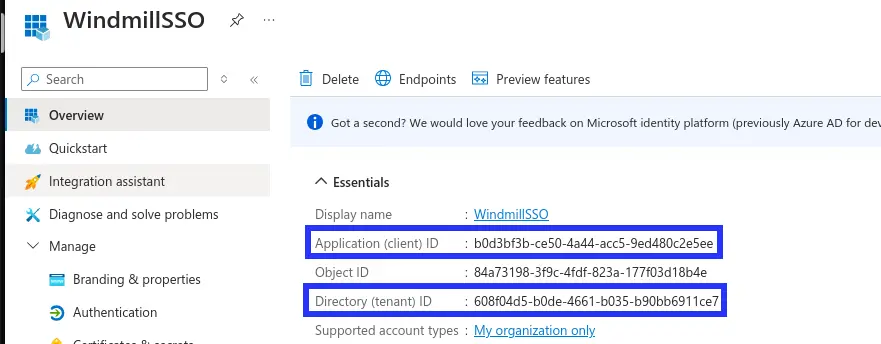
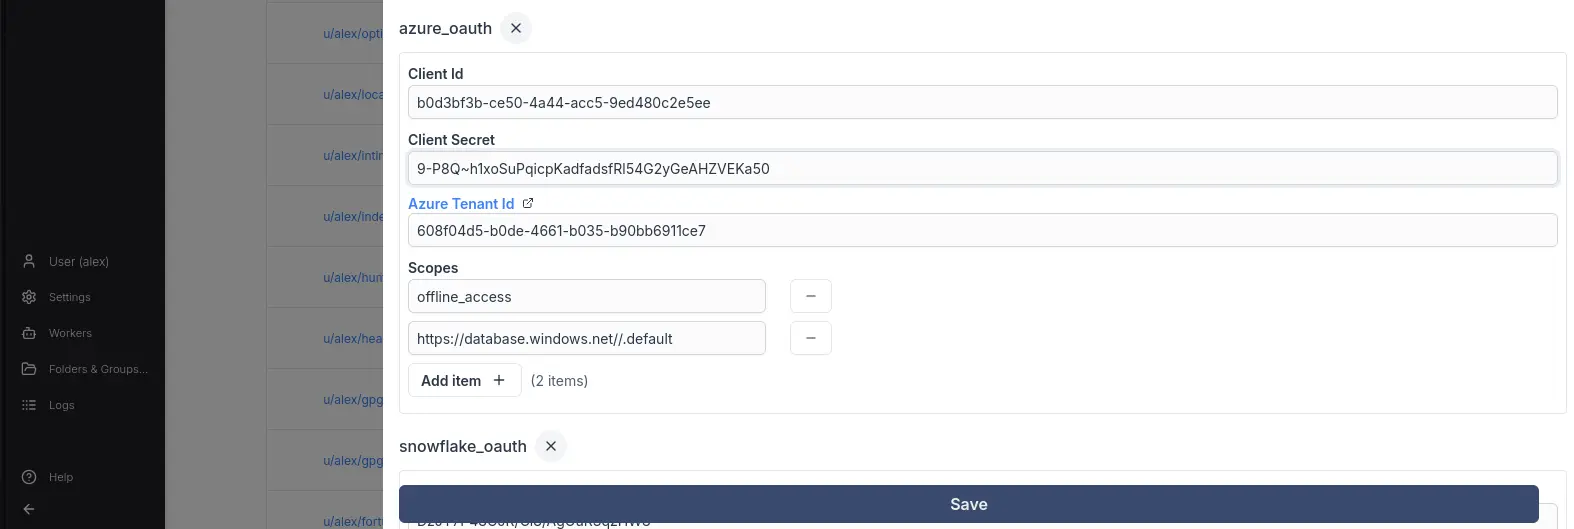
Next create a new OAuth client in the Windmill instance settings and fill in
- the "Client ID" corresponding to the "Application (client) ID" in Azure "Overview" menu item
- the "Client Secret" corresponding to the Secret Value from client secret you created earlier
- the "Tenant ID" from the "Overview" menu item
Now depending on which application you're trying to use you, you will need to as extra "scopes" such as https://database.windows.net//.default for MS SQL Server.
Custom OAuth
Under Enterprise Edition, you can add a completely custom OAuth without requiring a dev setup. The item accepts an extra optional field: connect_config or login_config of type OAuthConfig:
interface OAuthConfig {
    auth_url: string,
    token_url: string,
    userinfo_url?: string,
    scopes?: string[],
    extra_params?: Record<string, string>,
    extra_params_callback?: Record<string, string>,
    req_body_auth?: bool
}
connect_config is used for resources, and login_config for SSO.
Once you have validated your custom item, we would be grateful if you could open a PR. See Contributor's guide for more details.