Workers and worker groups
Workers are autonomous processes that run one script at a time using the entire cpu and memory available to them. They are at the basis of Windmill's architecture as run the jobs. The number of workers can be horizontally scaled up or down depending on needs without any overhead. Each worker on Windmill can run up to 26 million jobs a month, where each job lasts approximately 100ms.
Workers pull jobs from the queue of jobs in the order of their
scheduled_for datetime as long as it is in the past. As soon as a worker pulls
a job, it atomically sets its state to "running", runs it, streams its logs then
once it is finished, the final result and logs are stored for as long as the retention period allows. Logs are optionally stored to S3.
By default, every worker is the same and interchangeable. However, there are often needs to assign jobs to a specific worker pool, and to configure this worker pool to behave specifically or have different pre-installed binaries. To that end, we introduce the concept of "worker groups".
You can assign groups to flows and flow steps to be executed on specific queues. The name of those queues are called tags. Worker groups listen to those tags.
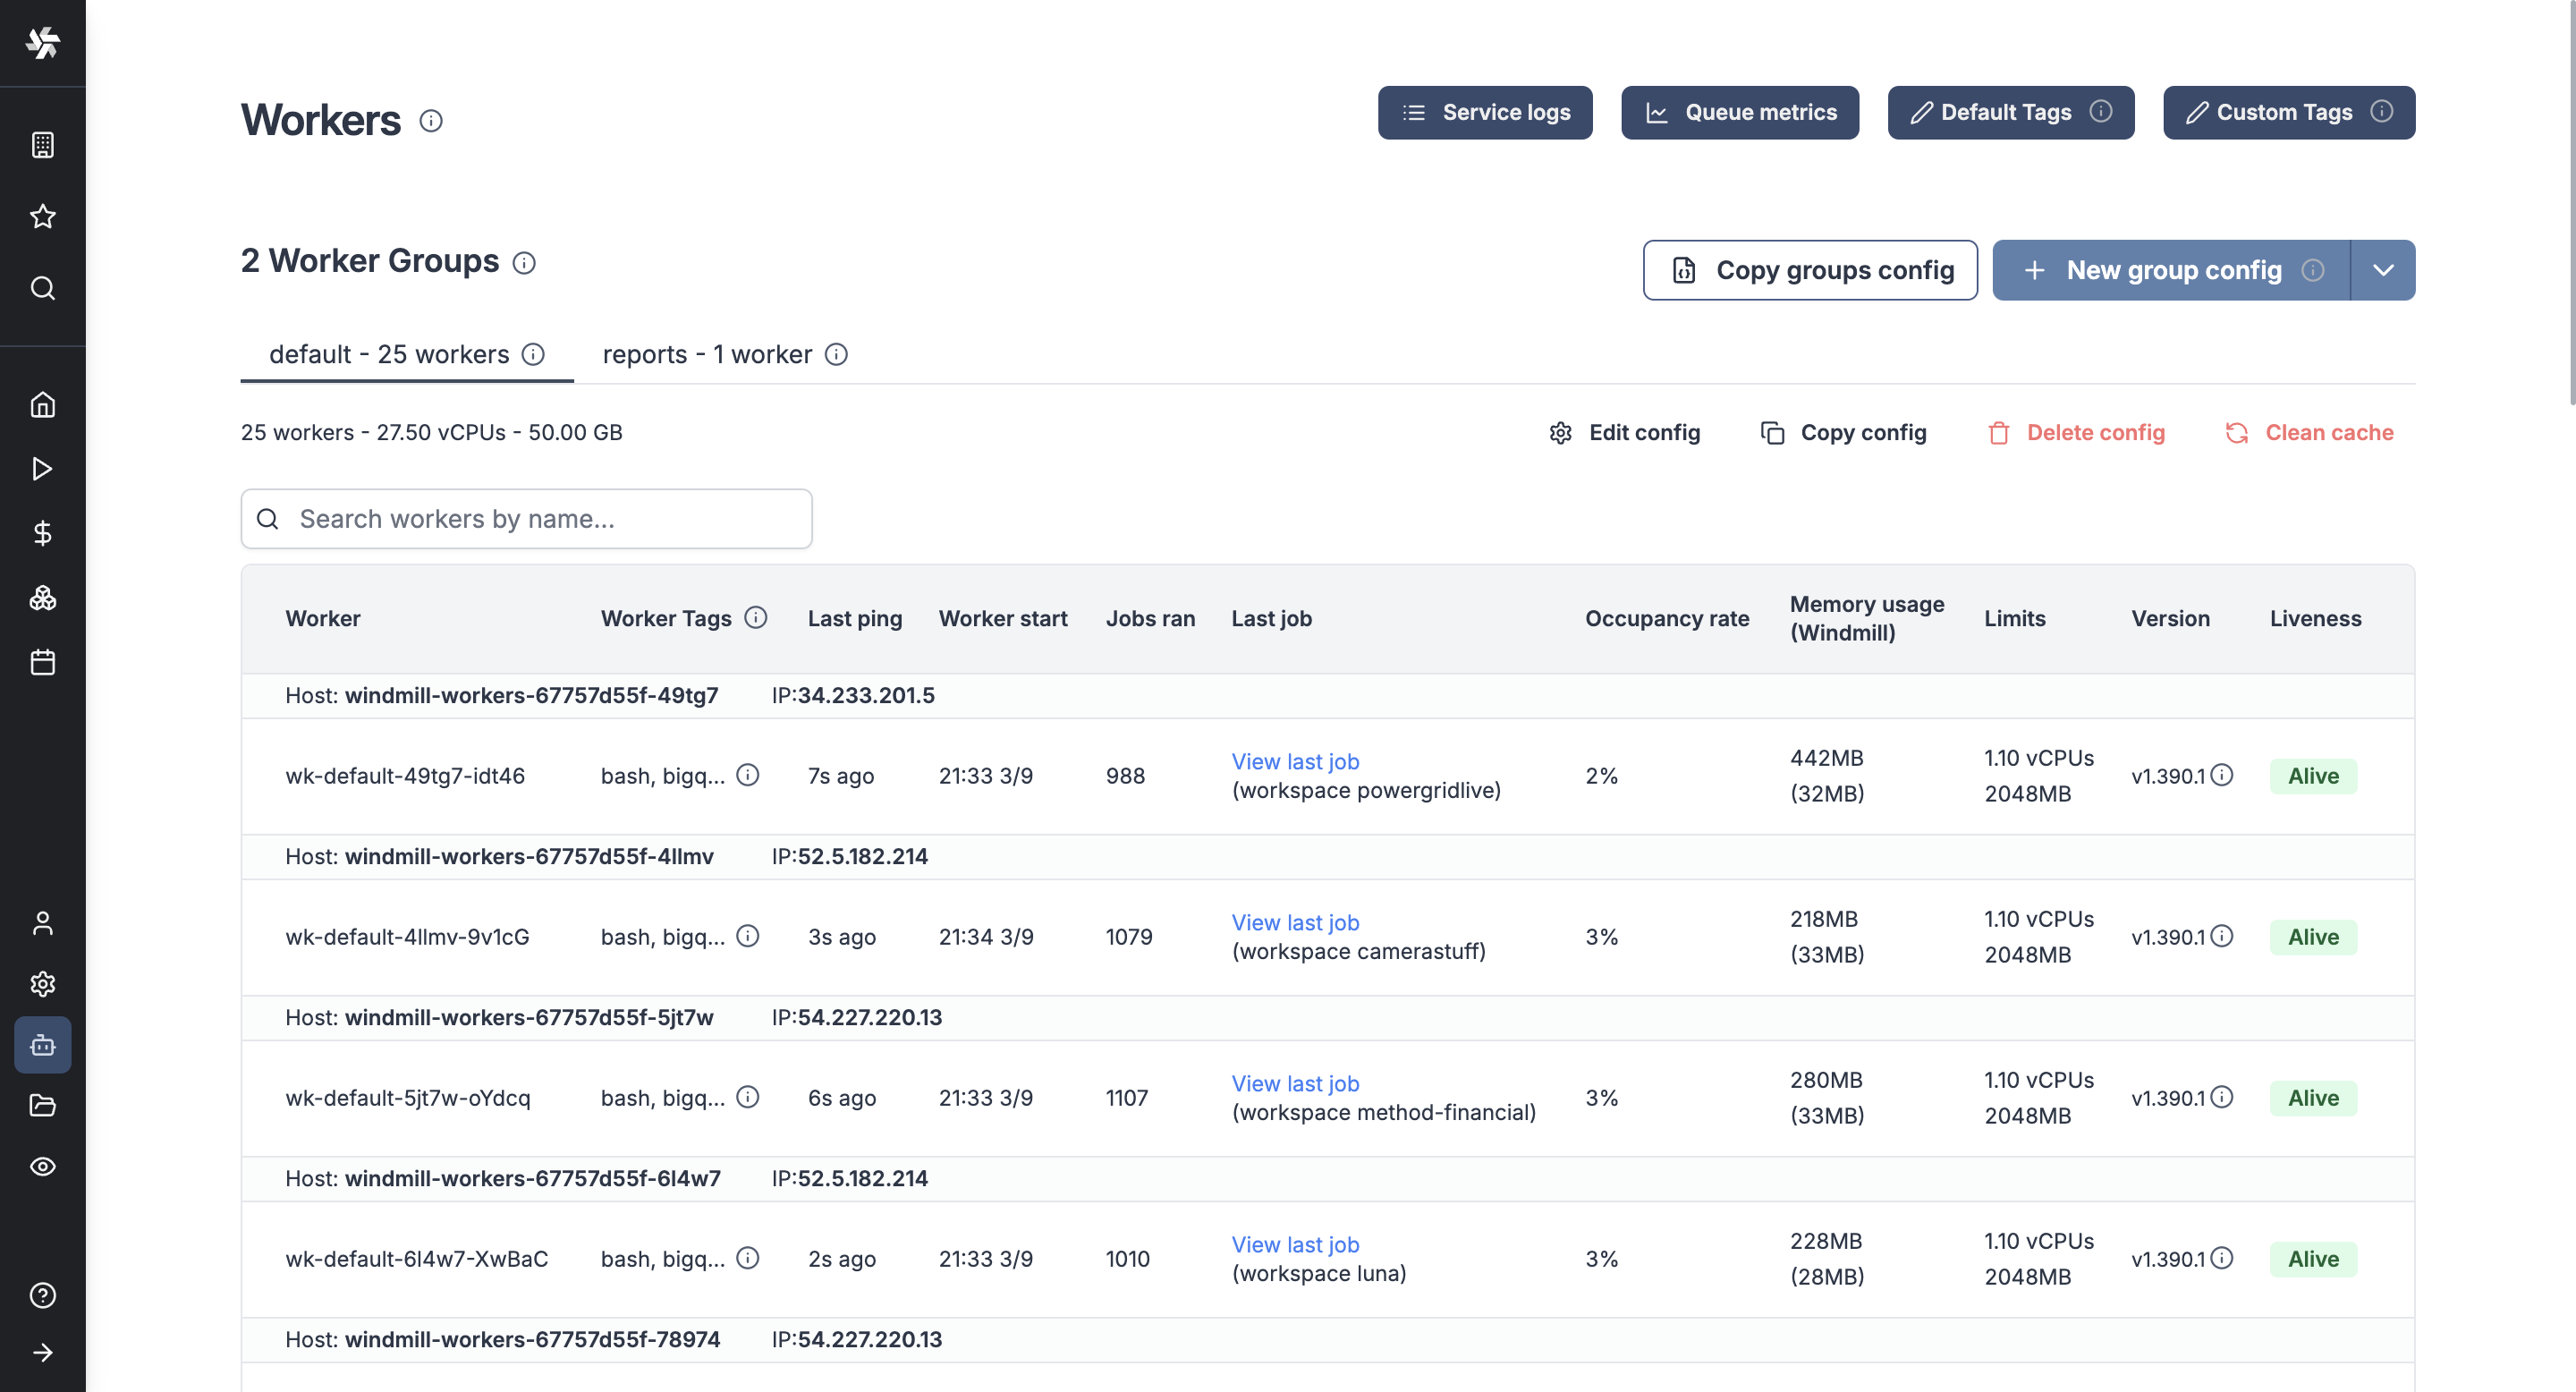
In the Community Edition, worker management is done using tags that can be respectively assigned to workers (through the env variable WORKER_TAGS) and scripts or flows, so that the workers listen to specific jobs queues.
In the Cloud plans & Self-Hosted Enterprise Edition, workers can be commonly managed based on the group they are in, from the UI. Specifically, you can group the workers into worker groups, groups for which you can manage the tags they listen to, assignment to a single script, or the worker init scripts, from the UI.
Examples of configurations include:
- Assign different jobs to specific worker groups by giving them tags.
- Set an init or periodic script that will run at the start of the workers or periodically (e.g. to pre-install binaries).
- Dedicate your worker to a specific script or flow for high throughput.
Assign custom worker groups
Assign custom worker groups to scripts and flows in Windmill for efficient execution on different machines with varying specifications.
This feature is useful if you want to run some scripts on a GPU machine, or if you want to run some scripts on high-memory machine.
How to have a worker join a worker group
Create a worker group in your docker-compose.yml and simply pass the worker group as the env variable WORKER_GROUP=<name_of_worker_group> for it to automatically join its corresponding worker group.
Windmill's responsibility is not to spawn the worker itself but to play well with existing service orchestrator such as Kubernetes, ECS, Nomad or Docker Compose, and any IaC. In those, you define the number of replicas (which can be auto-scaled up or down), the resource to allocate to those workers and the WORKER_GROUP passed as env.
Upon start, those workers will automatically join their worker group and fetch their configurations (including init scripts). They will also listen for changes on the worker group configuration for hot reloading.
Here is an example of a worker group specification in docker-compose:
windmill_worker_highmem:
  image: ghcr.io/windmill-labs/windmill-ee:main
  pull_policy: always
  deploy:
    replicas: 2
    resources:
      limits:
        cpus: '1'
        memory: 4096M
  restart: unless-stopped
  environment:
    - DATABASE_URL=${DATABASE_URL}
    - MODE=worker
    - WORKER_GROUP=highmem
Assign replicas, resource constraints, and that's it, the worker will automatically join the worker group on start and be displayed on the Workers page in the Windmill app!
Worker only require a database URL and can thus be spawned in separate VPCs if needed (as long as there is a tunnel to the database). There is also an agent mode for situations where workers are running in an untrusted environment.
Set tags to assign specific queues
You can assign groups to flows and flow steps to be executed on specific queues. The name of those queues are called tags. Worker groups listen to those tags.
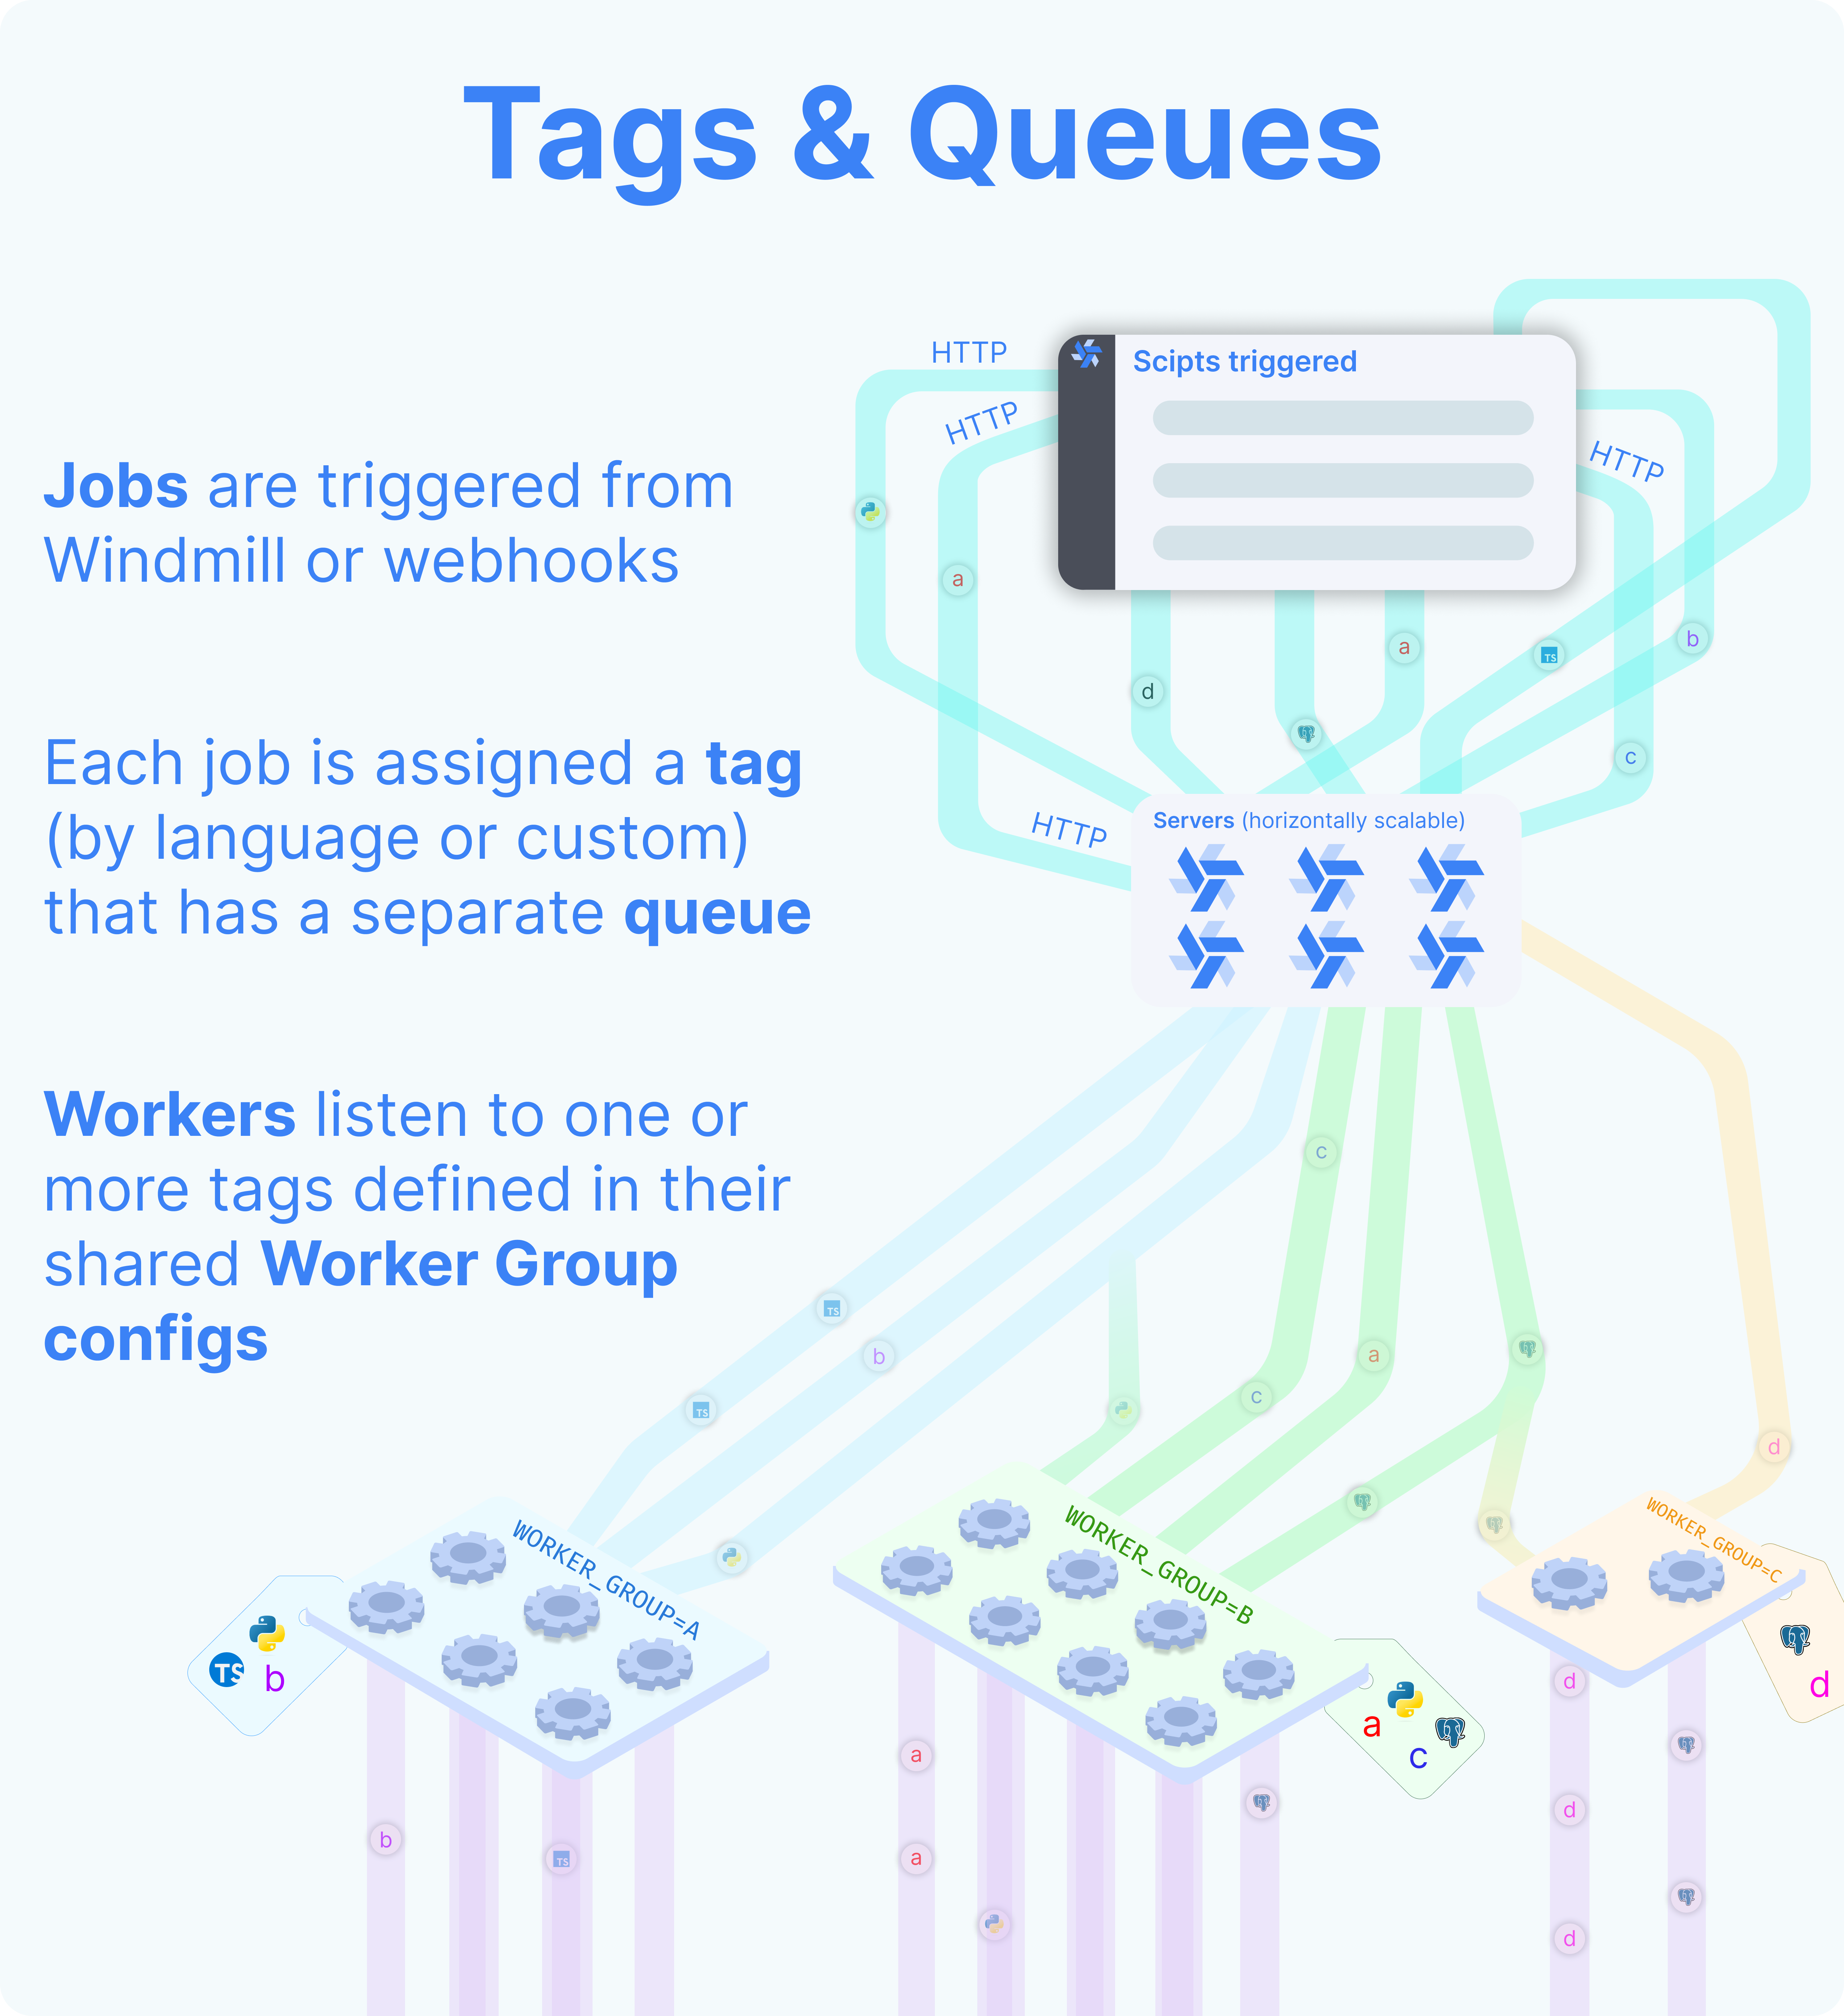
There are 2 worker groups by default: default and native.
Default worker group
The tags of default worker group are:
deno: The default worker group for Deno scripts.python3: The default worker group for Python scripts.go: The default worker group for Go scripts.bash: The default worker group for Bash scripts.powershell: The default worker group for Powershell scripts.dependency: Where dependency jobs are run.flow: The default worker group for executing flows modules outside of the script steps.hub: The default worker group for executing Hub scripts.bun: The default worker group for Bun scripts.php: The default worker group for PHP scripts.rust: The default worker group for Rust scripts.ansible: The default worker group for Ansible scripts.csharp: The default worker group for C# scripts.java: The default worker group for Java scripts.nu: The default worker group for Nu scripts.ruby: The default worker group for Ruby scripts.duckdb: The default worker group for DuckDB scripts.other: Everything else (other than the native tags).
Native worker group
Native workers are workers within the native worker group. This group is pre-configured to listen to native jobs tags. Those jobs are executed under a special mode with subworkers for increased throughput.
You can set the number of native workers to 0. Just make sure that you assign the native tags to other worker groups. Otherwise, the jobs with those tags will never be executed.
The tags of native worker group are:
nativets: The default worker group for Rest scripts.postgresql: The default worker group for PostgreSQL scripts.mysql: The default worker group for MySQL scripts.mssql: The default worker group for MS SQL scripts.graphql: The default worker group for Graphql scripts.snowflake: The default worker group for Snowflake scripts.bigquery: The default worker group for Bigquery scripts.oracledb: The default worker group for OracleDB scripts.
If you assign custom worker groups to all your workers, make sure that they cover all tags above, otherwise those jobs will never be executed.
Button Reset to native tags will reset the tags of native worker group to a given worker group.
Button Reset to all tags will reset the tags of default and native worker group to a given worker group.
Button Reset to all tags minus native ones will reset the tags of default worker group to a given worker group.
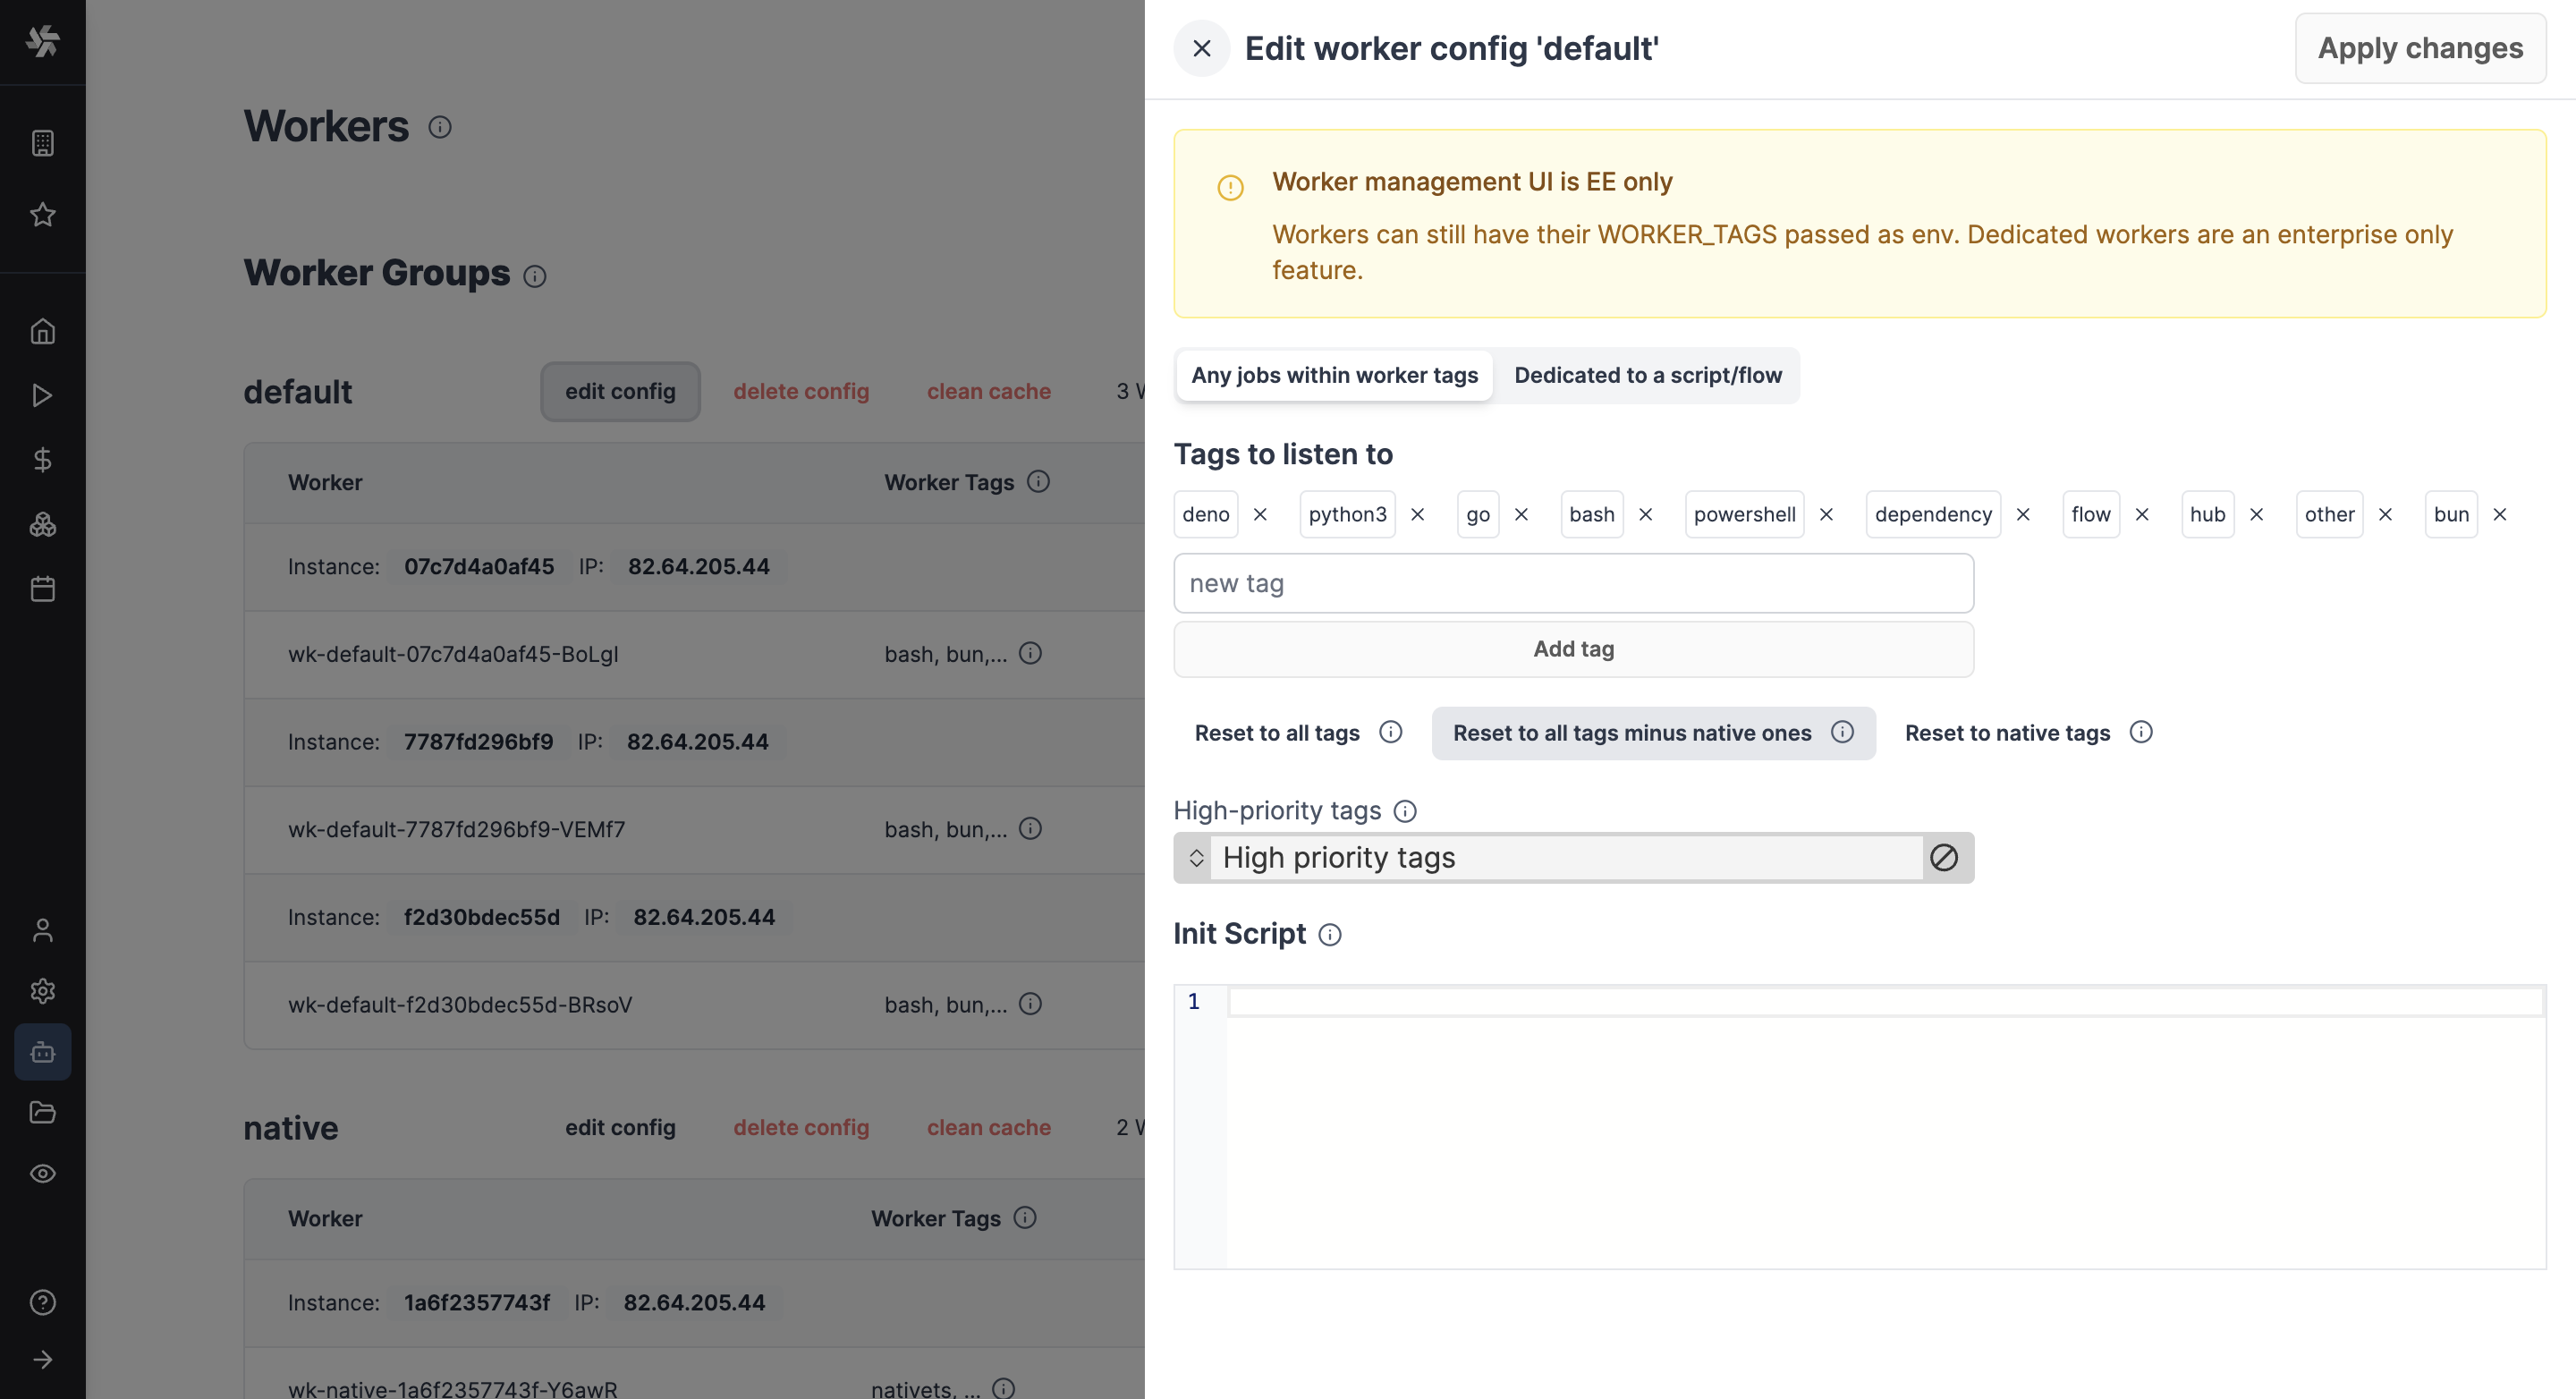
To make custom tags available from the UI, go to the dedicated "Workers" tab on the workspace and click on the "Assignable Tags" button:
Restrict tags to specific workspaces
It is possible to restrict some tags to specific workspace using the following syntax:
gpu(workspace+workspace2)
Only 'workspace' and 'workspace2' will be able to use the gpu tags.
Jobs within a same job queue can be given a priority between 1 and 100. Jobs with a higher priority value will be given precedence over jobs with a lower priority value in the job queue.
How to assign worker tags to a worker group
Use the edit/create config next to the worker group name in Windmill UI:
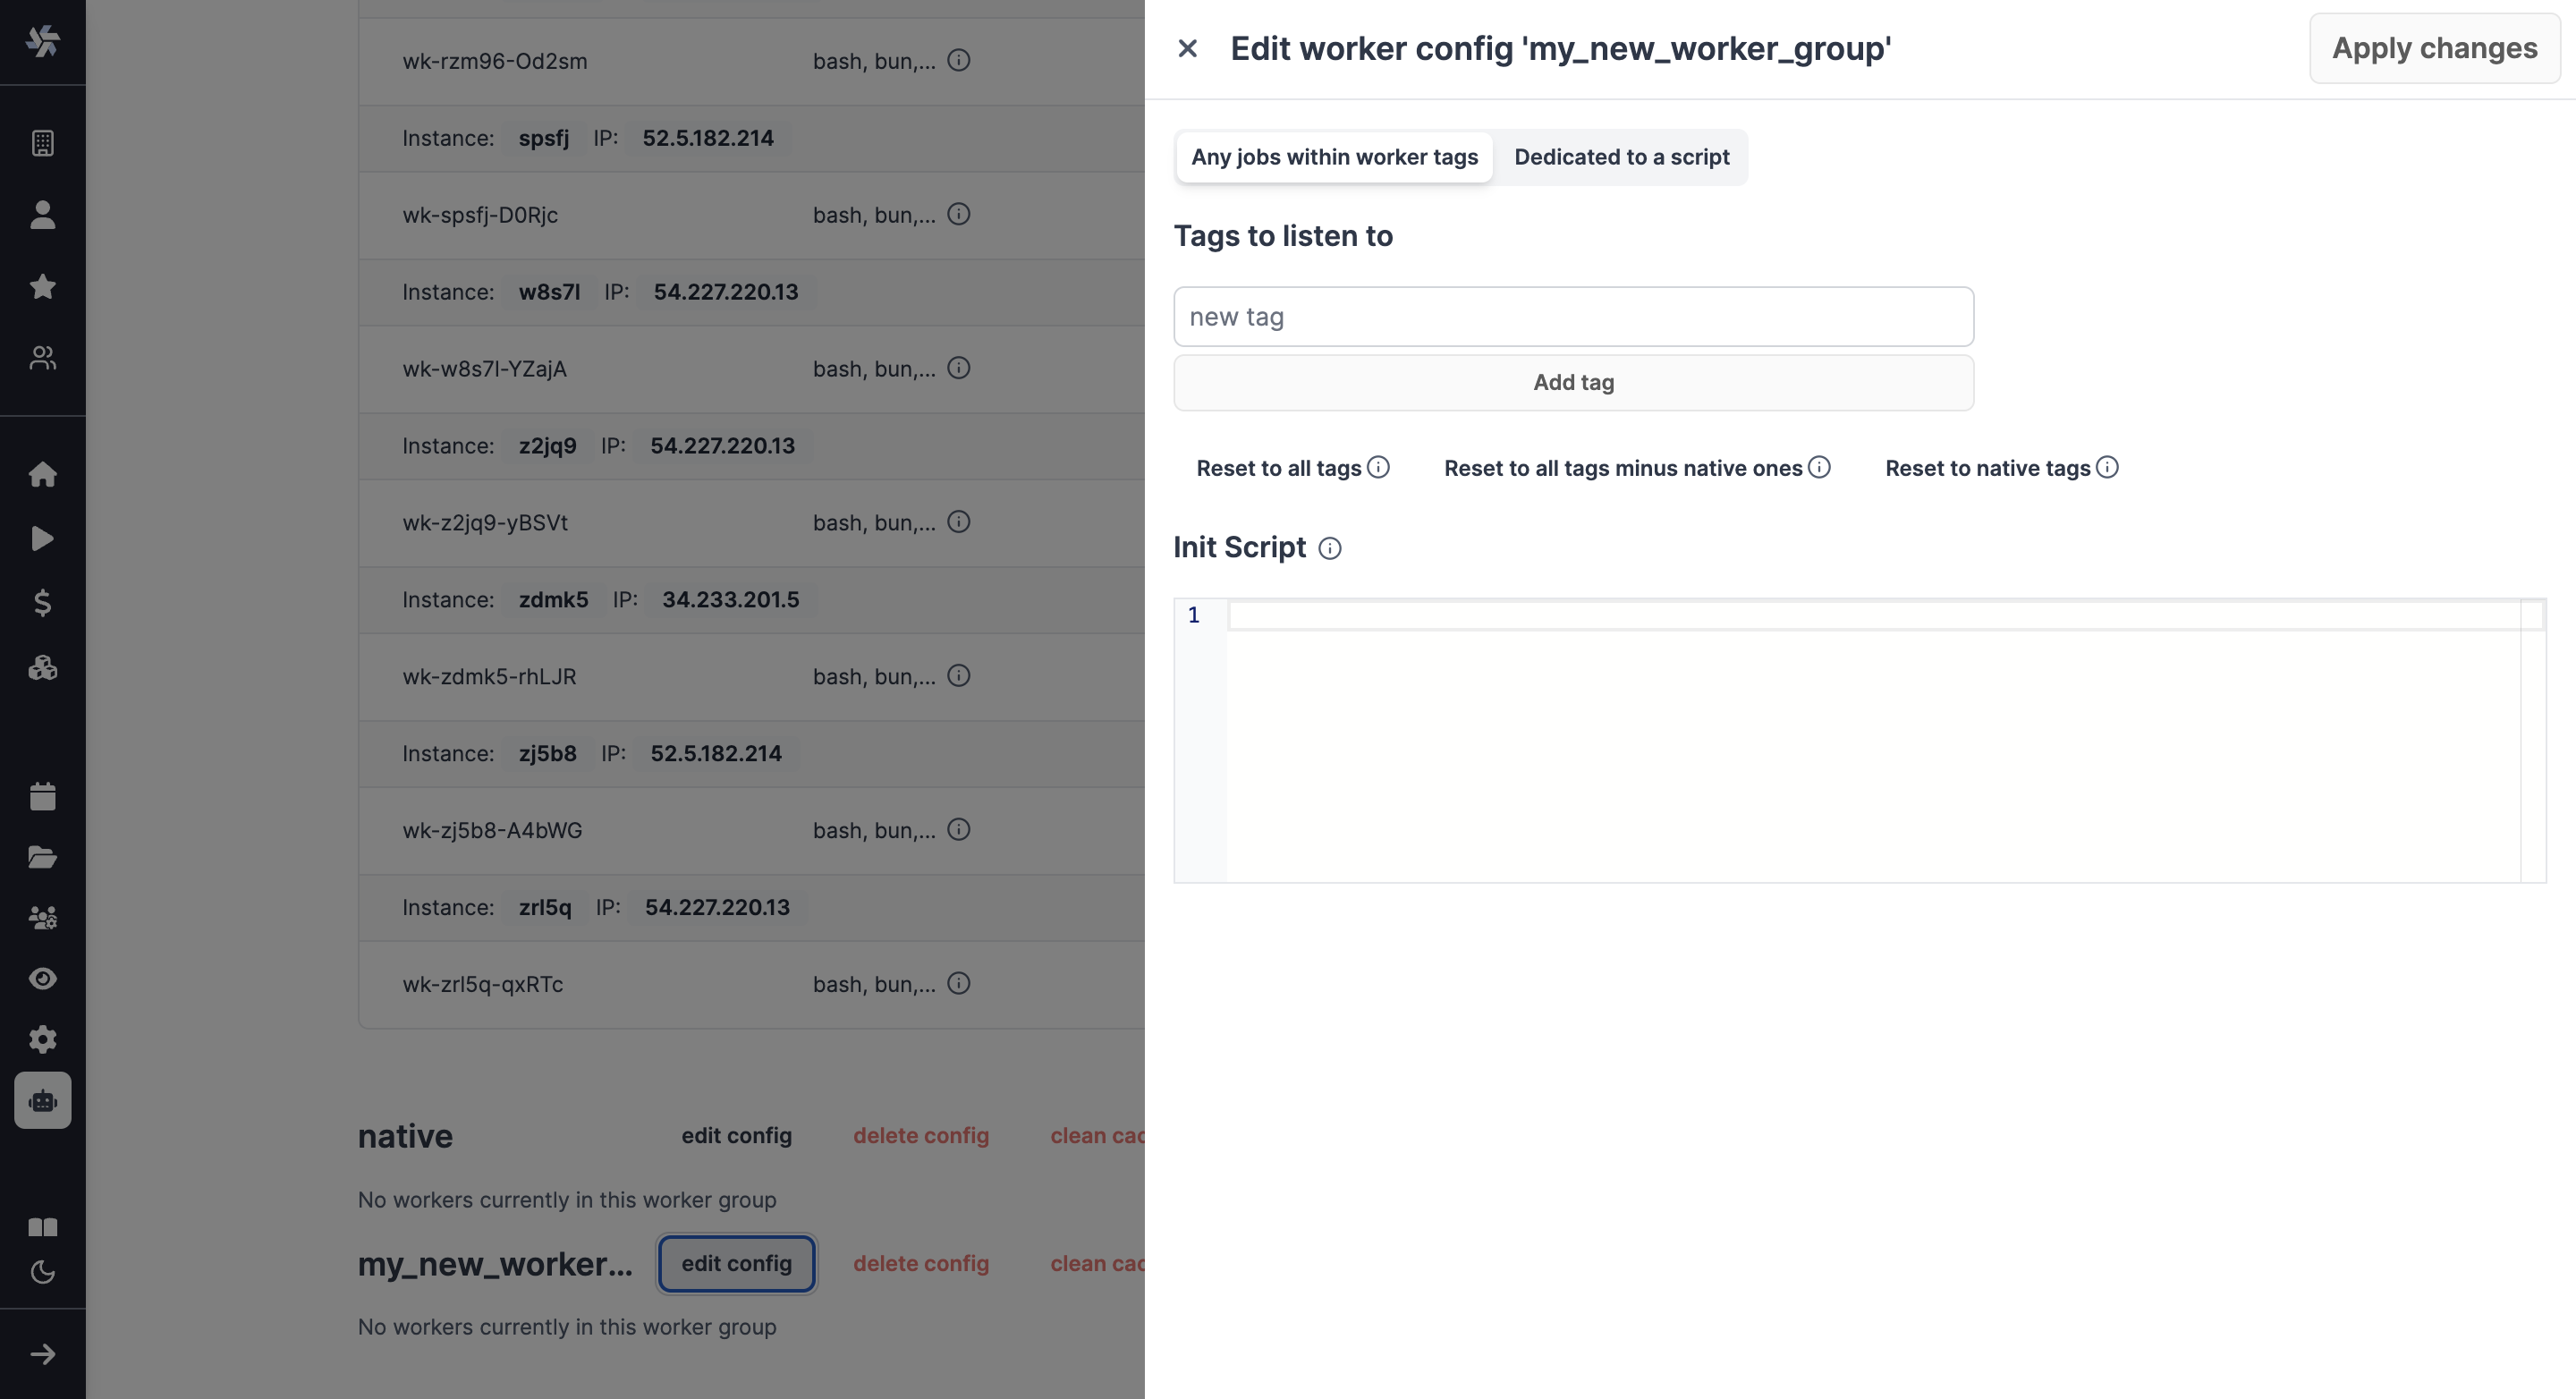
Note: The worker group management UI is a Cloud plans & Self-Hosted Enterprise Edition feature. It is still possible to use worker groups with the community edition by passing to each worker the env variable WORKER_TAGS:
WORKER_TAGS=tag1,tag2
How to assign a custom worker group to a script or flow
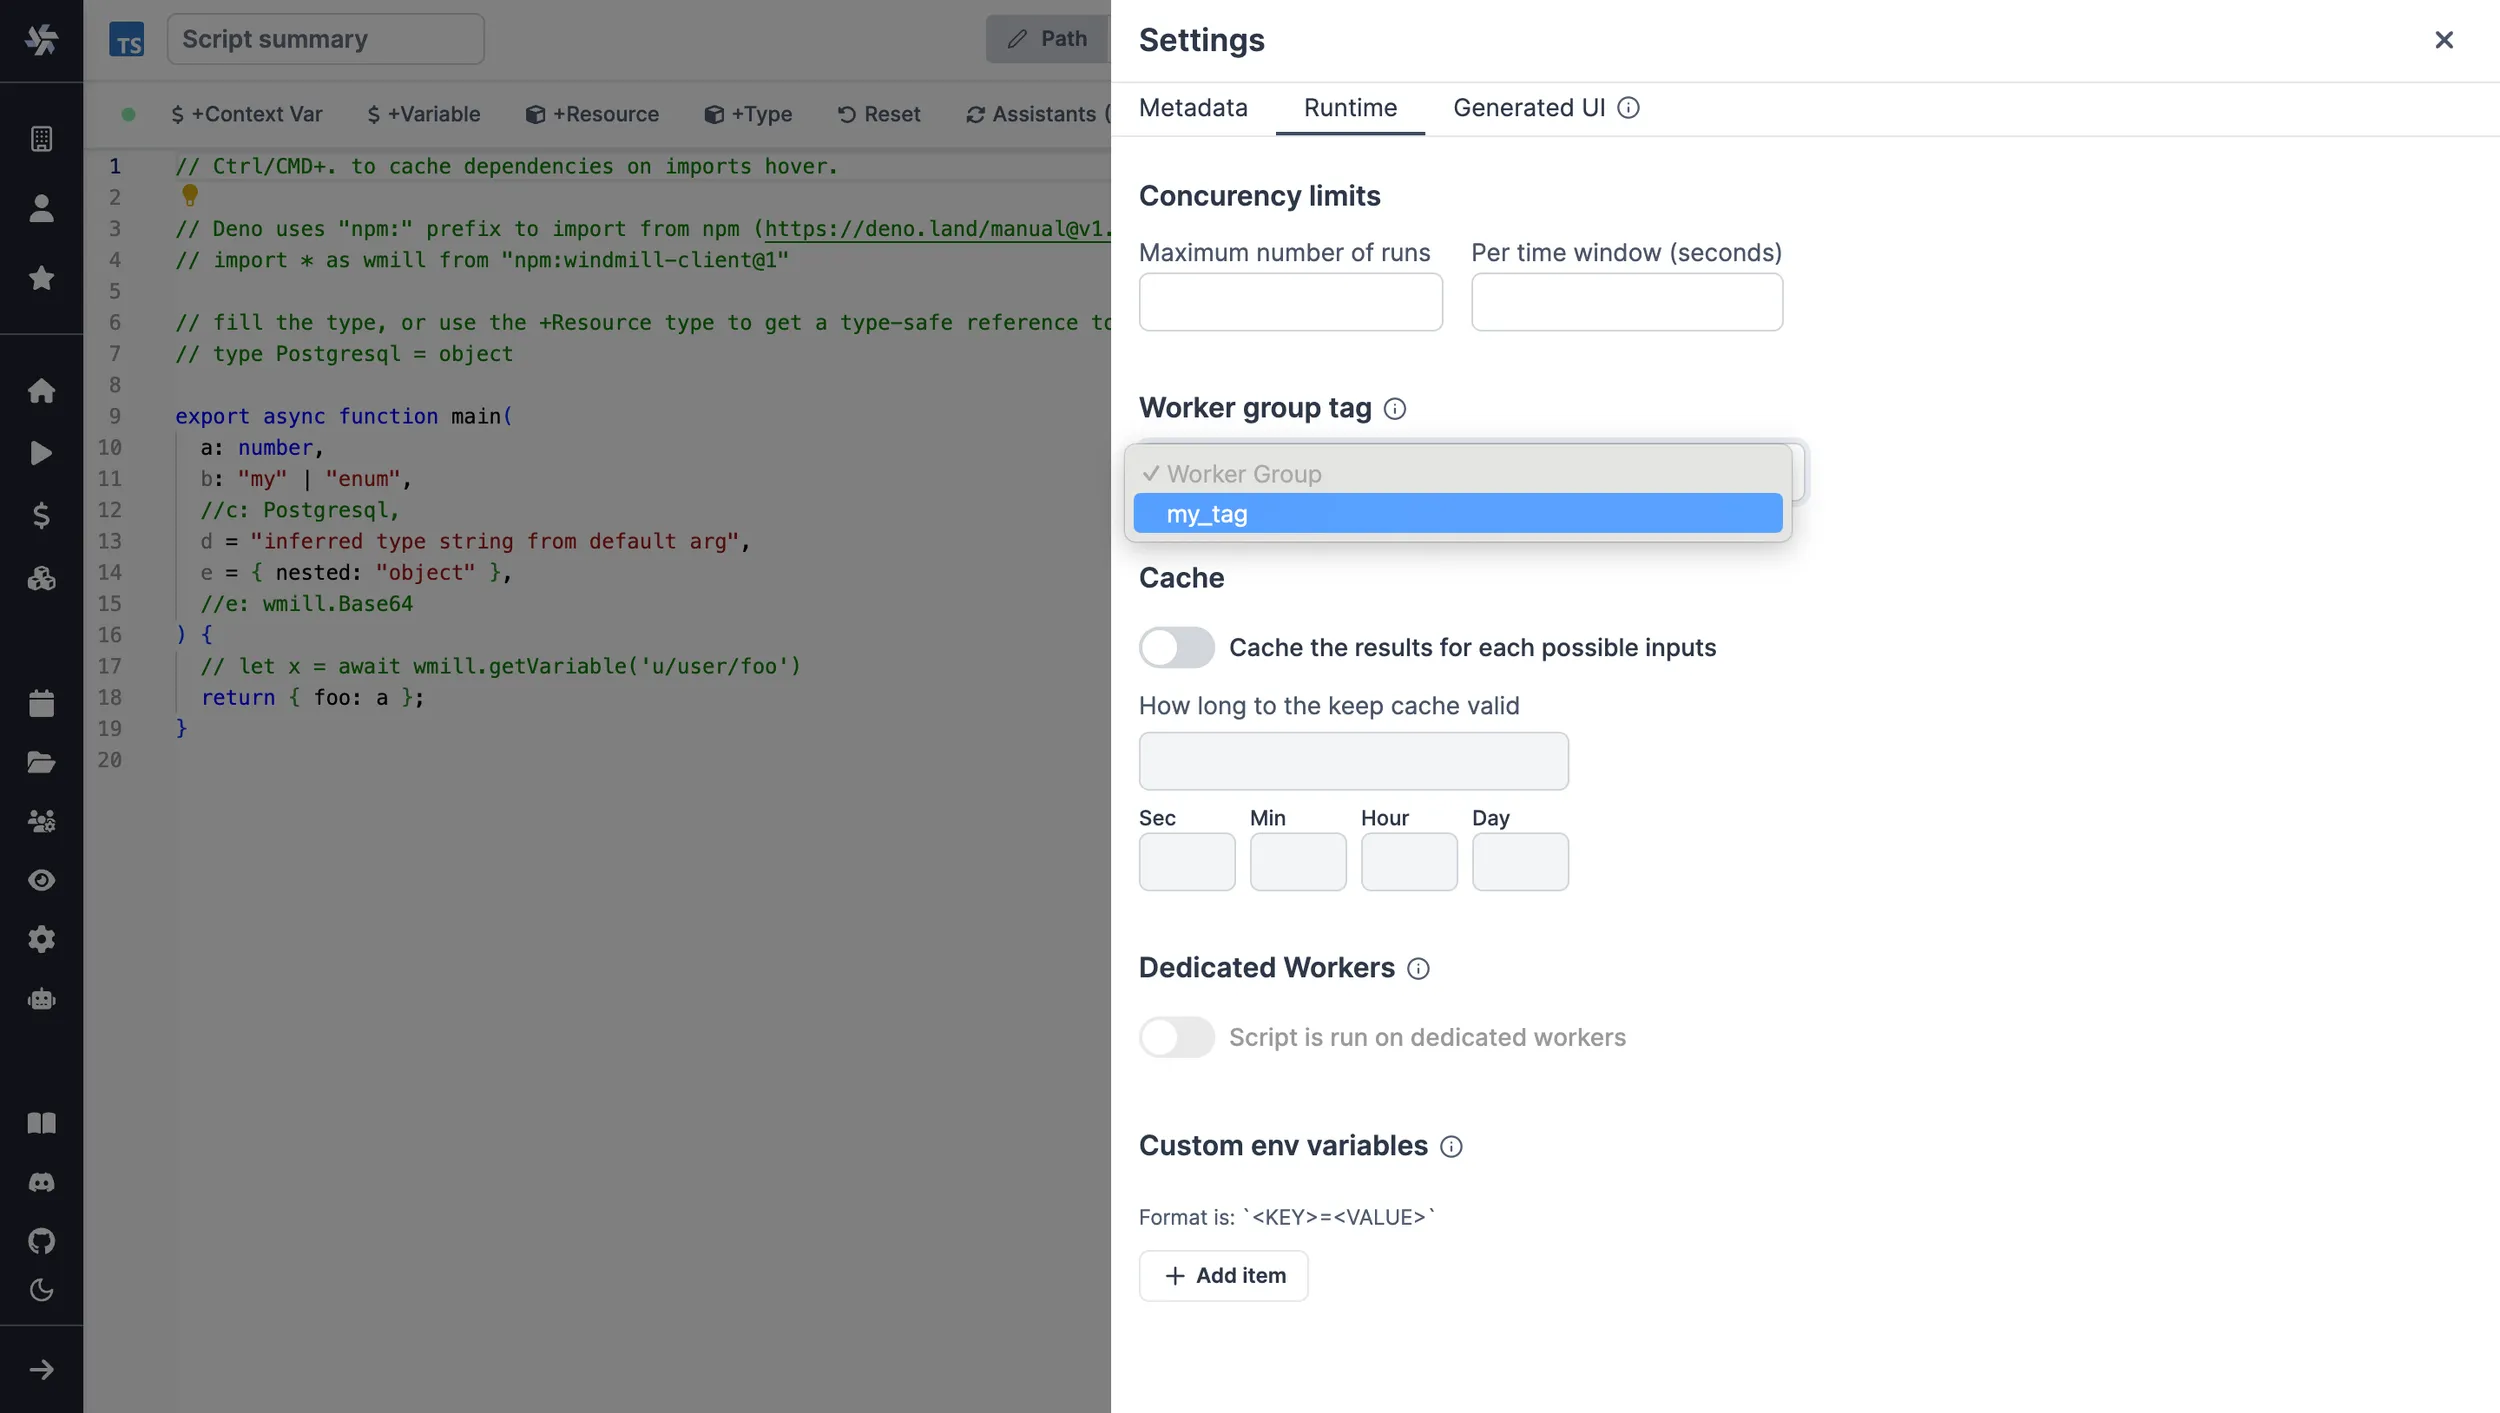
For scripts deployed on the script editor, select the corresponding worker group tag in the settings section.
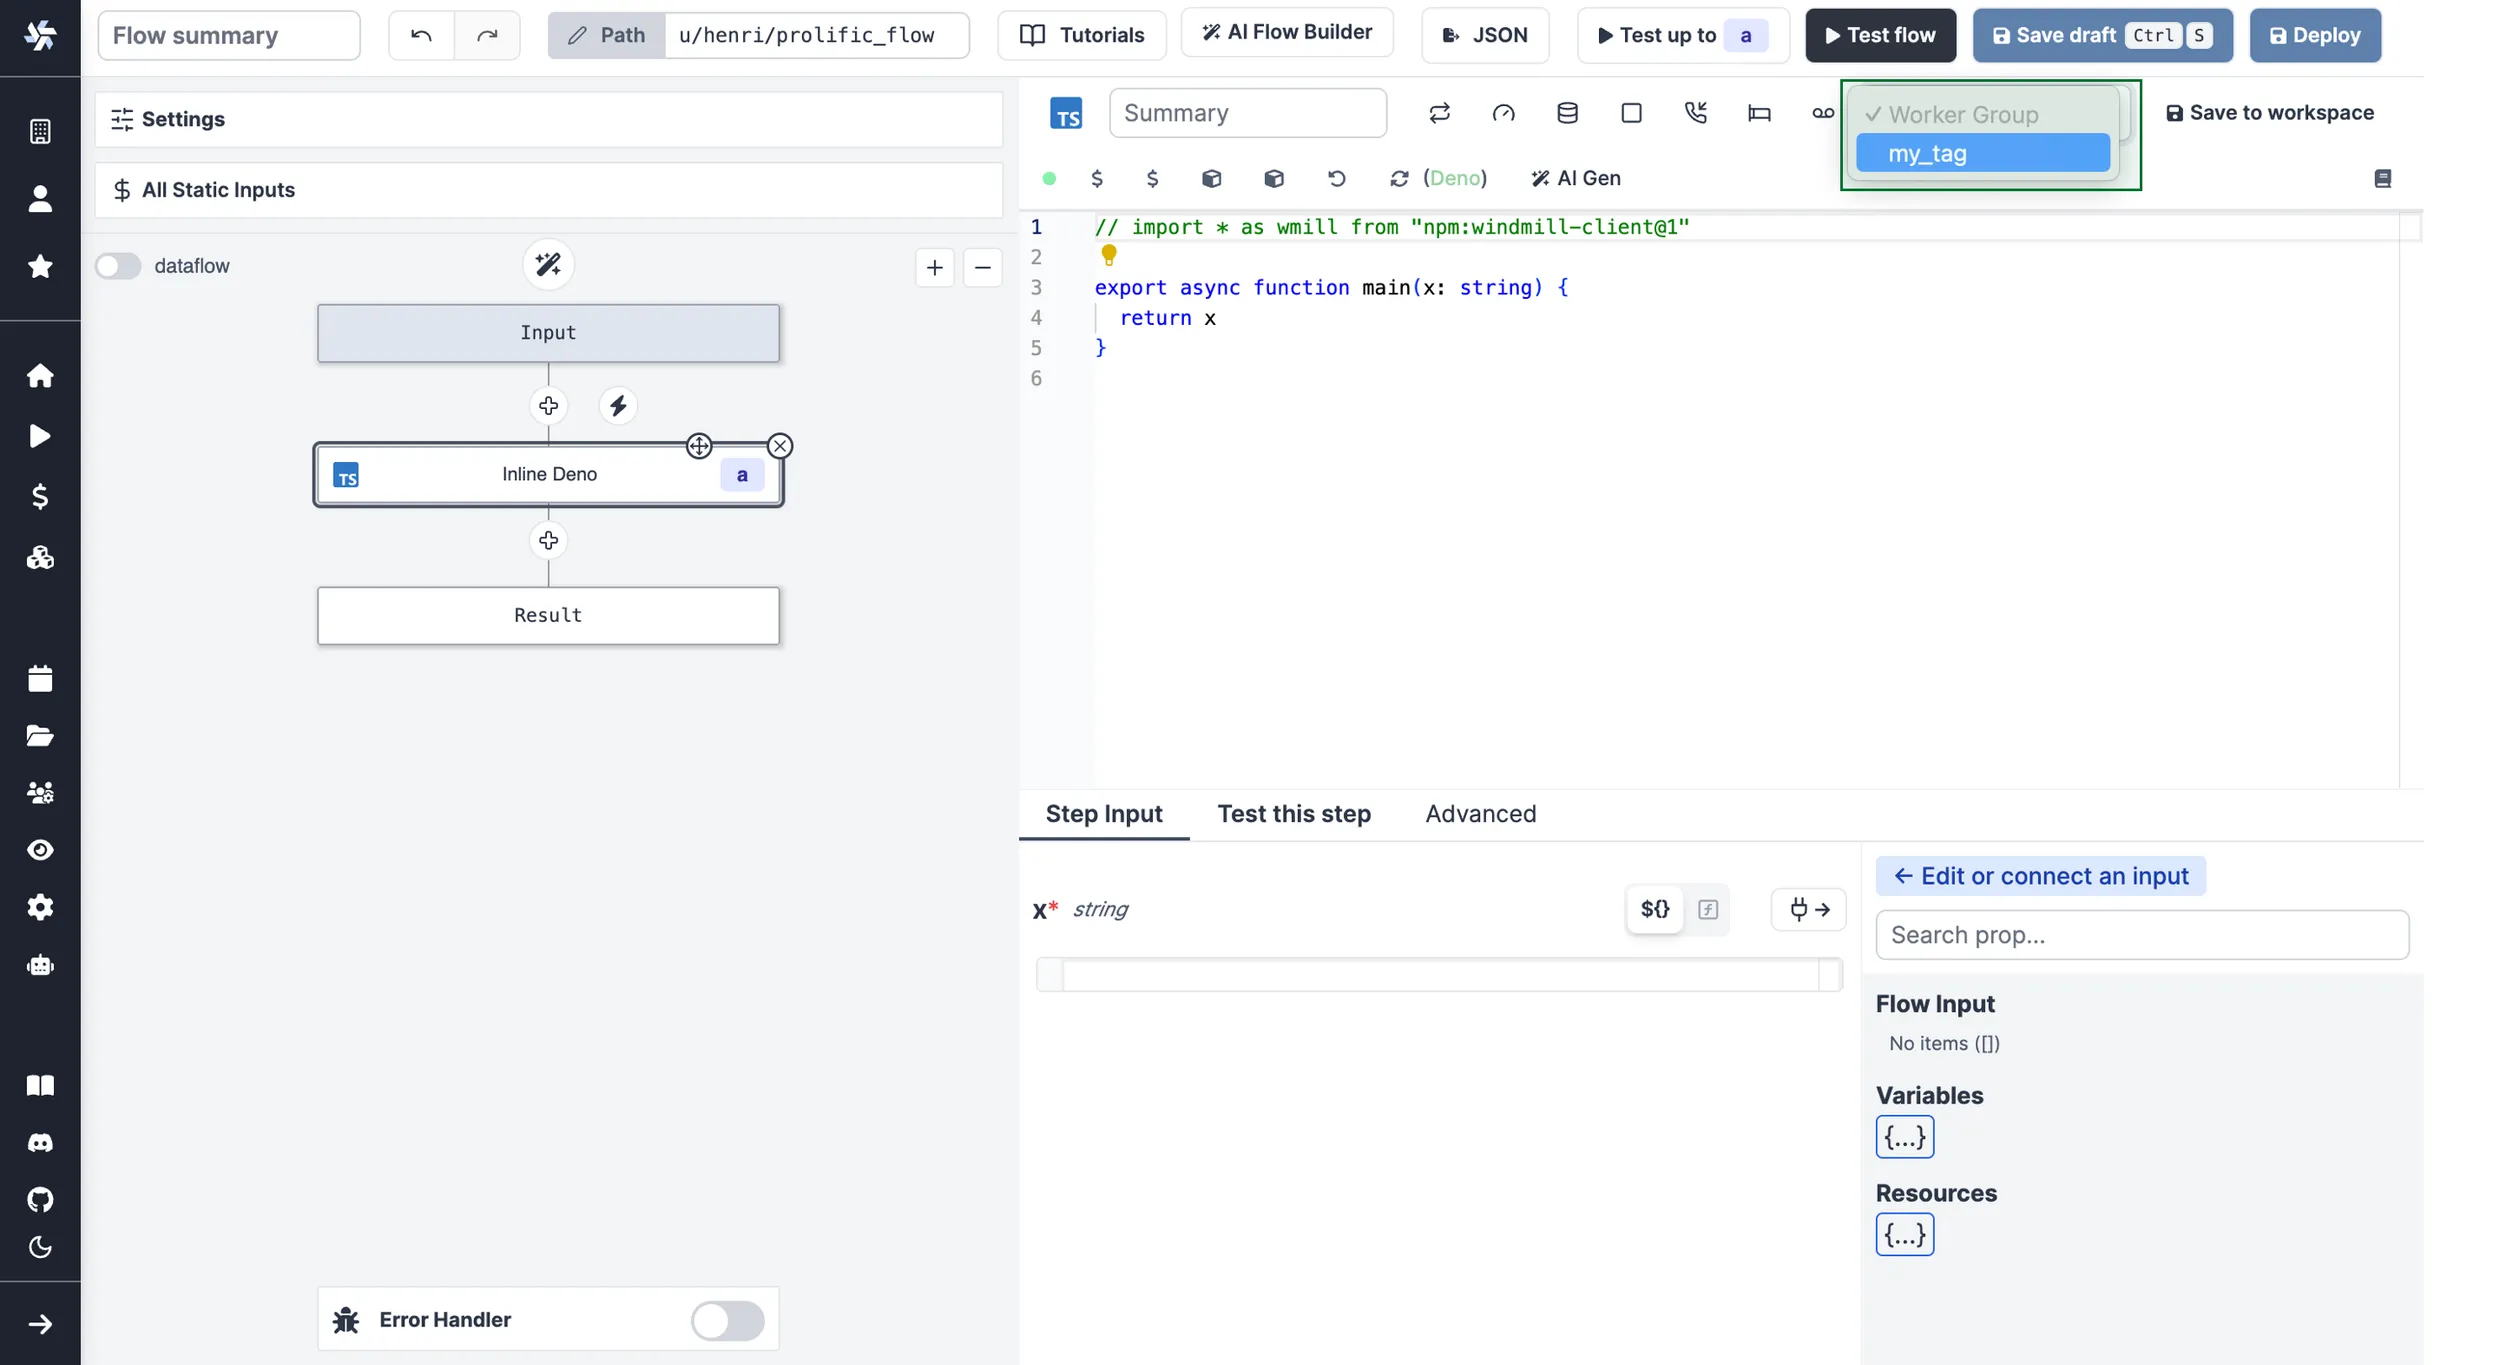
For scripts inlined in the flow editor, select it in the module header:
If no worker group is assigned to a script, it will be assigned the default worker group for its language.
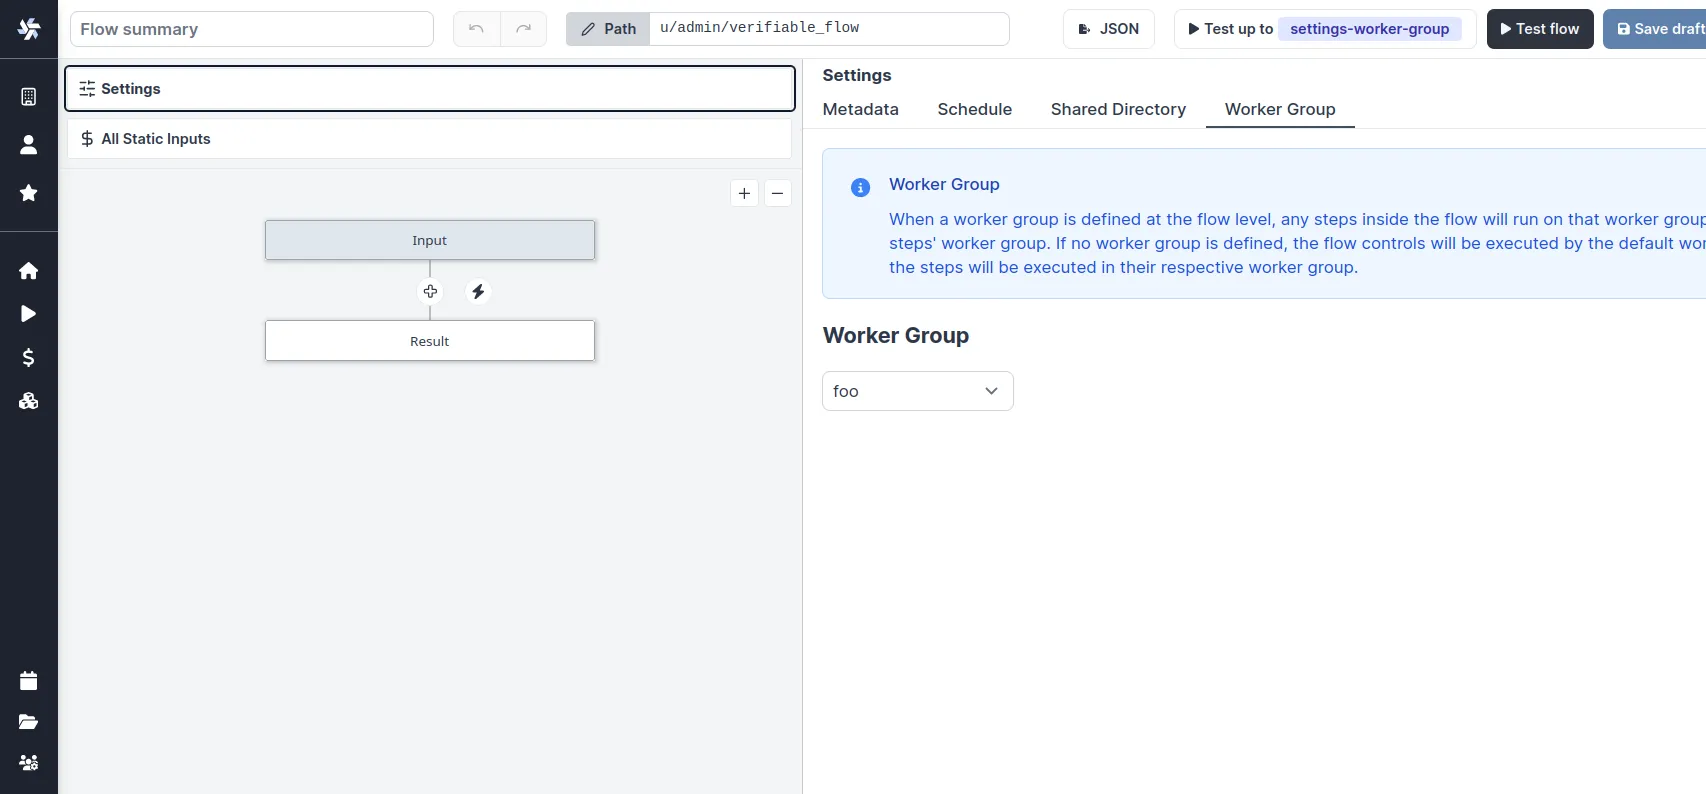
You can assign a worker group to an entire flow in the flow's settings:
Dynamic tag
If a workspace tag contains the substring $workspace, it will be replaced by the workspace id corresponding to the job. This is especially useful to have the same script deployed to different workspace and have them run on different workers.
With the following assignable tag:
normal-$workspace
the workspaces, dev, staging, prod and the worker groups: normal-dev, normal-staging, normal-prod. The same script wih the tag normal-$workspace will run on the corresponding worker group depending on the workspace it is deployed to. This enable to share the same control plane but use workers with different network restrictions for tighter security.
Last, if the tags contain $args[argName] (e.g: foo-$args[foobar]) then the tag will be replaced by the string value at the arg key argName and thus can be fully dynamic.
See Deploy to staging prod to see a full UI flow to deploy to staging and prod.
Alerts
You can set an alert to receive notification via Email, Slack, or Microsoft Teams when the number of running workers in a group falls below a given number. It's available in the worker group config.
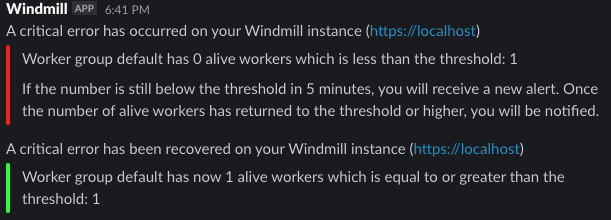
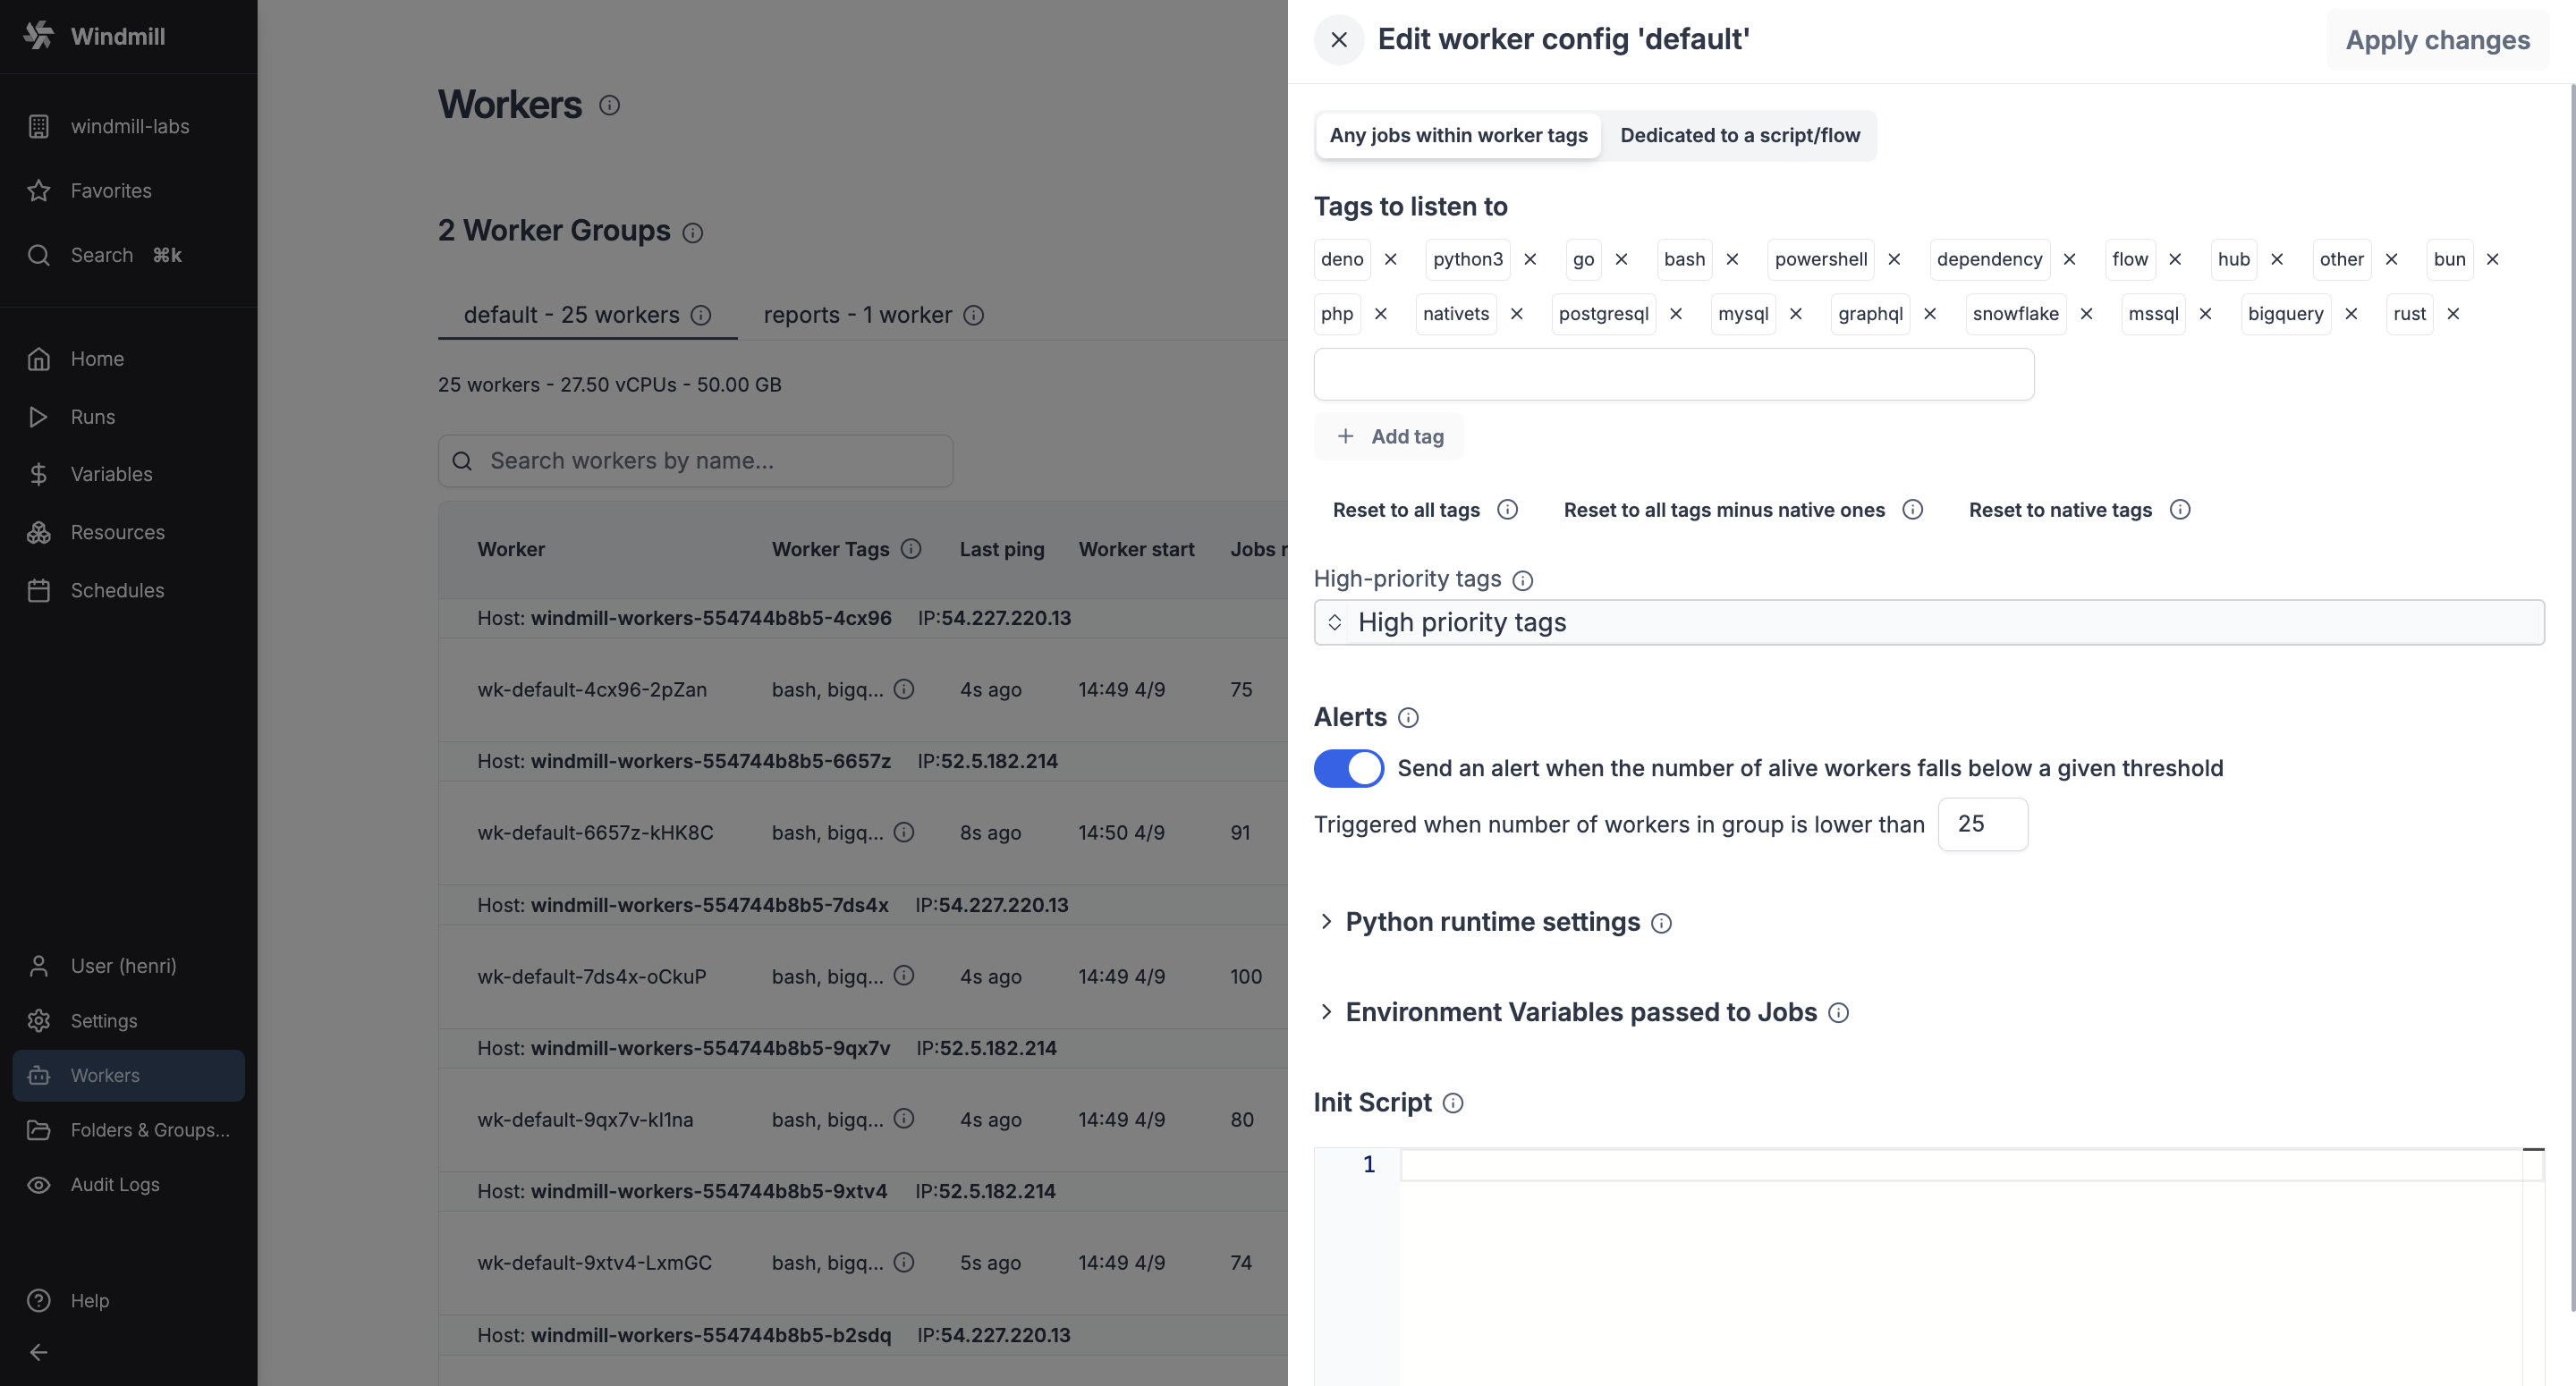
Enable 'Send an alert when the number of alive workers falls below a given threshold', and enter a number of workers below which the notification will be sent.
You need to configure Critical alert channels to receive notifications.
Create worker group config
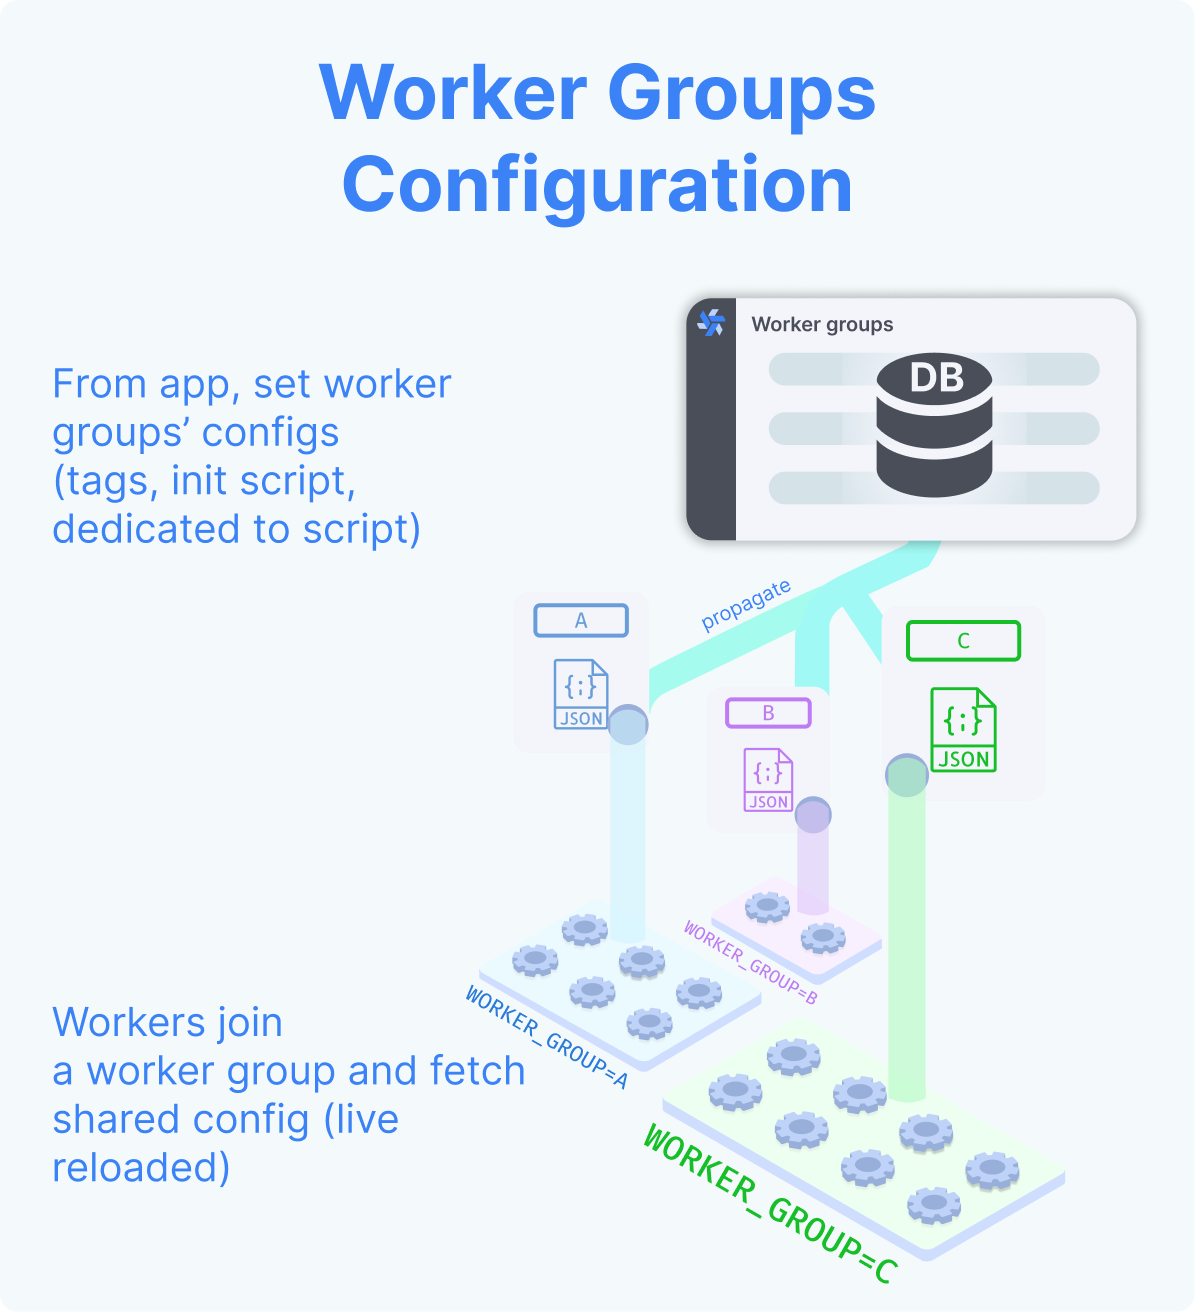
In the Cloud plans & Self-Hosted Enterprise Edition, workers can be commonly managed based on the group they are in, from the UI. Specifically, you can group the workers into worker groups, groups for which you can manage the tags they listen to (queue), assignment to a single script, or the worker init scripts, from the UI.
In Community Edition Workers can still have their WORKER_TAGS passed as env.
Pick "New worker group config" and just write the name of your worker group.
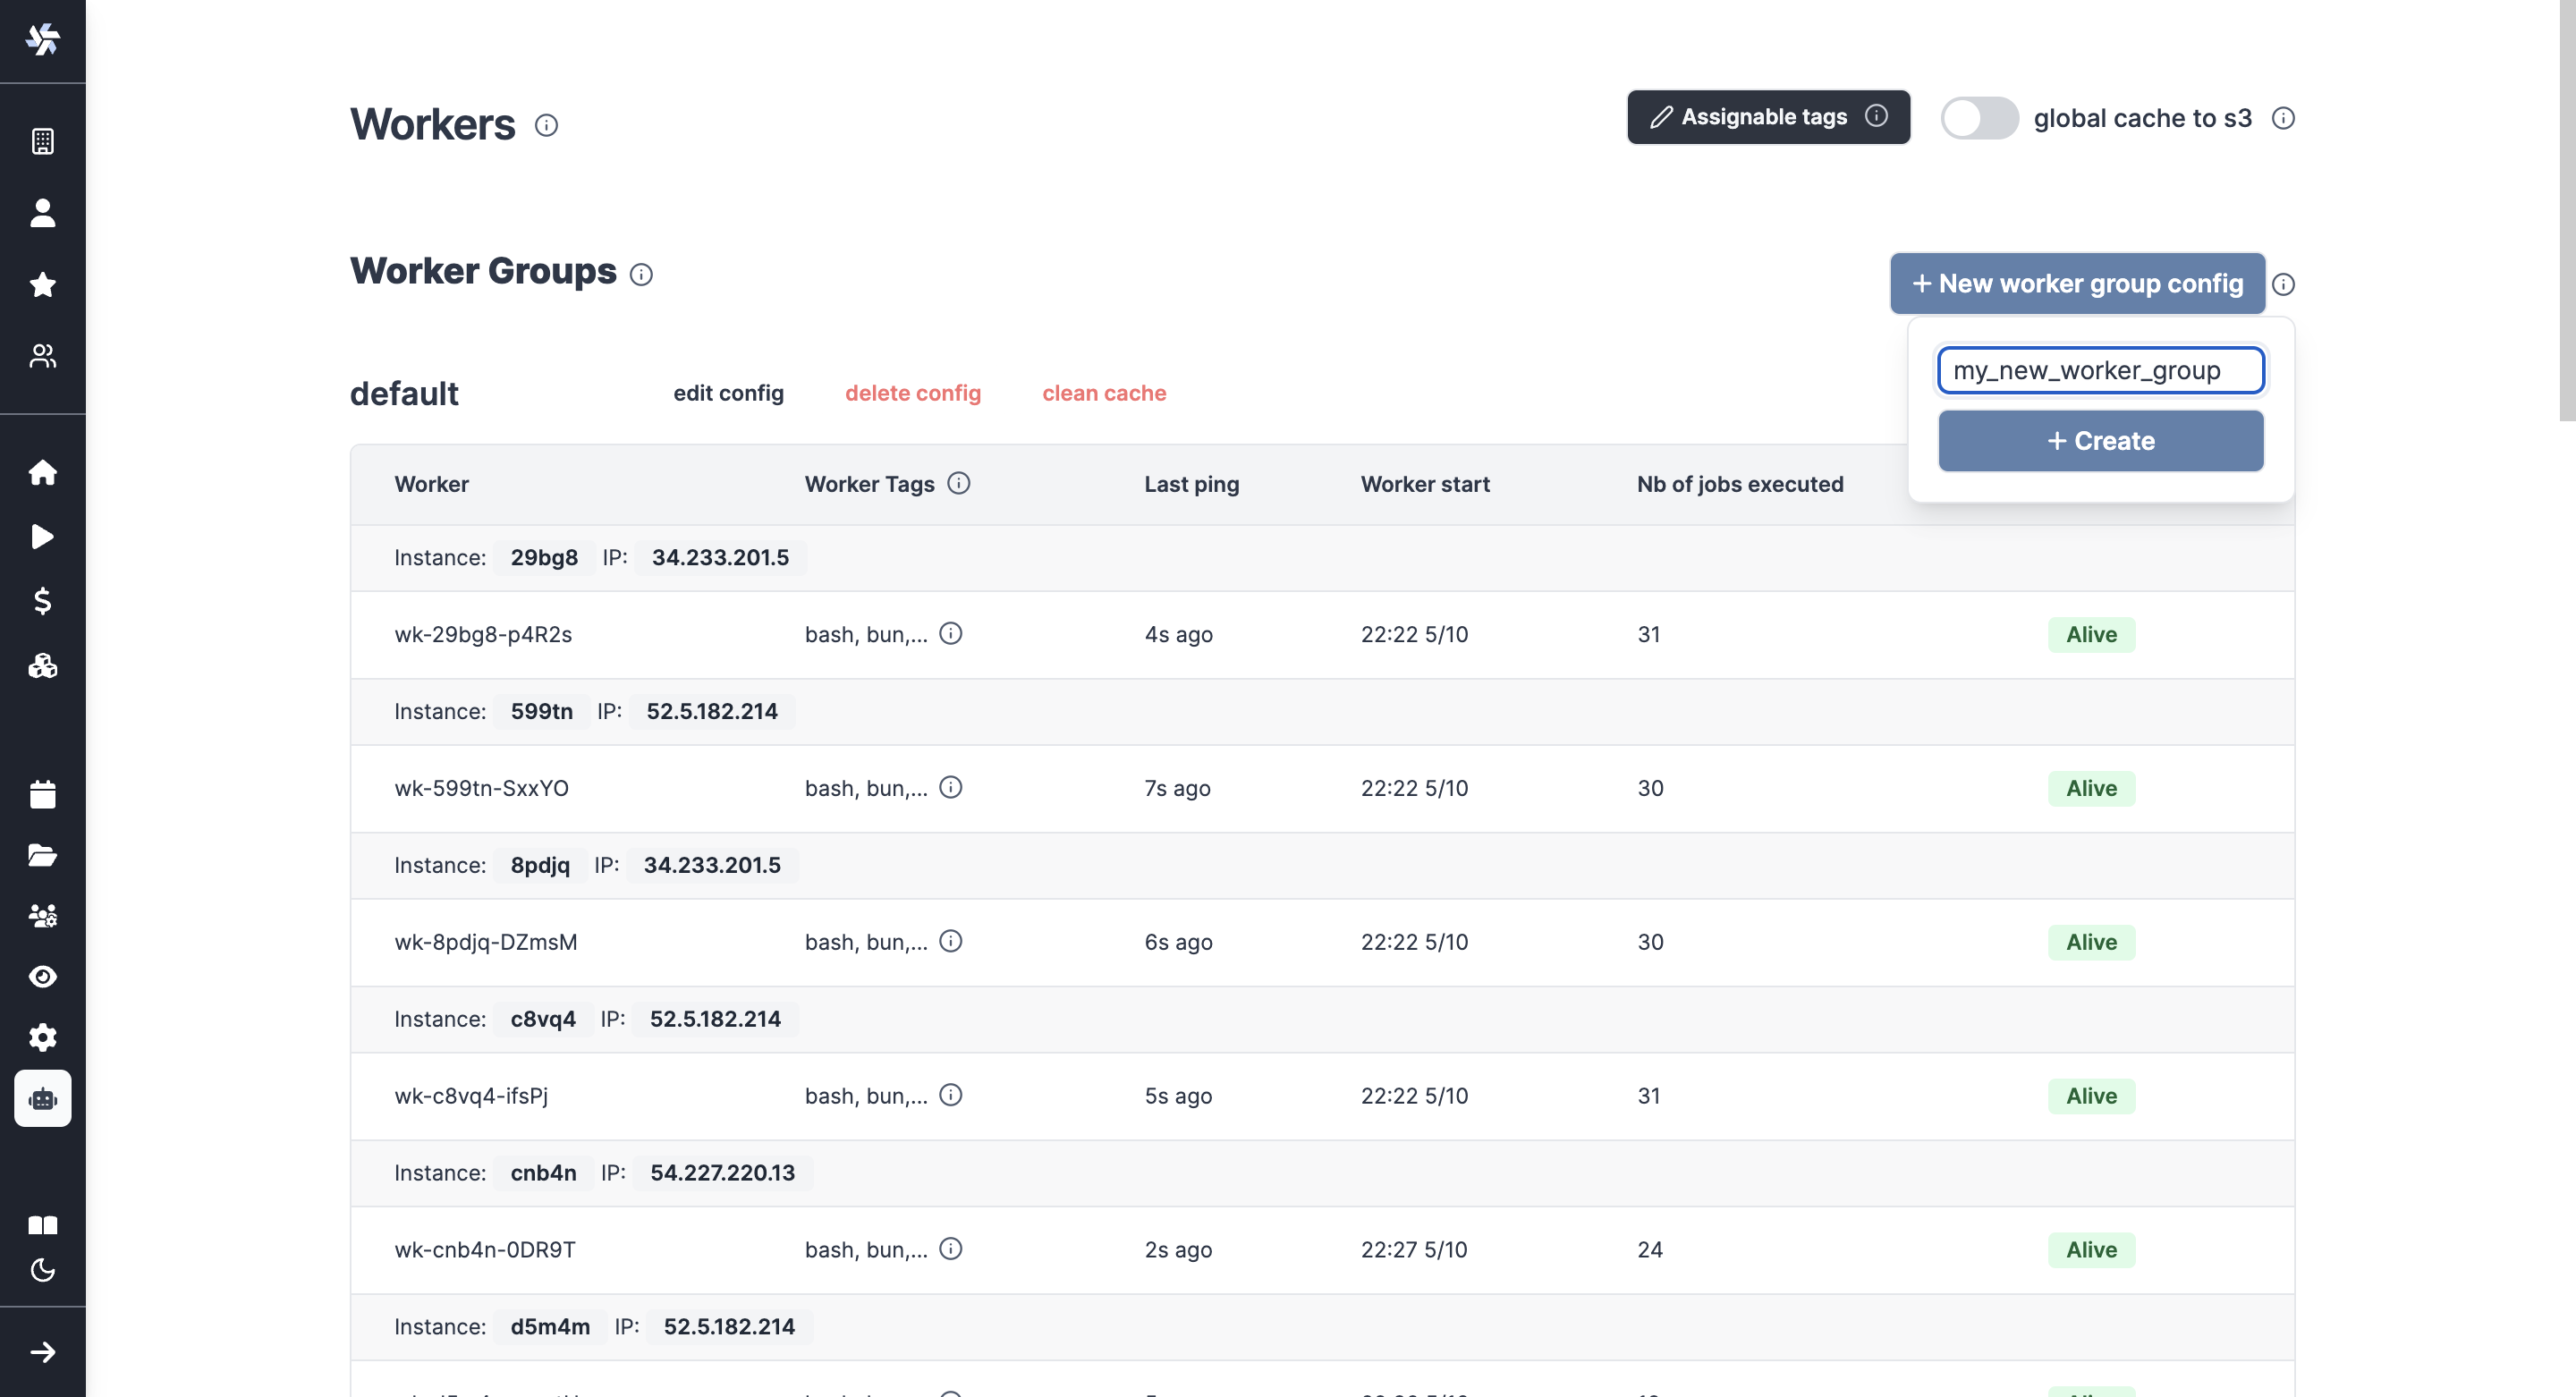
You can then configure it directly from the UI.

Examples of configurations include:
- Assign different jobs to specific worker groups by giving them tags.
- Set an init or periodic script that will run at the start of the workers or periodically (e.g. to pre-install binaries).
- Dedicate your worker to a specific script or flow for high throughput.
Alerts
You can set an alert to receive notification via Email, Slack, or Microsoft Teams when the number of running workers in a group falls below a given number. It's available in the worker group config.

Enable 'Send an alert when the number of alive workers falls below a given threshold', and enter a number of workers below which the notification will be sent.
You need to configure Critical alert channels to receive notifications.

Python runtime settings
Add Python runtime specific settings like additional Python paths and PIP local dependencies.

Environment variables passed to jobs
Add static and dynamic environment variables that will be passed to jobs handled by this worker group. Dynamic environment variable values will be loaded from the worker host environment variables while static environment variables will be set directly from their values below.

Autoscaling
Autoscaling automatically adjusts the number of workers based on your workload demands.
Autoscaling is available in the Enterprise plan.
Worker scripts
Worker scripts provide methods to run bash scripts on workers at different stages of the worker lifecycle. There are two types of worker scripts: init scripts that run once at worker startup, and periodic scripts that run at regular intervals for ongoing maintenance.
Under the Cloud plans & Self-Hosted Enterprise Edition, both types of worker scripts can be configured from the Windmill UI in the worker group settings.
When adjustments are made in the Worker Management UI, the workers will shut down and are expected to be restarted by their supervisor (Docker or k8s).
Init scripts
Init scripts provide a method to pre-install binaries or set initial configurations without the need to modify the base image. This approach offers added convenience. Init scripts are executed at the beginning when the worker starts, ensuring that any necessary binaries or configurations are set up before the worker undertakes any other job.
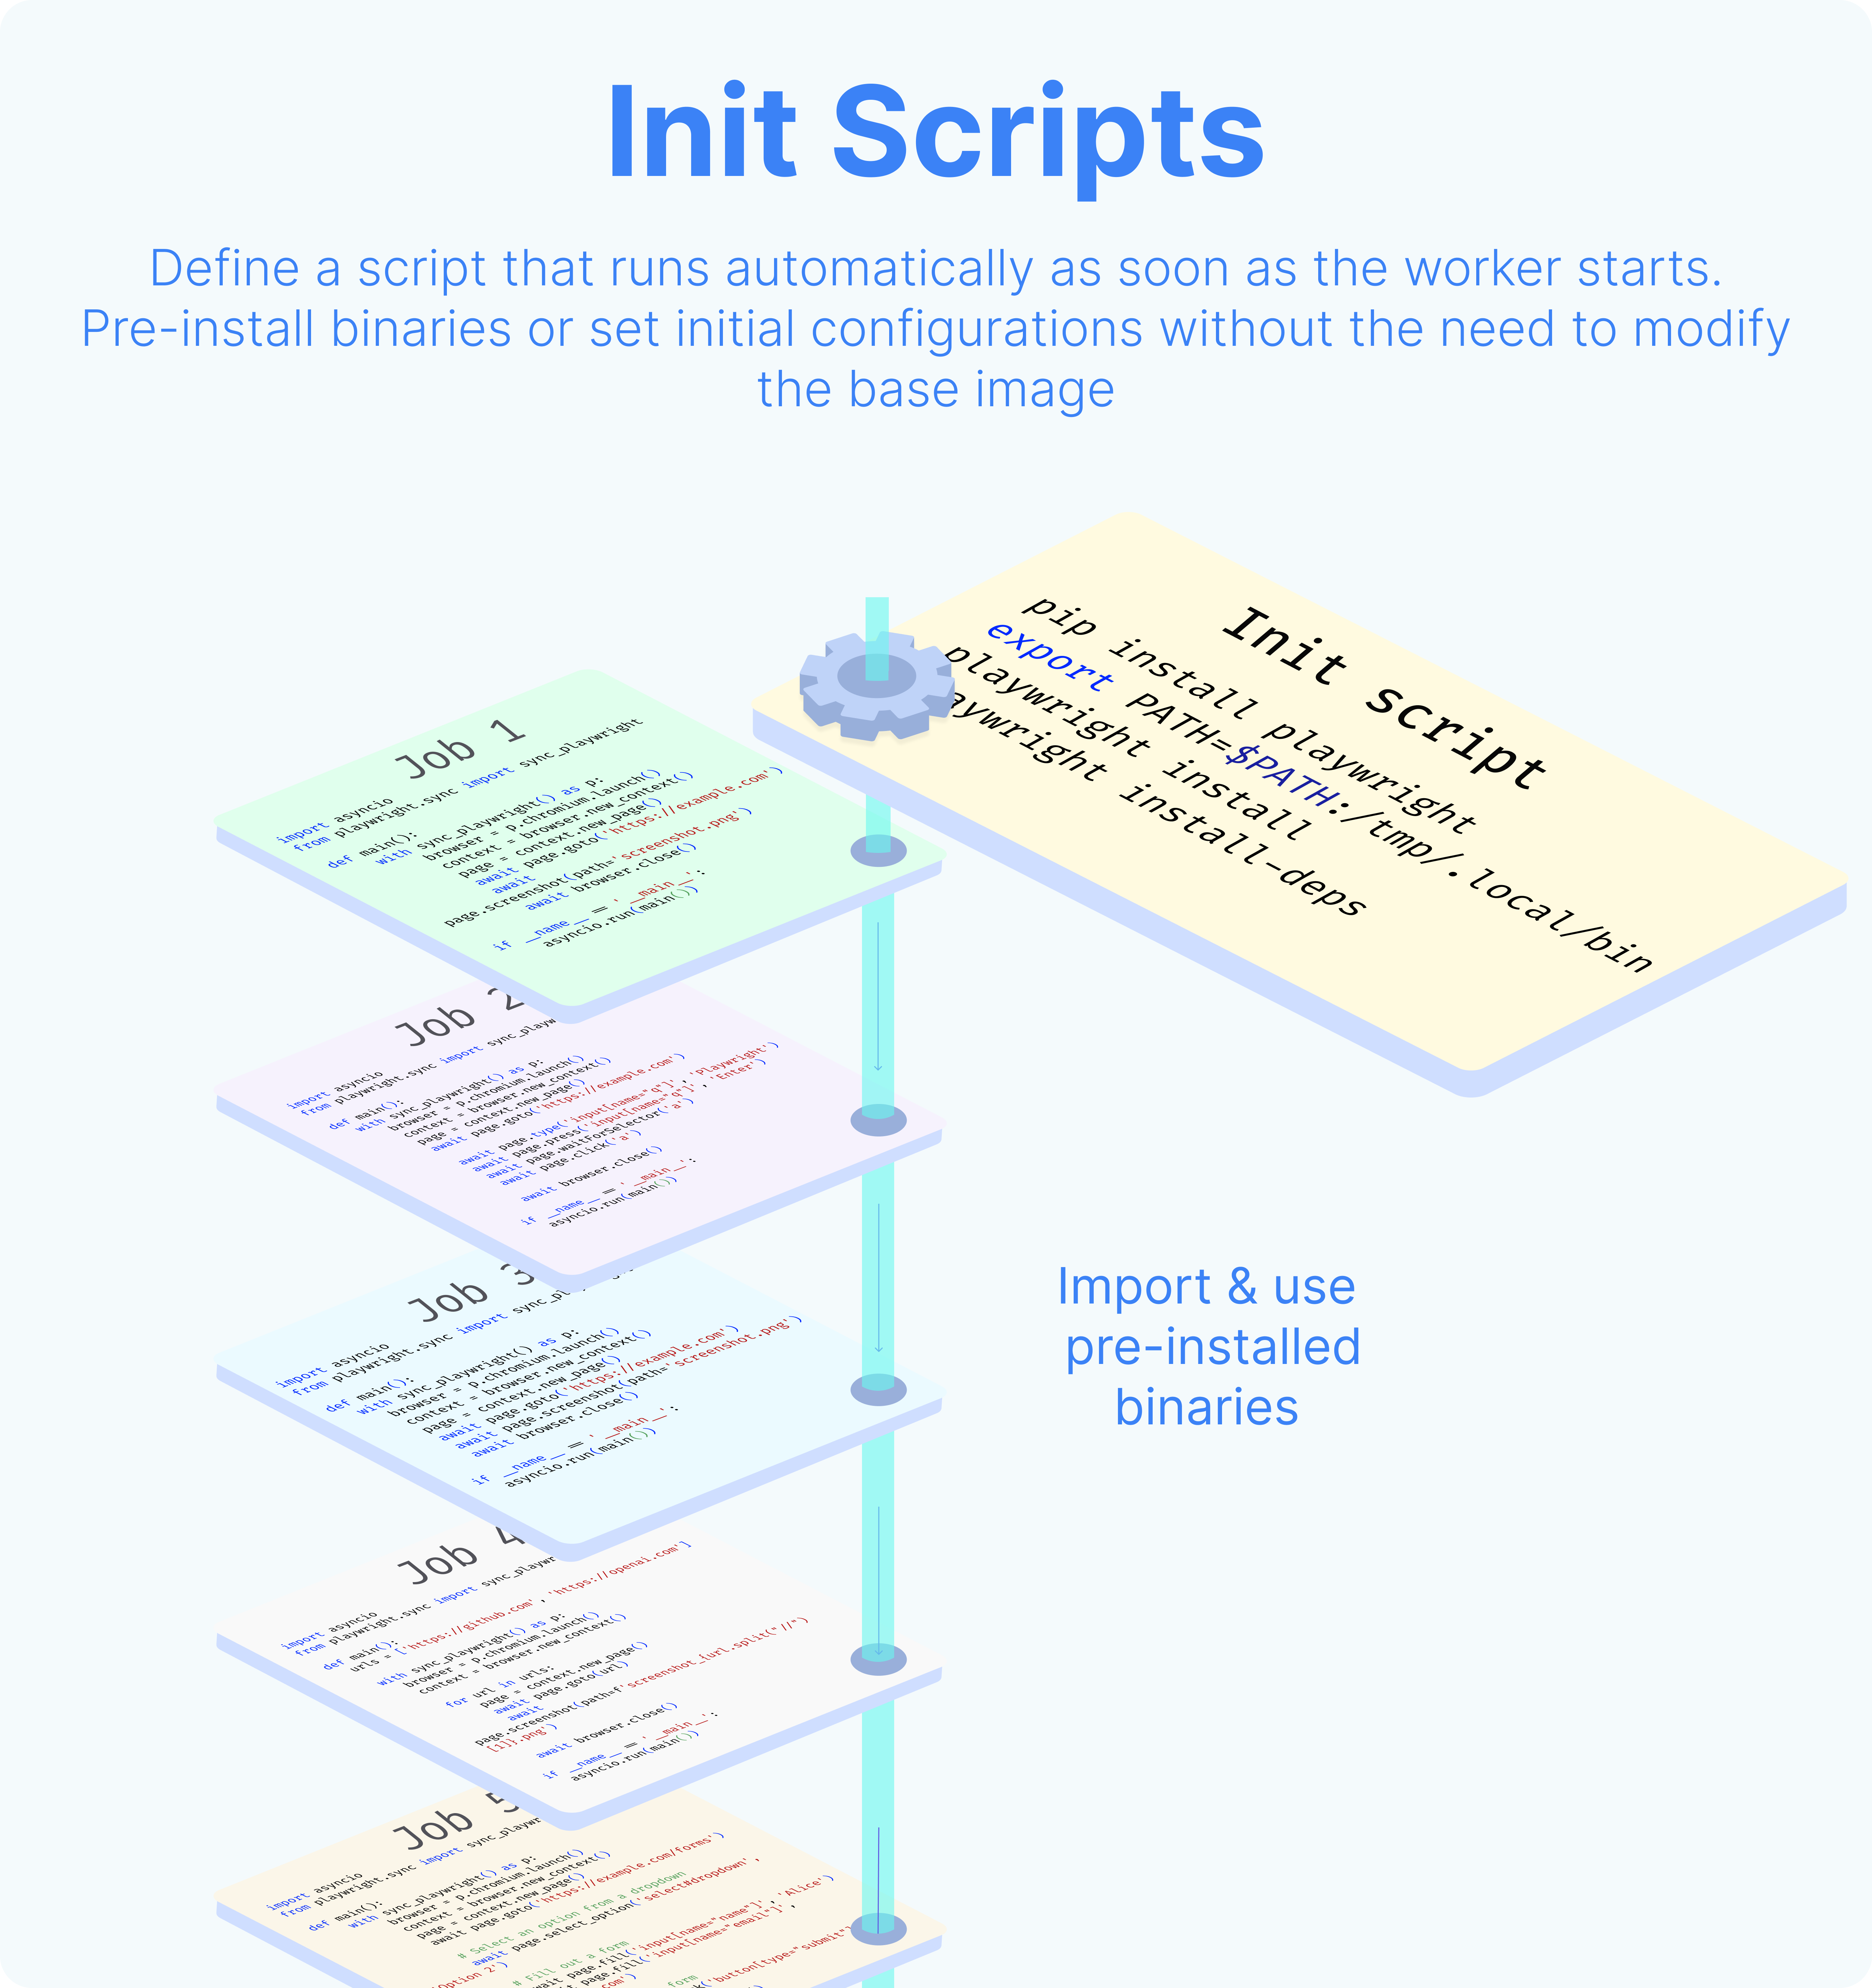
The execution of init scripts is inspectable in the superadmin workspace, with Kind = All filter. The path of those executions are init_script_{worker_name}.
Periodic scripts
Periodic scripts are bash scripts that run at regular intervals on workers, designed for ongoing maintenance tasks that need to be executed repeatedly during the worker's lifetime, with the minimum interval settable between periodic script executions being 60 seconds.
The execution of periodic scripts is inspectable in the superadmin workspace, with Kind = All filter. The path of those executions are periodic_script_{worker_name}_{timestamp}.
Worker scripts
Worker scripts are bash scripts that run at regular intervals on workers, complementing init scripts which only run at worker startup. While init scripts handle one-time setup tasks like installing dependencies or configuring the environment, worker scripts are designed for ongoing maintenance tasks that need to be executed repeatedly during the worker's lifetime.
Key differences from init scripts
- Init scripts: Run once when the worker starts, ideal for setup and configuration tasks
- Worker scripts: Run continuously at specified intervals (minimum 60 seconds), ideal for maintenance and monitoring tasks
Common use cases
Worker scripts are particularly useful for:
- System maintenance: Cleaning temporary files, rotating logs, or performing health checks
- Cache management: Clearing expired cache entries or warming up caches
- Resource monitoring: Collecting metrics or monitoring system resources
- Security tasks: Running periodic security scans or updating security configurations
Configuration and execution
Under the Cloud plans & Self-Hosted Enterprise Edition, worker scripts can be configured from the Windmill UI in the worker group settings, similar to init scripts.
When adjustments are made in the Worker Management UI, the workers will shut down and are expected to be restarted by their supervisor (Docker or k8s).
The execution of worker scripts is inspectable in the superadmin workspace, with Kind = All filter. The path of those executions are periodic_script_{worker_name}_{timestamp}.
Dedicated workers / High throughput
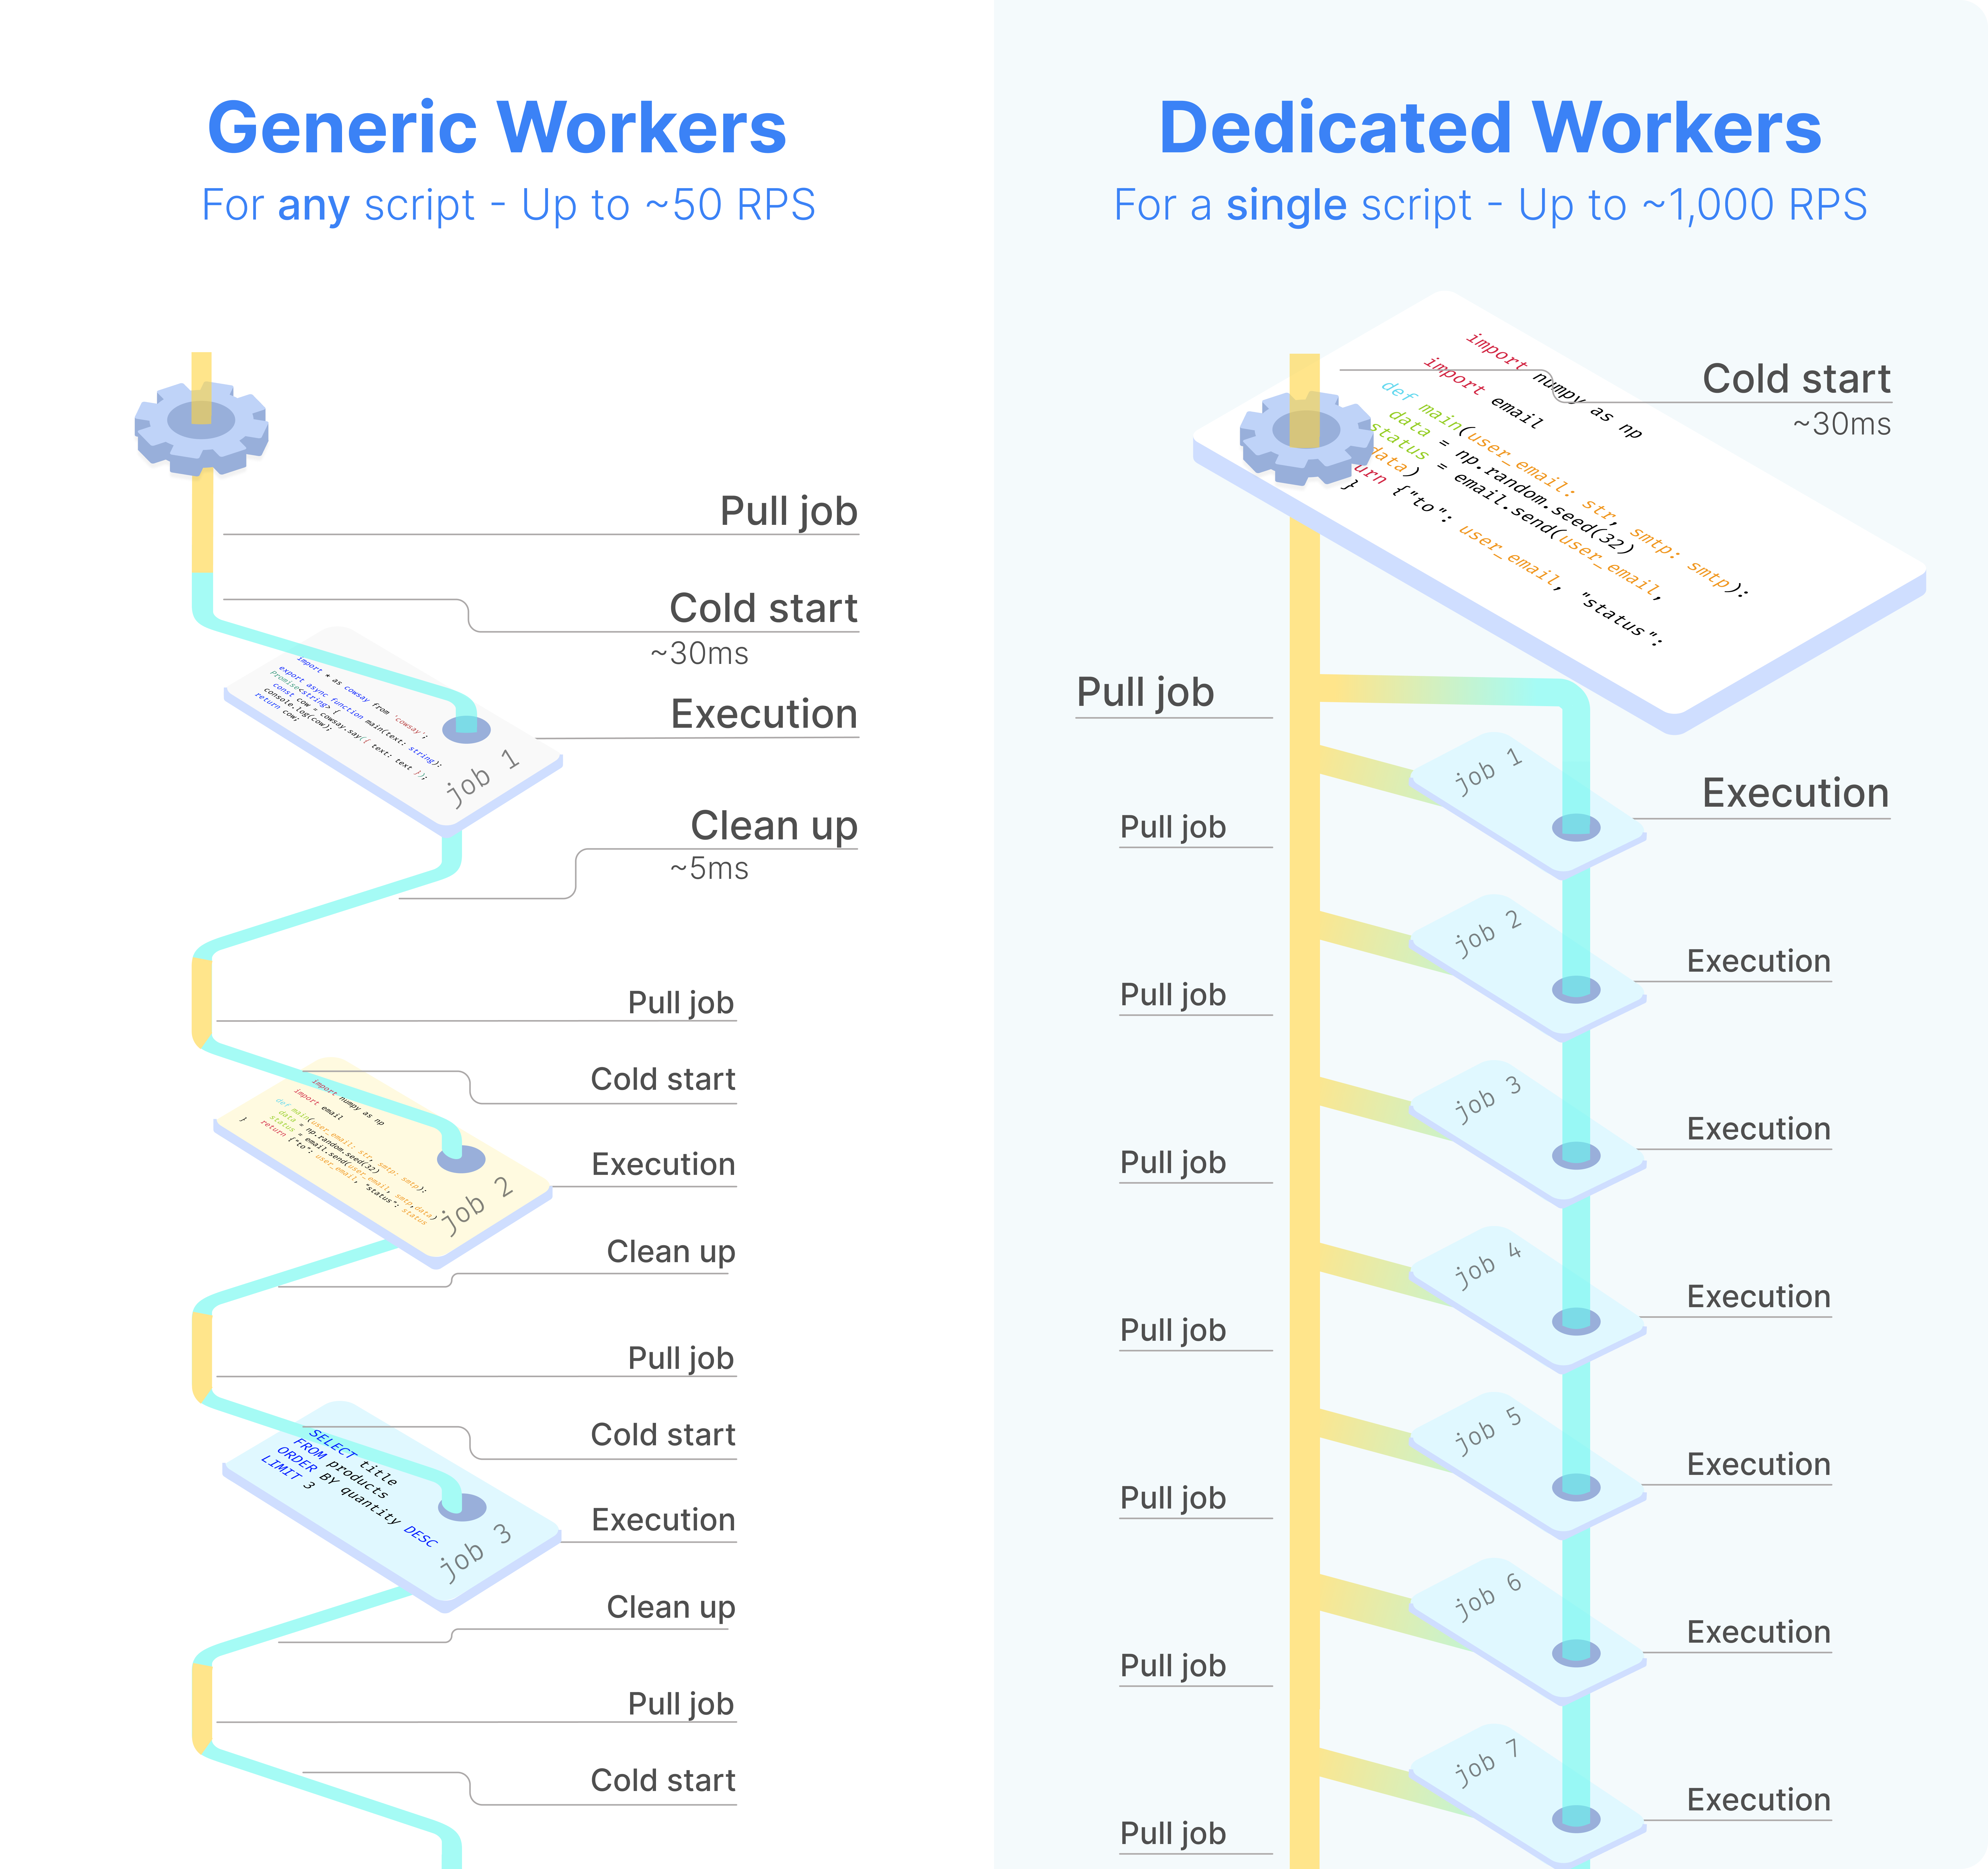
Dedicated Workers are workers that are dedicated to a particular script. They are able to execute any job that target this script much faster than normal workers at the expense of being capable to only execute that one script. They are as fast as running the same logic in a forloop, but keep the benefit of showing separate jobs per execution.
Dedicated workers / High throughput is a Cloud plans & Self-Hosted Enterprise Edition feature.
Service logs
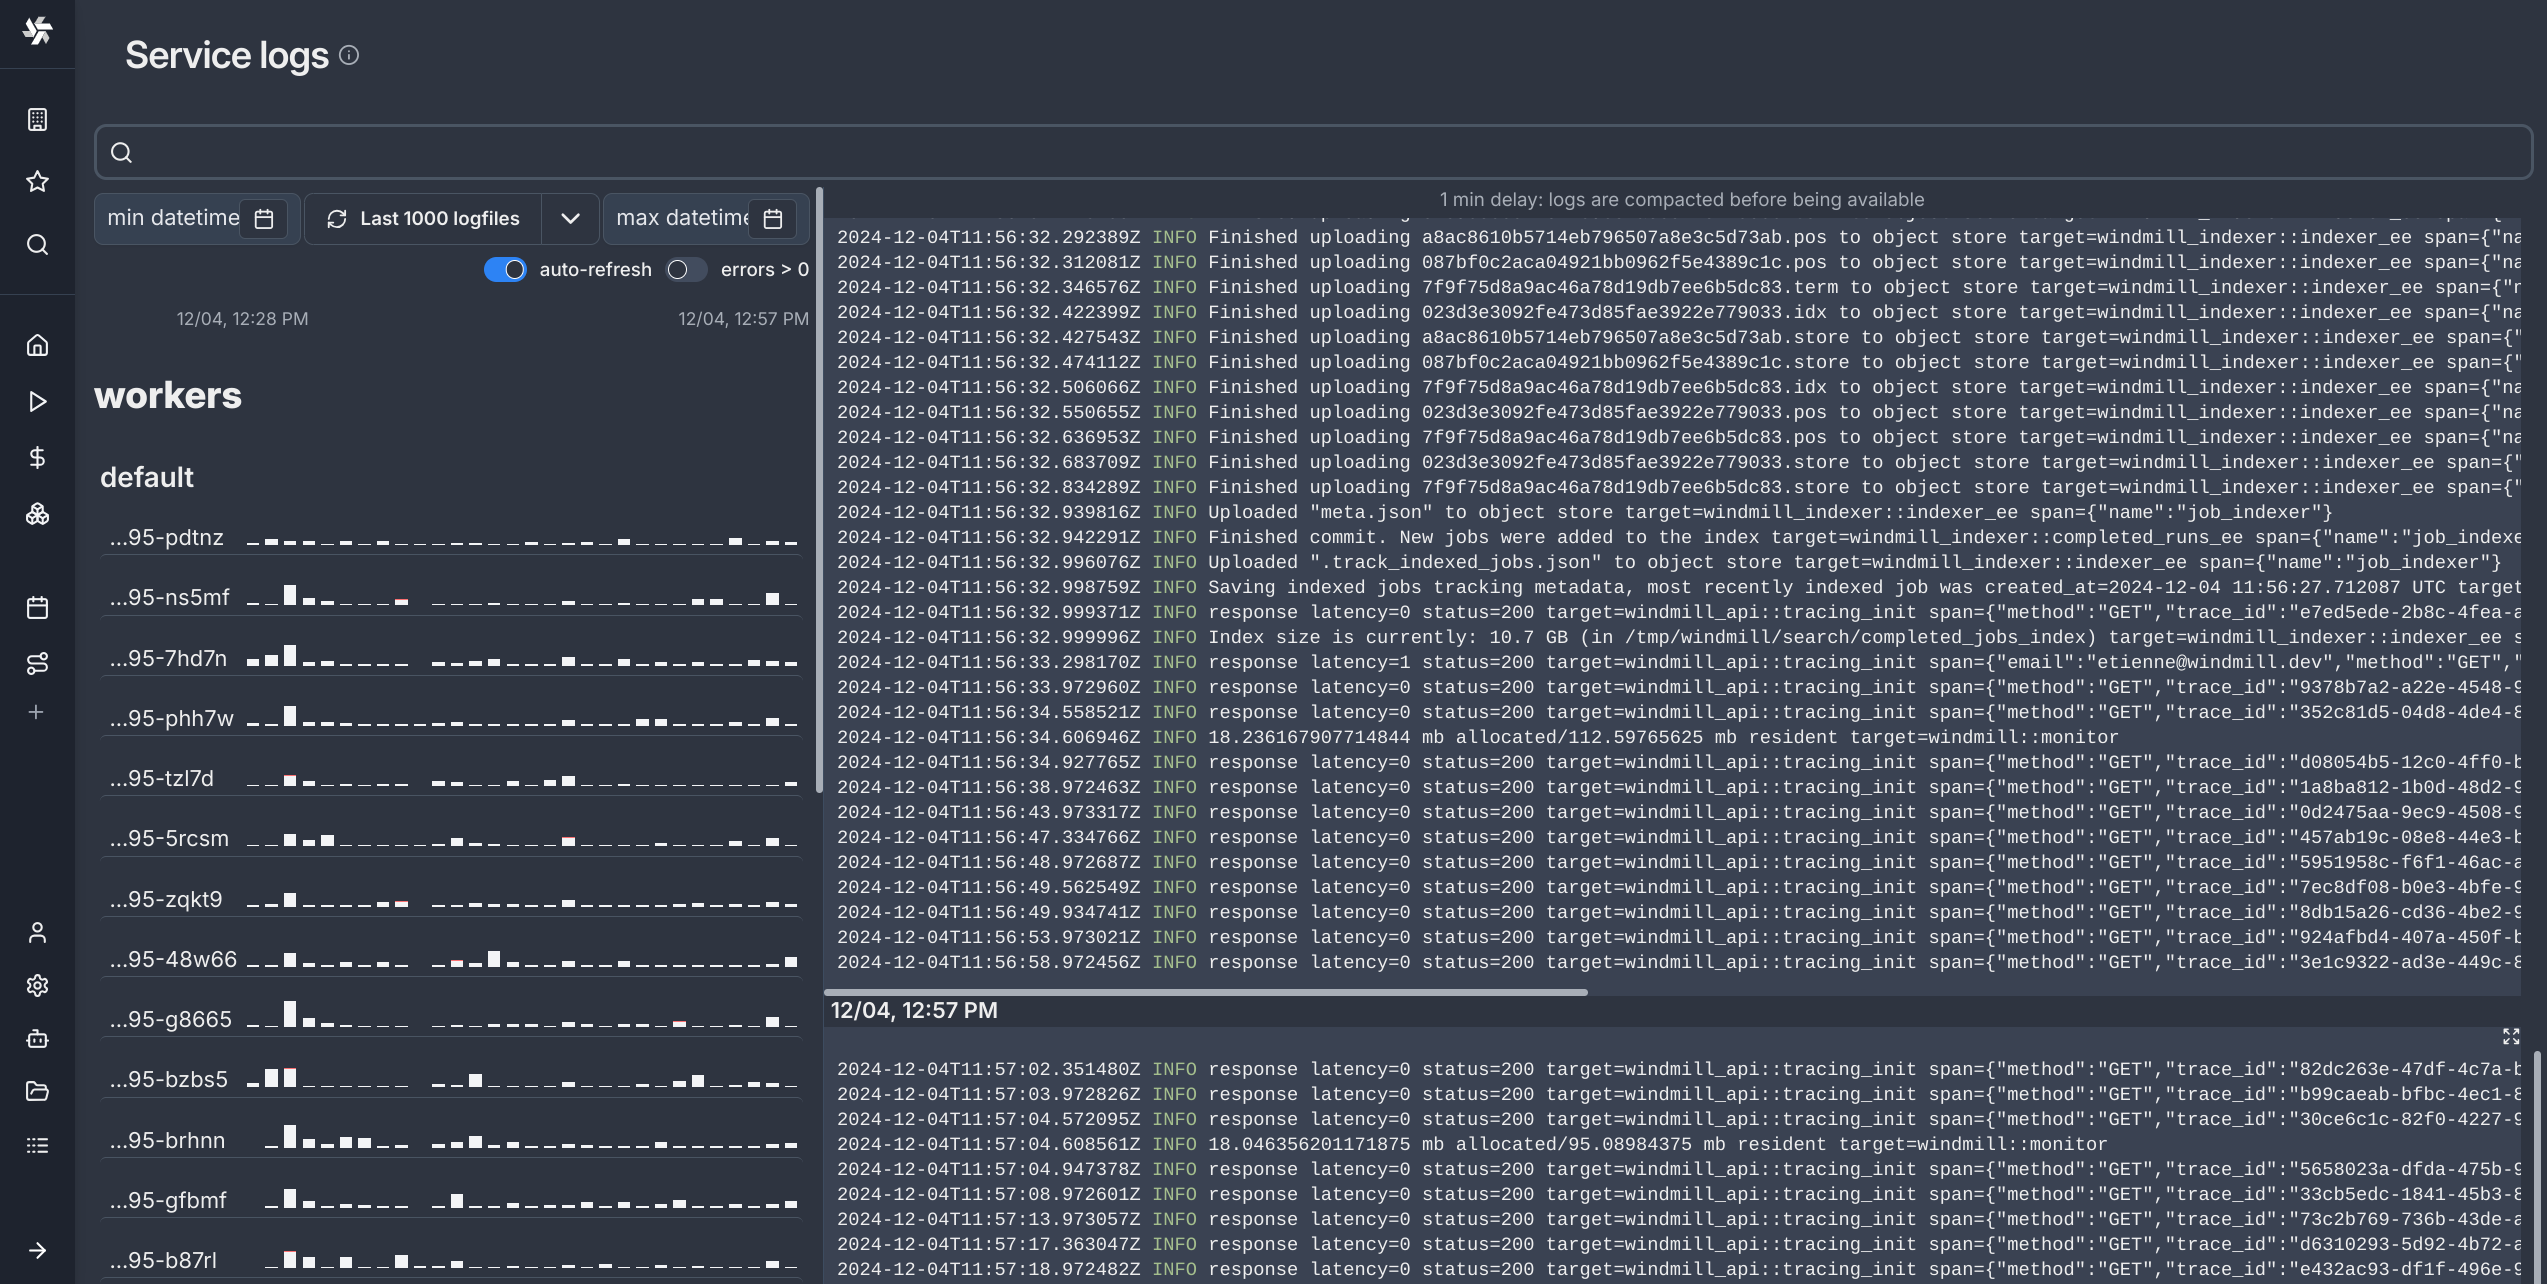
View logs from any workers or servers directly within the service logs section of the search modal.
Interactive SSH REPL for worker host
Windmill includes a built-in interactive SSH-like REPL for each worker. This allows you to execute bash commands directly on the machine running the worker, making it significantly easier to debug, explore the filesystem, or run quick system-level commands.
How to use
- Go to the Workers page in the Windmill.
- Find the worker you want to connect to in the table.
- Click the Command button in the "Live Shell" column.
- A drawer will open with an interactive bash shell.
- Type and run bash commands directly in the terminal.
This feature is especially useful for debugging init scripts, verifying pre-installed binaries, inspecting the file system, or quickly running bash commands without needing to deploy a script.
Note:
- Use
cdto navigate directories — the REPL remembers your working directory across commands. - You can press
Ctrl+Cor use the Cancel button to stop a running job. - If no command has run in the past 2 minutes, the first one may take up to ~15 seconds to start.
Queue metrics
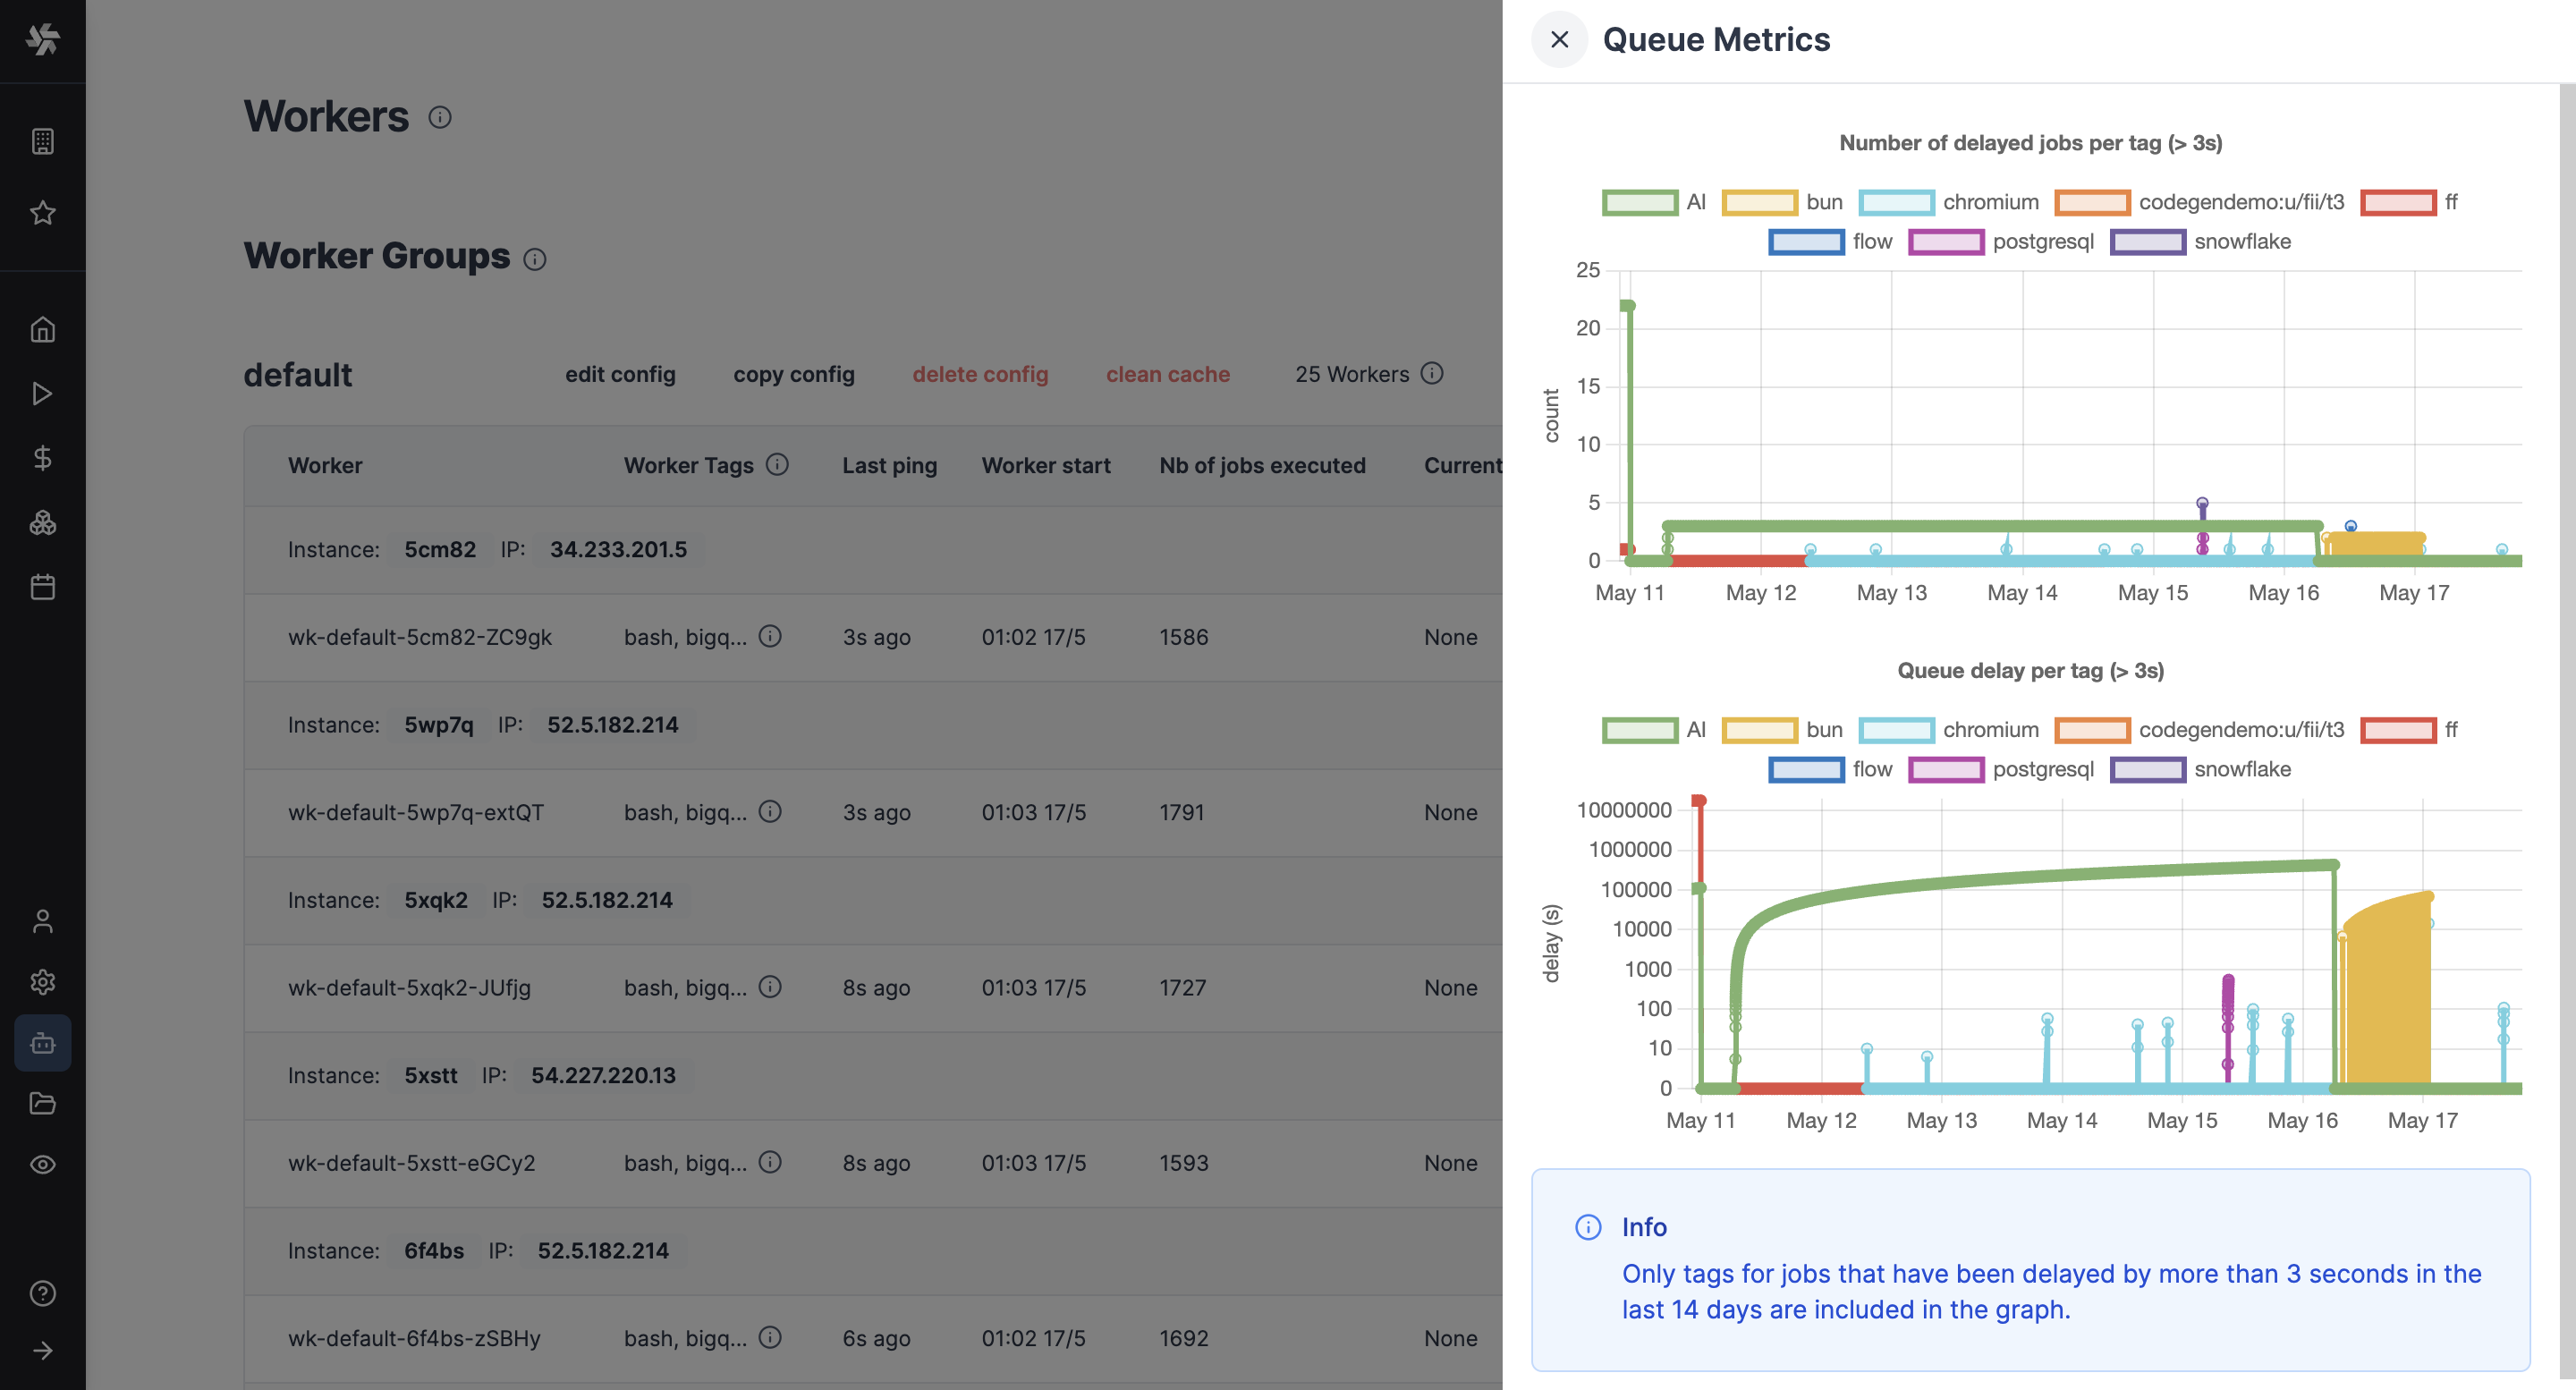
You can visualize metrics for delayed jobs per tag and queue delay per tag.
Queue metrics is an Enterprise Edition feature.
Metrics are available under "Queue metrics" button on the Workers page.
Only tags for jobs that have been delayed by more than 3 seconds in the last 14 days are included in the graph.
Queue metric alerts
Enterprise Edition users can set up Critical alerts on the Queue Metrics page, and be notified when the number of delayed jobs in a queue is above a certain threshold for more than a configured amount of time. The "cooldown" parameter determines the minimum duration between two consecutive alerts if the number of waiting jobs are fluctuating around the configured threshold.

Process isolation and security
Windmill workers provide multiple layers of process isolation to protect your infrastructure from potentially malicious or buggy code execution.
Isolation mechanisms
Windmill supports two primary isolation mechanisms that can be used independently or together:
- PID namespace isolation (enabled by default in docker-compose) - Protects process memory and environment variables
- NSJAIL sandboxing (optional, requires special image) - Provides filesystem, network, and resource isolation
Environment variables
Configure worker isolation through these environment variables:
| Variable | Default | Description |
|---|---|---|
ENABLE_UNSHARE_PID | false (true in docker-compose) | Enable PID namespace isolation using Linux unshare |
DISABLE_NSJAIL | true | Enable NSJAIL sandboxing (requires -nsjail image, set to false to enable) |
UNSHARE_ISOLATION_FLAGS | --user --map-root-user --pid --fork --mount-proc | Customize unshare isolation flags |
Default configuration
The official docker-compose enables PID namespace isolation by default:
windmill_worker:
  environment:
    - DATABASE_URL=${DATABASE_URL}
    - MODE=worker
    - WORKER_GROUP=default
    - ENABLE_UNSHARE_PID=true # Enabled by default
PID namespace isolation prevents jobs from accessing parent process memory and environment variables, protecting sensitive credentials like DATABASE_URL.
For complete documentation on security isolation, see the Security and Process Isolation guide.
Workers and compute units
Even though Windmill's architecture relies on workers, Windmill's pricing is based on compute units. A compute unit corresponds to 2 worker-gb-month. For example, a worker with 2GB of memory limit (standard worker) counts as 1 compute unit. A worker with 4GB of memory counts as 2 compute units. On self-hosted plans, any worker with memory above 2GB counts as 2 compute units (16GB worker counts as 2 compute units). Each worker can run up to ~26M jobs per month (at 100ms per job).
The number of compute units will depend on the workload and the jobs Windmill will need to run. Each worker only executes one job at a time, by design to use the full resource of the worker. Workers come in different sizes based on memory: small (1GB), standard (2GB), and large (> 2GB). Each worker is extremely efficient to execute a job, and you can execute up to 26 million jobs per month per worker if each one lasts 100ms. However, it completely depends on the nature of the jobs, their number and duration.
As a note, keep in mind that the number of compute units considered is the number of production compute units of your workers, not of development staging, if you have separate instances. You can set staging instances as 'Non-prod' in the Instance settings. The compute units are calculated based on the memory limits set in docker-compose or in Kubernetes. For example, a standard worker with 2GB memory counts as 1 compute unit, while a large worker with >2GB memory counts as 2 compute units (on self-hosted plans, any worker with memory above 2GB still counts as 2 compute units Small workers are counted as 0.5 compute unit.
Also, for the Enterprise Edition, the free trial of one month is meant to help you evaluate your needs in practice.