Workspace forks
Workspace forks allow users to create independent copies of a workspace, enabling parallel development workflows similar to git branches and GitHub forks.
Adopting workspace forks corresponds to stage 2 of the collaboration and deployment stages guide. If you are setting up collaboration for a team, that guide explains how forks fit alongside protection rulesets, git sync, and multi-workspace promotion.
How workspace forks work
Workspace forks create a complete copy of your workspace, including scripts, flows, apps, resources, variables, and data tables. Each fork operates independently and changes can later be merged to a parent workspace through a couple of methods.
Key features:
- Independent development: Make changes without affecting the parent workspace
- Git integration: Automatically creates corresponding git branches using the git sync workflow
- Team collaboration: Multiple developers can work on separate forks simultaneously
- Data table forking: Data tables are included in the fork, giving each fork its own isolated copy of the data
- DuckLake data environments: Pipelines that materialize DuckLake tables write to a fork-scoped namespace and read not-yet-materialized tables from the parent (see Fork data environments for DuckLake)
- CLI merge: Use
wmill workspace mergeto merge changes from a fork back to the parent workspace
Example feature development workflow
- Create fork: Fork the main workspace for new feature development
- Develop: Make changes in the forked workspace
- Create PR: Use github/gitlab to create a pull request
- Review & merge: Team reviews changes before merging to main branch
- Sync back changes: Changes are automatically synced to the workspace linked to the main branch
Managing workspace forks
Prerequisites
- On self-hosted Windmill, forks work on any edition. On Community Edition, forks count toward the global 3-workspace limit; Enterprise Edition removes that cap.
- On Windmill Cloud, forking is available for workspaces on a paid (Team or Enterprise) plan only. See Forks on Windmill Cloud below.
- Git sync configured (optional, required only for git-based workflows)
- For git sync workflows, a way to sync changes back from the git remote to Windmill: either automatic fork sync (recommended, no CI needed) or the CI/CD actions
Forks on Windmill Cloud
On Windmill Cloud, forking is available for workspaces on a paid (Team or Enterprise) plan. Free-tier workspaces cannot create forks - upgrade the workspace to a paid plan first (see plans & how to upgrade).
A fork inherits its parent (root) workspace's plan and usage limits rather than getting its own:
- Shared plan: a fork takes on the premium status of its root workspace. You don't subscribe a fork separately.
- Shared usage limits: a fork's executions are metered into the root workspace's usage, so all forks in a family draw from the same pool and count toward the root's usage-based bill. Billing stays with the parent - a fork never has its own invoice.
- Per-seat fork cap: the number of forks a workspace family can have is capped at 5 per paid (developer) seat of the root workspace (for example, 2 seats allow up to 10 forks). Delete a fork or add seats to free up capacity.
If a workspace is later downgraded to the free tier, its existing forks keep working under the root's shared free-tier limits, but no new forks can be created until it is upgraded again.
On self-hosted Windmill, none of these cloud limits apply - forks are governed only by your edition's workspace limit (see prerequisites above).
Fork creation
From the UI
- Navigate to the workspace you want to fork.
- Click on the Workspace menu on the sidebar.
- Click on
Fork current workspace. - Configure the name and id and then press on the
Fork workspacebutton.
From the CLI
- Enter the local repo being synced with the workspace you want to fork.
- Run
wmill workspace forkand follow the prompts to name your workspace. This uses yourworkspacessettings inwmill.yamlto determine which workspace to fork from based on the branch you are on. - The fork will be created on your instance and is ready to be worked on.
- Run the command shown on your terminal to create the corresponding branch and start adding edits to your newly created fork!
Deleting a fork
Workspace forks can be deleted by their creator, or by any workspace admin.
From the UI
Just press the cogwheel on the sidebar and select the option to delete the workspace fork.
From the CLI
- Find the workspace profile corresponding to the workspace fork using the
wmill workspacecommand. - If missing, add it using
wmill workspace add - Now run
wmill workspace delete-fork <profile_name>
Permissions and access
Forks can be created by any user of the workspace. Roles and access will be the same as in the original workspace. All users of the original workspace can join the fork at any time, which will make it appear as another workspace on their menu.
On Windmill Cloud, creating a fork additionally requires the workspace to be on a paid plan and to have fork capacity left under the per-seat cap.
Managing members of a fork you created
The creator of a fork can manage developers on it without being an admin of it. From the fork's workspace settings, under Members, they can:
- add a developer or admin of the parent workspace to the fork, as a developer;
- remove any non-admin member of the fork.
Because a fork is a full copy of its parent - variables and secrets included - this right is deliberately narrow. As a fork creator, you cannot:
- add anyone who is not already a developer or admin of the parent workspace (the picker only lists eligible parent members, so operators of the parent do not appear);
- grant the admin or operator role, or change the role of an existing member;
- invite someone by email;
- remove an admin of the fork.
Anything outside these bounds - and every other workspace setting - still requires a workspace admin. If the fork's creator is an admin, the usual full workspace settings apply instead.
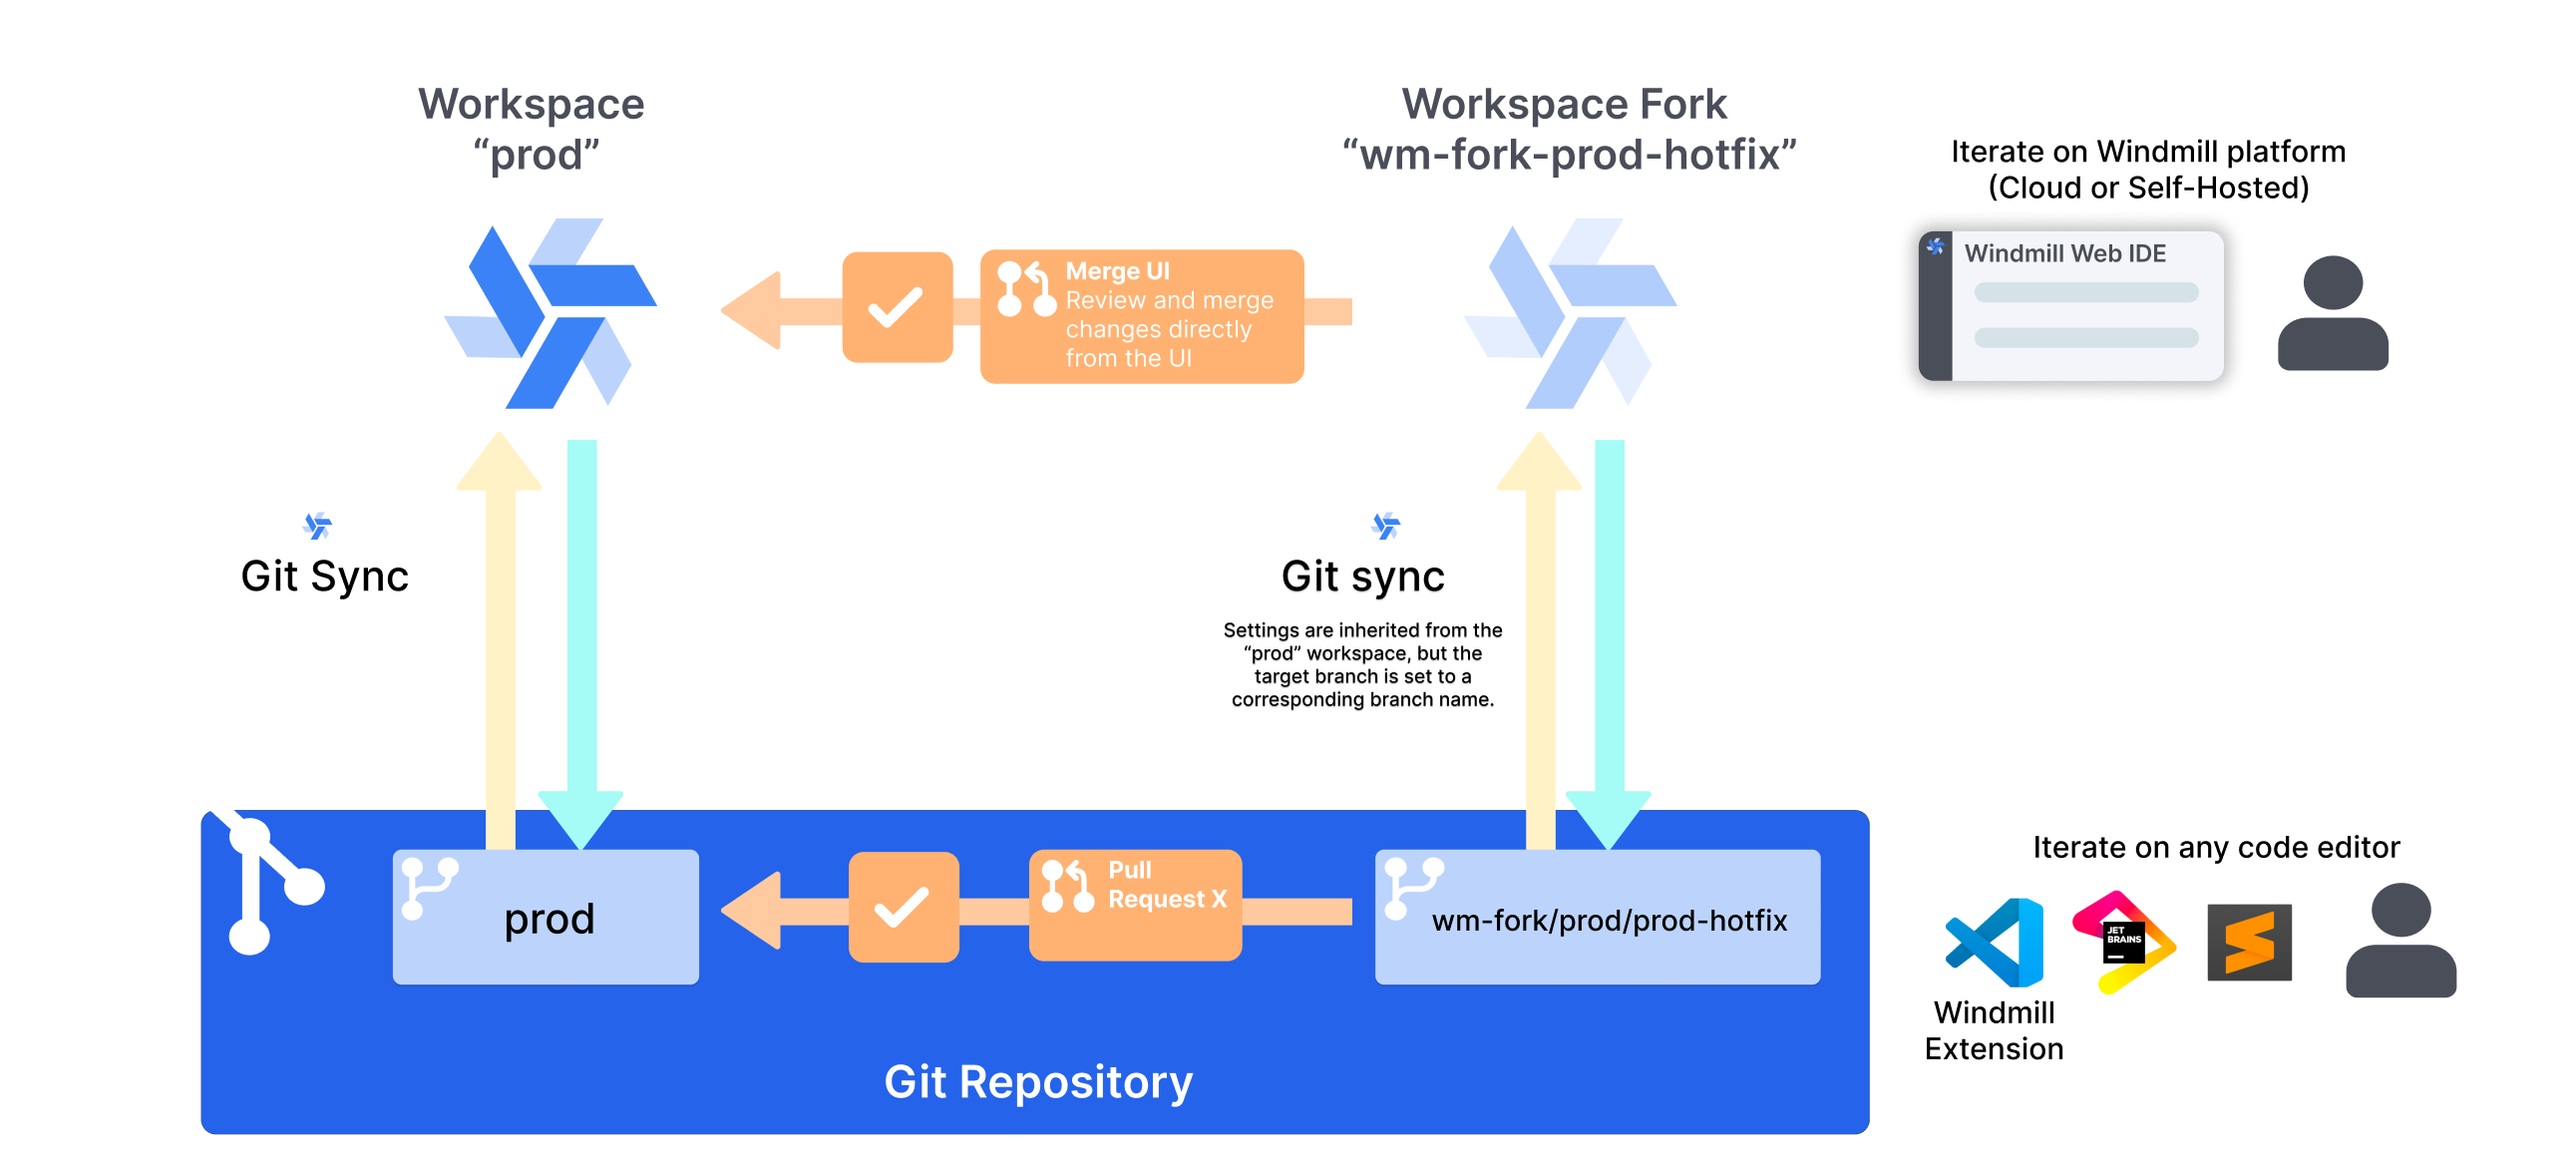
Git sync integration
When workspace forks are used with git sync, Windmill will automatically create a git branch on the same repository as the parent workspace, and keep track of changes there. External changes to the branch are then synced back to the forked workspace. Once the changes are ready, a PR can be opened to sync back changes to the original workspace.
There are two ways to sync external branch changes back into fork workspaces:
- Automatic fork sync (recommended): enable "Automatically sync forks with git branches" on the parent workspace's repository in the Git sync settings. Windmill then deploys changes on each fork's
wm-fork/**branch into the matching fork workspace, with no CI setup and no per-fork configuration. Fork workspaces show a read-only "managed in the parent workspace" line on their repository card. Enterprise Edition only. - CI/CD actions: set up the fork-specific actions, in particular the
push-on-merge-to-forks.yamlaction.
Similarly, the pull request that merges a fork's changes back into the tracked branch can be opened by Windmill itself when an item is deployed in the fork ("Open a pull request when an item is deployed in a fork" on the parent's repository, see In-app pull request creation), or by the open-pr-on-fork-commit GitHub Action.
Fork and branch naming
Forks workspace IDs are always prefixed by wm-fork-. The associated branch name is always prefixed by wm-fork/<originalBranch>/ where <originalBranch> is the branch that is associated with the original branch was worked from.
For example:
| Workspace ID | Default or selected branch of repo associated with workspace | Fork Workspace ID | Branch associated to fork |
|---|---|---|---|
| windmill | main | wm-fork-feature1 | wm-fork/main/feature1 |
This naming convention is what enables Windmill to match branches to workspaces without having to reconfigure it for each branch. This is why fork workspace ids and branch names cannot be changed.
Synchronization and merging
Simple edits with the deployment UI
Once a fork is created, it is automatically setup to deploy to its parent branch. You can deploy any item to the parent branch directly from the UI by clicking it and selecting Deploy to staging/prod. Learn more about the Deployment UI.
Merge workspaces from the UI (Merge UI)
You can merge changes from a forked workspace back to its parent workspace directly from the UI without requiring git sync. This provides a simpler workflow for teams that don't need full git integration.
To merge a fork:
- Navigate to the forked workspace
- On the home page, a banner will show you the diff with its parent workspace. Click
Review & Deploy Changes - Review the changes and confirm the merge
Items behind and conflicts
If it is detected that some of the differences come in fact from the original workspace, these changes will be shown as 'behind'. Before deploying, all behind changes must be updated into the fork and properly tested. When an items has changes that are both ahead and behind, it will be marked as a conflict and will be warned to the user. The user must then review the diff and decide how to edit the item to resolve the conflicting changes. Until deployed or updated however, the item will still be marked as a conflict. For more granular conflict detection and better tracked resolution, you can choose to merge the workspaces through a git workflow instead.
The merge will transfer all selected scripts, flows, apps, resources, and variables from the fork to the parent workspace.
Triggers and schedules
When a fork is created, it clones the parent's triggers and schedules, but always as disabled, so nothing fires or competes with the parent automatically. You re-enable in the fork only what you need to test. Native triggers (such as Nextcloud, Google Drive and GitHub) and non-workspaced HTTP and email triggers are not cloned, because their external endpoints cannot be safely duplicated.
Re-enabling a trigger or schedule that also exists in the parent shows a warning: the two would share the same upstream (Kafka consumer group, Postgres replication slot, message queue, schedule, etc.) and compete for events. You can confirm to enable it anyway.
A trigger's or schedule's enabled/disabled state is owned by the parent workspace. When you sync or merge a fork back, the parent's state is preserved, so toggling a trigger in the fork never flips it in the parent and trigger state produces no spurious diff or conflict when merging through git. Any trigger you create in the fork is still surfaced in the merge UI so you can deploy, disable or delete it.
Git sync based merging
When git sync is properly setup, the workspace is synchronized with one of the branches in your repo, and the forks are also synchronized with their own branches. It is then possible your preferred git workflow to merge into or out of these branches to sync, so you can update the fork, or deploy changes into the parent workspace.
Fork data environments for DuckLake
When the parent workspace has DuckLake lakes configured, a fork gets its own isolated data environment for each lake by default. Running a pipeline that materializes DuckLake tables in a fork writes to a fork-scoped namespace (a separate metadata schema in the same catalog database, and a dedicated __wm_forks/<fork id>/... prefix in the bucket) instead of the parent workspace's tables. This applies transparently: scripts keep the same ducklake://<lake>/<table> URIs and annotations, and the redirect covers managed materialization, raw SQL, previews and backfills alike.
This also applies to dev workspaces, which are persistent forks.
Reading parent data (defer)
For every table the parent workspace has materialized but the fork has not, the fork sees a read-only view over the parent's current data, in the style of dbt's defer. You can iterate on a single pipeline step in a fork without first rebuilding everything upstream: consumers read the parent's data until the fork materializes the table itself, at which point they switch to the fork's own copy. For an SCD2 history table, the <table>_current companion view is deferred as well.
Parent lakes are attached read-only in a fork, so a fork job cannot write the parent's data through DuckLake even accidentally.
Isolated vs shared with parent
When the parent workspace has lakes configured, the fork-creation dialog shows a Ducklake data environment section with a per-lake choice:
- Isolated (default): the fork gets the isolated data environment described above.
- Shared with parent: the fork reads and writes the parent's lake directly, with no isolation. Useful for forks that must operate on production data, such as a prod-equivalent backfill; a warning is shown since pipeline runs in the fork will modify the parent's tables.
The choice is stamped per lake on the fork and is visible in the fork's workspace settings under Object storage (S3) -> Ducklake, where each lake shows an isolated or shared-with-parent chip. Forks created through the API without an explicit choice default to isolated.
Lakes using a MySQL catalog cannot be isolated (the fork-scoped metadata schema requires a PostgreSQL catalog): pipeline runs against such a lake fail with an explicit error in an isolated fork, while sharing the lake with the parent works.
Fork status in the pipeline graph
In a fork, each DuckLake asset in the pipeline graph carries a chip showing where its data currently comes from:
- an amber
deferredchip: the fork has not materialized this table yet, reads are deferred to the parent's data; - an emerald
forkchip: the fork has materialized its own copy in its isolated namespace.
Selecting the asset shows a matching banner in the details pane.
Cleanup
Deleting a fork also offers to drop its forked DuckLake namespaces: the fork-scoped metadata schema and the __wm_forks/<fork id>/... files in the bucket. The same cleanup is available as an API endpoint, POST /w/<workspace>/workspaces/drop_forked_ducklake_namespaces, which requires the same permission as deleting the workspace. It is safe to retry if a previous attempt failed partway. Lakes shared with the parent have nothing to clean up.
Dev workspaces
A dev workspace is a persistent fork that serves as a team's standing editable environment, paired with a "prod" workspace that can be locked so changes only reach it through promotion. Unlike an ordinary fork, a dev workspace keeps a plain, git-branch-safe workspace ID (no wm-fork- prefix), and there is at most one per workspace. Use a dev workspace when you want a long-lived dev/prod pair rather than the create-merge-delete lifecycle of an ordinary fork.
Related features
Workspace-specific tags and forks
When workspace-specific default tags are enabled (the instance setting that appends the workspace id to every job tag, e.g. python3-myworkspace), forked workspaces automatically resolve to their parent workspace's tag. This means fork jobs are routed to the same worker group as the parent workspace — there is no need to provision separate workers for every fork.
For example, if the parent workspace is staging and a fork wm-fork-feature1 runs a Python script, the job tag will be python3-staging (not python3-wm-fork-feature1).
Dedicated fork workers (optional)
If you want to route fork jobs to their own worker pool — for instance to isolate fork workloads from the parent — you can enable the "Fork workspace tag: append -fork suffix" toggle in the instance settings under the Default Tags section. When enabled, fork jobs are tagged with the parent workspace id plus a -fork suffix (e.g. python3-staging-fork), so all forks of a given parent share a common dedicated tag. You can then provision a worker group listening to *-staging-fork tags to handle all fork jobs for that parent.
OIDC tokens in forks
Job OIDC tokens generated in a fork carry the fork's own workspace id in the workspace claim, plus a fork_parent_workspace claim containing the parent workspace id. External OIDC consumers such as Vault can bind policies to fork_parent_workspace so a single policy covers a workspace and all its forks. See Token payload reference.